This guide provides the full meaning, step-by-step instructions, and a deep understanding of the İncili Arkadaşlık Bilekliği (Pearl Friendship Bracelet) — a beautiful Turkish macrame and crochet hybrid pattern using beads, chains, and slip stitches.
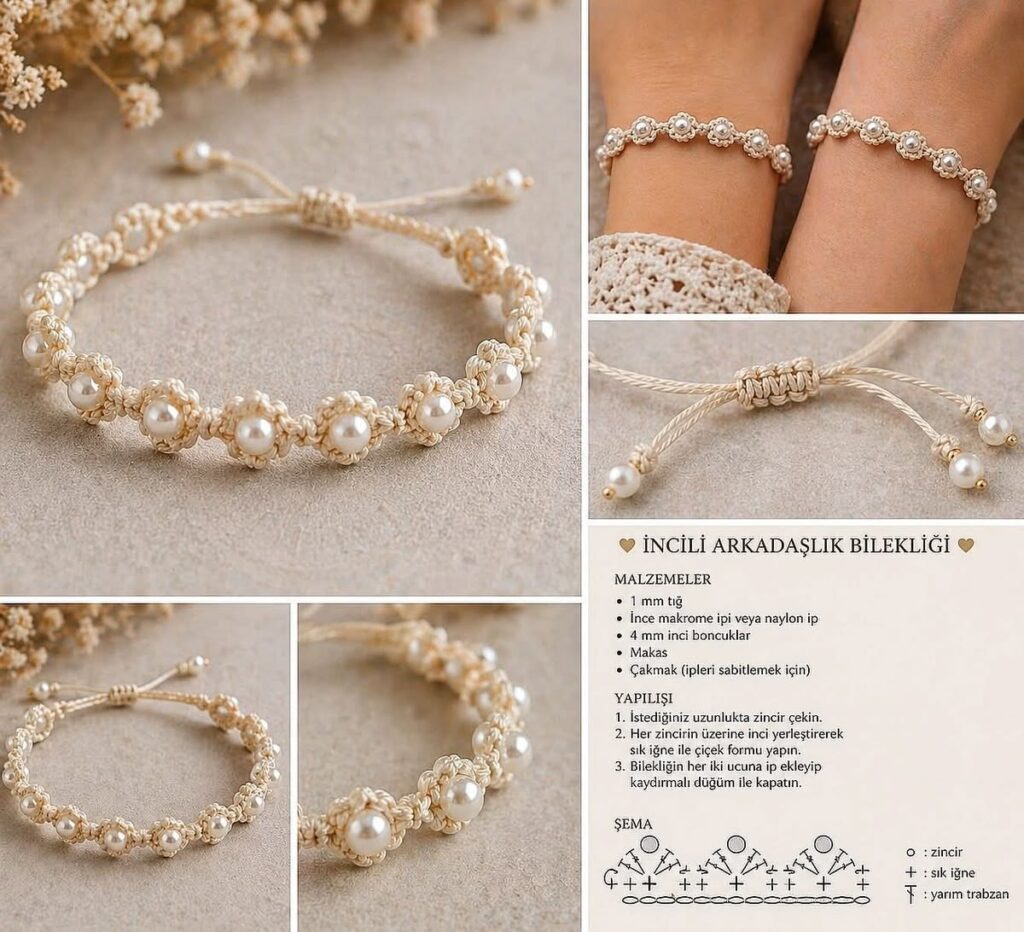
İncili Arkadaşlık Bilekliği: Turkish Pearl Friendship Bracelet – Complete Guide
Introduction: A Bracelet That Means Friendship
The İncili Arkadaşlık Bilekliği (Pearl Friendship Bracelet) is a traditional Turkish handmade bracelet given to friends as a symbol of affection, loyalty, and shared memories. Unlike standard friendship bracelets made purely of knots, this design combines crochet chains, slip stitches, and 4mm pearl beads to create a delicate, flower-like pattern.
In this guide, you will learn:
- The full meaning of each Turkish term
- Step-by-step instructions for making the bracelet
- How to read the crochet symbols (zincir, sık iğne, yarım trabzan)
- How to add a sliding knot closure (kaydırmalı düğüm)
Why Make a Turkish Pearl Friendship Bracelet?
| Benefit | Explanation |
|---|---|
| Beautiful flower pattern | Beads sit inside each crochet flower, creating a 3D effect |
| Fast to make | Takes 30–45 minutes once you learn the stitch |
| Adjustable closure | Sliding knots mean one size fits most wrists |
| Meaningful gift | A handmade friendship bracelet carries emotional value |
| Uses simple materials | Only thread, beads, hook, and scissors |
Part 1: Materials (Malzemeler)
| Turkish | English | Specification |
|---|---|---|
| 1 mm tığ | 1 mm crochet hook | Steel hook, size 1.0mm or 1.25mm |
| İnce makrome ipi veya naylon ip | Thin macrame cord or nylon thread | 0.5–1mm thickness; waxed cord works best |
| 4 mm inci boncuklar | 4 mm pearl beads | Round, 4mm diameter; faux or real pearls |
| Makas | Scissors | Sharp scissors for trimming thread |
| Çakmak (ipleri sabitlemek için) | Lighter (to secure the threads) | For melting nylon cord ends |
Material Notes:
- If using nylon thread, a lighter melts and seals the ends.
- If using macrame cord (cotton), use fray check or a tiny drop of clear glue instead of a lighter.
Part 2: Crochet Stitches Used (Turkish to English)
Your image includes a small diagram key. Here is the full meaning:
| Turkish | Abbreviation | English | Symbol |
|---|---|---|---|
| Zincir | zn | Chain stitch | ○ |
| Sık iğne | sık iğne | Single crochet | ✚ |
| Yarım trabzan | y.trabzan | Half double crochet | ┬ |
Note: Turkish crochet terms follow European/US conventions. Yarım trabzan = half double crochet (not a half treble).
Part 3: Step-by-Step Instructions (Yapılışı)
The original instructions are brief. Below is the expanded, full explanation.
Step 1: Chain the Desired Length (İstediğiniz uzunlukta zincir çekin)
| Action | Detail |
|---|---|
| What you do | Make a foundation chain of single crochet chains |
| Length | Measure around the wrist, then add 2–3 cm for comfort |
| Example | For a 16 cm wrist, make a chain of approximately 18–20 cm (chains will shorten slightly when beads are added) |
How to make a foundation chain:
- Make a slip knot on your 1mm hook.
- Yarn over and pull through to make one chain (zincir).
- Repeat until the chain reaches your desired length.
Step 2: Create Flower Forms by Placing Pearls on Each Chain (Her zincirin üzerine inci yerleştirerek sık iğne ile çiçek formu yapın)
This is the signature technique of the İncili Arkadaşlık Bilekliği.
| Action | Detail |
|---|---|
| What you do | Work single crochet (sık iğne) stitches across the chain, inserting a 4mm pearl bead into each stitch |
| Result | Each bead sits inside a “flower” shape created by the crochet stitch |
Step-by-step for the flower pattern:
| Sub-step | Action |
|---|---|
| 1 | Insert hook into the 2nd chain from the hook. |
| 2 | Place a 4mm pearl bead onto the hook (slide it down so it sits at the hook’s throat). |
| 3 | Yarn over and pull up a loop through the chain (the bead is now captured). |
| 4 | Yarn over again and pull through both loops on the hook — completing a single crochet (sık iğne) with a bead trapped in the stitch. |
| 5 | Repeat for each chain across the row. |
Visual result: A row of pearl beads, each surrounded by a crochet stitch that looks like a small flower (çiçek formu).
Step 3: Add Cord to Both Ends and Close with a Sliding Knot (Bilekliğin her iki ucuna ip ekleyip kaydırmalı düğüm ile kapatın)
After completing the beaded row, you need to add extra cord to each end to create the adjustable closure.
| Action | Detail |
|---|---|
| What you do | Attach new cord to the left end and right end of the beaded strip |
| Knot type | Kaydırmalı düğüm (sliding knot / adjustable knot) |
| Result | A bracelet that fits any wrist size |
How to make a kaydırmalı düğüm (sliding knot):
| Sub-step | Action |
|---|---|
| 1 | Cut two 15–20 cm pieces of the same cord. |
| 2 | Attach one piece to the left end of the beaded strip (using a lark’s head knot). |
| 3 | Attach the second piece to the right end. |
| 4 | Tie a square knot or a simple overhand knot to create a loop. |
| 5 | Use the two cords to make a sliding knot (Peruvian knot style). |
| 6 | Trim and melt/seal the ends. |
Alternative: Use a button and loop closure instead of sliding knots for a different look.
Part 4: Understanding the Diagram (Şema)
Your image includes a small diagram with the following symbols:
| Symbol | Turkish | English |
|---|---|---|
| + | Zincir | Chain |
| + (with annotation) | Sık iğne | Single crochet |
| + (with annotation) | Yarım trabzan | Half double crochet |
How to read the diagram:
- The diagram likely shows a repeat pattern: chain, then single crochet with bead, then half double crochet, then repeat.
- Because the original image is cropped, the full diagram is not visible. However, the written instructions confirm that the main technique is single crochet with bead insertion.
Part 5: Full Turkish-to-English Vocabulary
| Turkish | English |
|---|---|
| İncili Arkadaşlık Bilekliği | Pearl Friendship Bracelet |
| Malzemeler | Materials |
| 1 mm tığ | 1 mm crochet hook |
| İnce makrome ipi | Thin macrame cord |
| Naylon ip | Nylon thread |
| 4 mm inci boncuklar | 4 mm pearl beads |
| Makas | Scissors |
| Çakmak | Lighter |
| Zincir | Chain |
| Sık iğne | Single crochet |
| Yarım trabzan | Half double crochet |
| İstediğiniz uzunlukta | Desired length |
| İnci yerleştirerek | By placing pearls |
| Çiçek formu | Flower form |
| Kaydırmalı düğüm | Sliding knot |
| Kapatmak | To close / to fasten |
Part 6: Step-by-Step Photo Guide (Text Version)
Row 1 (Foundation)
Chain 20–25 chains (depending on wrist size).
Row 2 (Beaded Flower Row)
- Insert hook into 2nd chain from hook.
- Slide one 4mm pearl onto the hook.
- Yarn over, pull up a loop (pearl is now on the loop).
- Yarn over, pull through both loops.
- Repeat for each chain across.
Row 3 (Optional – Half Double Crochet Border)
- Chain 2 (turning chain).
- Work 1 half double crochet (yarım trabzan) in each stitch across.
- This creates a slightly taller edge.
Finishing
- Add 15–20 cm of cord to each end.
- Tie a kaydırmalı düğüm (sliding knot).
- Trim and melt the ends.
Part 7: Common Mistakes & Fixes
| Mistake | Cause | Fix |
|---|---|---|
| Bead falls off the stitch | Did not place bead on hook before pulling up the loop | Always slide bead onto the hook before yarning over |
| Beads are crooked | Tension uneven when pulling through | Keep the bead centered as you complete the stitch |
| Bracelet too short | Foundation chain was too short | Add 2–3 cm extra to the foundation chain |
| Sliding knot doesn’t slide | Tied too tightly | Keep loops loose until the final adjustment |
| Crochet hook too large | Used a hook larger than 1mm | Use 1mm or 1.25mm hook for 4mm beads |
| Nylon thread frays | Cut with dull scissors | Use sharp scissors; seal with a lighter immediately |
Part 8: Design Variations
| Variation | Change | Effect |
|---|---|---|
| Different bead colors | Use pastel pink, blue, or lavender instead of white pearls | A softer or more colorful look |
| Larger beads | Use 6mm beads with a 1.5mm hook | A chunkier, more dramatic bracelet |
| Two beads per flower | Place two beads on the hook before pulling up the loop | A denser, heavier flower |
| Metallic thread | Use gold or silver metallic cord | A dressier, evening-appropriate bracelet |
| Anklet version | Make the foundation chain longer (25–30 cm) | A matching anklet |
Part 9: What to Make with This Technique
| Project | Adaptations |
|---|---|
| Friendship bracelet | Standard version (as described) |
| Anklet | Longer chain; use smaller 3mm beads |
| Necklace | Very long chain (40–50 cm); use larger 6mm beads |
| Keychain | Short chain (10 cm); add a key ring to the sliding knot |
| Phone strap | Medium length (15–20 cm); attach to phone case loop |
SEO Blog Post Optimization
| Meta Tag | Suggested Content |
|---|---|
| Title | İncili Arkadaşlık Bilekliği: Turkish Pearl Friendship Bracelet – Complete Guide |
| Meta Description | Learn to make the İncili Arkadaşlık Bilekliği (Pearl Friendship Bracelet) with 4mm pearls, 1mm crochet hook, and sliding knot closure. Step-by-step Turkish pattern. |
| URL slug | /incili-arkadaslik-bilekligi-turkish-pearl-bracelet |
| Keywords | İncili arkadaşlık bilekliği, Turkish friendship bracelet, pearl crochet bracelet, 4mm inci boncuk, kaydırmalı düğüm, makrame bileklik |
| Alt text for image | Turkish İncili Arkadaşlık Bilekliği diagram showing zincir (chain), sık iğne (single crochet), and yarım trabzan (half double crochet) with 4mm pearl beads |
Final Pro Tip: Giving the Bracelet as a Gift
In Turkish culture, the İncili Arkadaşlık Bilekliği is traditionally:
- Made by one friend for another
- Tied onto the wrist by the giver
- Worn until it naturally falls off (symbolizing the friendship’s strength)
When you give this bracelet, explain its meaning. It makes the gift much more special.
Summary: You Can Now Make a Turkish Pearl Friendship Bracelet
| Step | Skill Learned |
|---|---|
| 1 | Make a foundation chain (zincir) |
| 2 | Insert a 4mm pearl into a single crochet (sık iğne) |
| 3 | Create a flower form (çiçek formu) with beads |
| 4 | Add cord to both ends |
| 5 | Tie a kaydırmalı düğüm (sliding knot) |
| 6 | Finish and seal the ends |
This bracelet is beginner-friendly once you practice the bead insertion technique. Make one for yourself and a matching one for your best friend.


