How to Make a Multi-Strand Pearl & Leather Necklace: 12-Step DIY
Learn how to make a stunning multi-strand pearl and leather necklace with this easy 12-step tutorial. Perfect for creating boho-chic jewelry with an adjustable clasp!
Introduction: The Perfect Boho-Chic Accessory
If you love the effortless, layered look of bohemian jewelry but don’t want to spend a fortune at a boutique, this Multi-Strand Pearl & Leather Necklace is the perfect DIY project for you. 🪢✨
The necklace in the image is a beautiful blend of textures—smooth, glossy white and blue pearls strung on rustic brown leather cord, finished with a sleek, adjustable clasp. It looks like a high-end artisan piece, but it is incredibly simple to make at home.
With just a few strands of cord, a handful of beads, and a basic knotting technique, you can create a stunning statement necklace that goes with everything from a flowy summer dress to a cozy sweater. Let’s dive into the 12-step guide and learn how to make your own! 🪢✨
What You Will Need
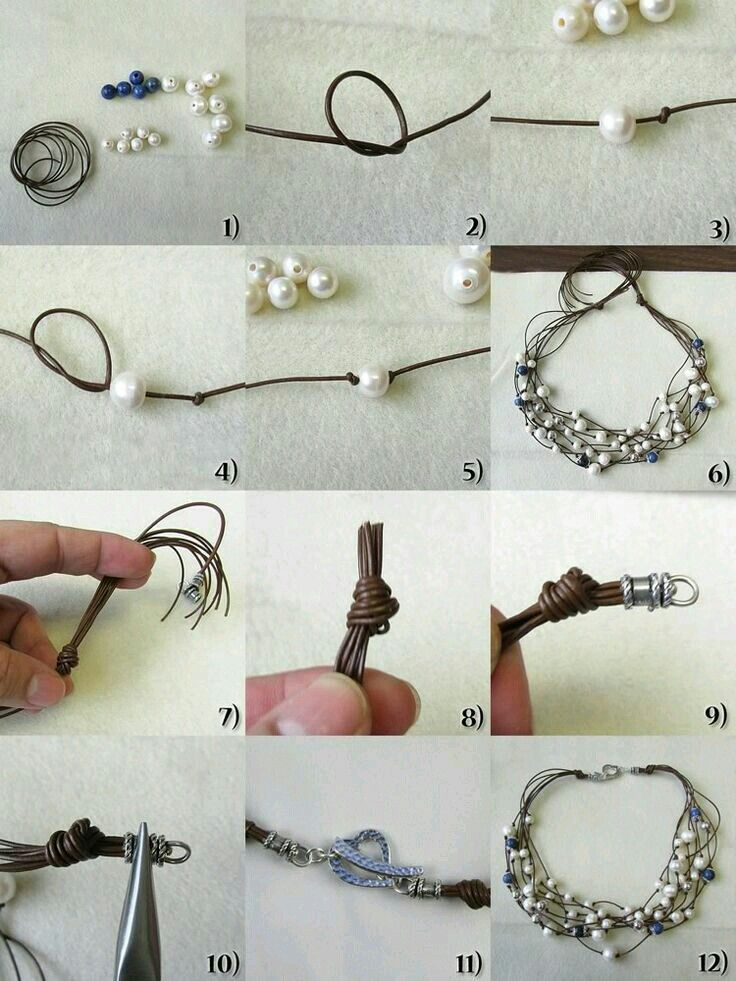
Before you begin, gather these supplies (as shown in Panel 1 of the image):
- Leather or Waxed Cotton Cord: Brown, approximately 1mm to 1.5mm thick. You will need 5 separate strands, each about 18 to 20 inches long (depending on your desired neckline).
- Beads: A mix of styles and sizes.
- White round pearls (glass or freshwater).
- Small blue or navy beads (to add a pop of color).
- Small silver spacer beads (optional, but adds polish).
- Clasps & Findings:
- 1 x Magnetic Tube Clasp (the silver cylinder shown in Panel 9).
- 1 x Lobster Clasp (to make it adjustable).
- 2 x Jump Rings.
- 1 x Extension Chain (for the back).
- Tools:
- Flat-nose or needle-nose pliers (for closing rings).
- Wire cutters (for trimming cord).
- Clear craft glue (to secure the knots).
- Optional: A lighter (to slightly melt the tips of synthetic leather cord to prevent fraying).
Step-by-Step Tutorial: Making the Necklace
Follow these 12 panels carefully to bring your necklace to life. This project is all about the “knot and bead” technique.
Panels 1 & 2: Prepare the Cords
- Lay out your 5 strands of leather cord. They should all be roughly the same length (about 18 inches).
- Starting with the first strand, make a simple overhand loop at one end. (Panel 2). This loop will later be used to attach the clasp.
Panel 3: String the First Bead
- Take one of your white pearls and thread it onto the first strand of cord.
- Slide it down toward the loop you just made.
- Tie a simple overhand knot immediately below the pearl to hold it in place.
- Pro-Tip: Leave about 1 to 1.5 inches of space between the loop and the first bead to allow the necklace to drape naturally.
Panel 4 & 5: Add the Second Bead
- Slide the knot you just tied down toward the loop so it sits securely.
- Thread a second white pearl onto the same strand.
- Tie a knot right under this second pearl.
- Continue this process along the strand, alternating pearls and knots, until the cord is almost full. Leave about 1.5 inches of empty cord at the very end.
Panel 6: Repeat for All Strands
- Repeat this exact process for all 5 strands of leather cord.
- Tip for Layering: Make each strand slightly different! Use white pearls on some strands, blue beads on others, and mix in silver spacer beads on a third. This creates the beautiful, organic “scattered” look shown in Panel 6.
- Once all 5 strands are beaded, gather them together and drape them into a U-shape to see how they lay.
Panel 7 & 8: Gather and Wrap the Ends
- Gather the ends of all 5 strands together at one side.
- Note: Be sure to attach one end of your magnetic tube clasp to one side of the cords before wrapping (as shown in Panel 7).
- Take a separate, small piece of leather cord (about 4 inches long). Wrap it tightly around the gathered bundle of 5 cords, right next to the clasp.
- Wrap it around 3 to 4 times. Tie a tight knot to secure the wrapping. (Panel 8).
Panel 9: Secure the Clasp
- Your wrapped bundle is now securely attached to one half of the magnetic clasp.
- Use your flat-nose pliers to gently squeeze the wrapped knot and the clasp loop together to ensure they are flush and secure.
Panel 10 & 11: Create the Adjustable Closure
- On the other end of your 5-strand bundle, repeat the gathering and wrapping process (Step 8 & 9) to attach the other half of the magnetic clasp.
- Make it Adjustable: Take a lobster clasp and attach it to a jump ring. Connect this to the end of one of the magnetic clasps.
- Take a silver extension chain. Use another jump ring to connect this to the other magnetic clasp end. (Panel 11).
- Note: In Panel 11, the image also shows a small blue ribbon tied to the extension chain for extra decorative flair—a cute optional touch!
Panel 12: The Finished Masterpiece
- Your necklace is now complete!
- You have a beautiful, multi-layered, textured necklace with a magnetic closure and an adjustable length.
- Layer it with other gold or silver chains, or wear it alone as a stunning statement piece. ✨
Pro-Tips for a Professional Finish
- Seal Your Knots: Before you trim the very ends of your leather cord after tying the knots, add a tiny drop of clear craft glue (like G-S Hypo Cement) to the knot. Let it dry. This ensures your knots never come undone.
- Space Your Beads Evenly: As you are stringing beads onto the 5 different strands, try to stagger them. If you put a pearl at the exact same spot on every strand, the necklace will look bulky. Stagger them slightly for that organic, “boho” drape.
- Use Waxed Cotton for Easier Tying: If you are new to knotting, look for waxed cotton cord (instead of bare leather). It has a slightly tacky coating that prevents knots from slipping before you can glue them.
- Mix Your Textures: Don’t be afraid to add a few small silver, gold, or matte black beads amongst the pearls. The mix of textures gives the necklace depth and interest.
Creative Ways to Style Your Necklace
This versatile necklace is a wardrobe staple. Here is how to wear it:
- Everyday Casual: Wear it over a solid white t-shirt or a chunky knit sweater. The pearls add an instant touch of elegance to a simple outfit.
- Layered Boho: Pair it with a long, thin gold chain and a suede fringe jacket for a full bohemian vibe.
- Dressy Occasions: Because of the pearls, this necklace easily transitions to evening wear. Wear it with a black turtleneck or a silk slip dress.
- Gift Giving: This makes a phenomenal handmade gift for Mother’s Day, birthdays, or bridesmaid thank-yous.
Conclusion
Creating a multi-strand, layered necklace doesn’t have to be complicated or expensive. By mastering the simple “knot, bead, knot” technique, you can create a professional-looking piece of jewelry that you will be proud to wear and gift.
Save this 12-step guide to your Pinterest board for your next crafting session! Let me know in the comments: What color pearls and cord are you planning to use for your necklace?
Happy Beading and Knotting!