Creating a durable handle using paracord and clips is a common project for outdoor gear or bags. Here is a general overview of the process:
- Materials Needed: Typically, this requires 25-100 feet of 550 paracord, two metal clips (such as HK-style or lobster clips), and a heat source like a lighter to singe and seal the ends of the cord.
- Braiding Technique: A common method is the cobra knot (also known as a Solomon weave). This involves centering the cord on the first clip and knotting the two loose strands around a central core to build the handle’s structure.
- Finishing: Once the desired length is reached, the remaining cord is threaded through the second clip. The ends are then trimmed and melted slightly to prevent fraying and to secure the weave in place.
Full Meaning of the Instructions (Steps 9–20)
These steps describe:
- A standard cobra weave (right, left, right, left)
- Followed by a king cobra weave (second layer woven over the first)
- Finished with an HK clip (a dual-slot clip used for tools, flashlights, or key holders)
- Optional bottle opener integration
Key Terms Defined
| Term | Meaning |
|---|---|
| Cobra weave | Alternating square knots around two center core strands |
| King cobra | A second cobra weave tied directly over the first, filling the grooves |
| HK clip | A metal clip with two parallel slots; paracord passes through to create a secure loop |
| Bottle opener | A flat metal piece with a tooth; paracord is woven through its center |
Full Understanding: How the King Cobra Works
Why Two Layers?
| Layer | Function |
|---|---|
| First cobra (base) | Provides structure and grip width |
| King cobra (top) | Fills the valleys between knots, creating a smooth, tight, professional finish |
Without the king cobra, the handle would have deep gaps between knots. The second layer locks everything in place and adds thickness for better grip.
The Alternating Pattern (Steps 7–11)
Your instructions correctly state: right, left, right, left — tighten after each knot. This is the essential rhythm of a flat cobra weave. If you do two rights in a row, the bracelet/handle will twist.
How-To Guide (Complete from Step 9)
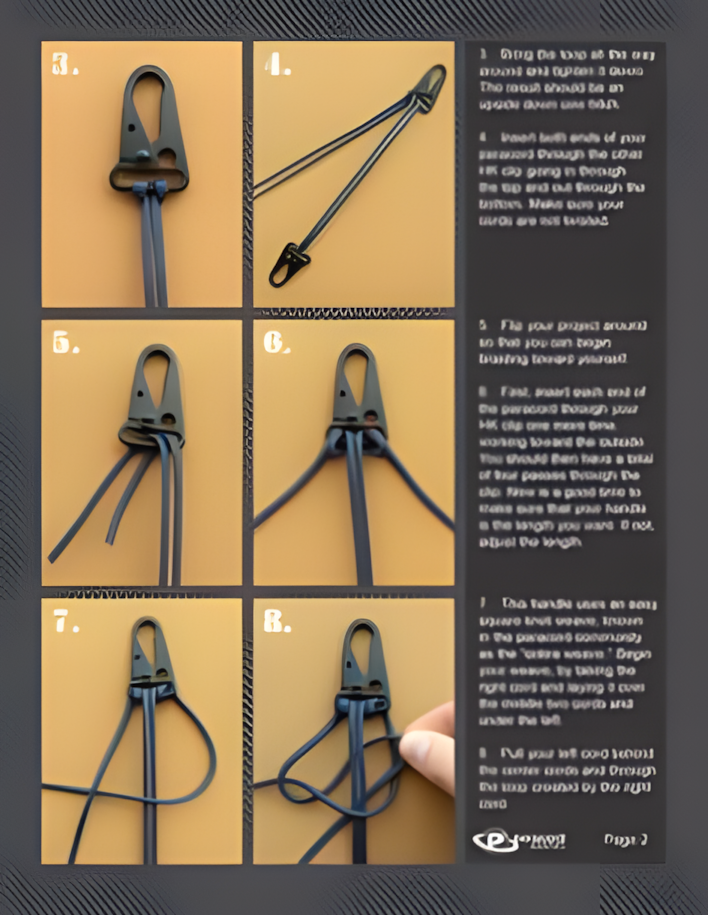
Before You Start (Context from illegible step 1–8)
Assume you already have:
- Two core strands running along the handle
- Two working cords (left and right) attached at one end
- An HK clip temporarily placed at the starting end
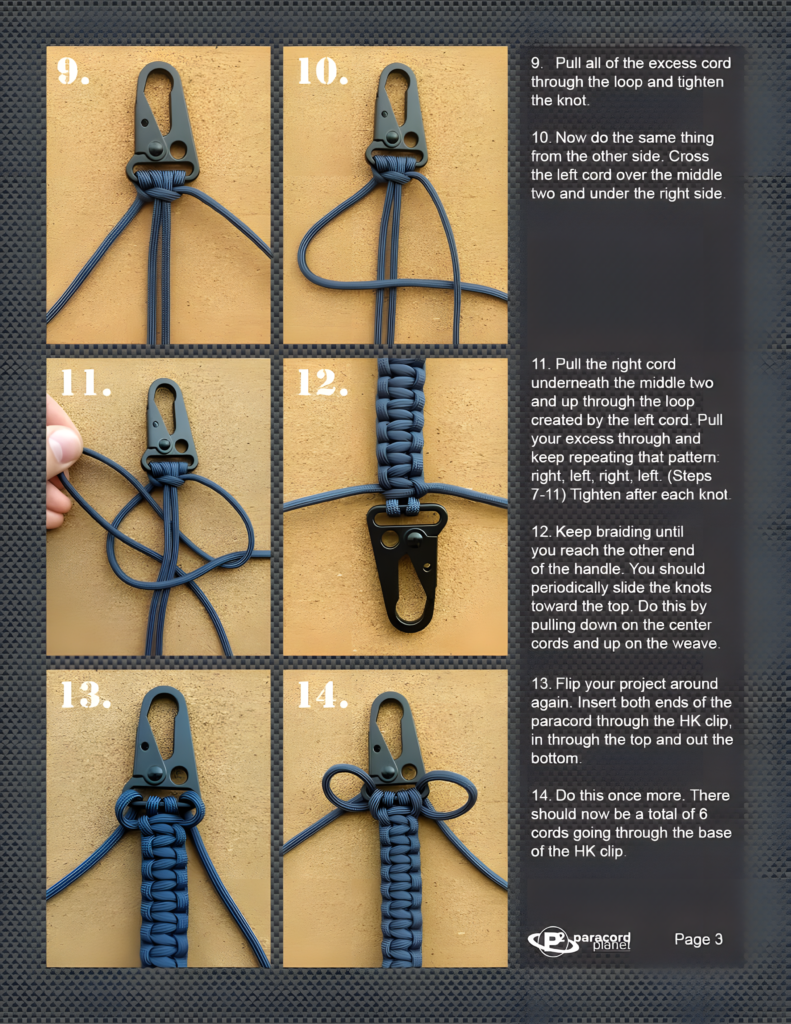
Step 9 — Pull and Tighten
After completing a half-knot, pull all excess cord through the loop. Tighten firmly. This secures the half of the square knot.
Step 10 — Switch Sides
Cross the left cord over the two middle strands and under the right side. This begins the left-side half-knot.
Step 11 — Complete the Left Side
Pull the right cord underneath the middle two strands and up through the loop created by the left cord. Pull excess through. Repeat the pattern: right, left, right, left. Tighten after each knot.
Step 12 — Braid to the End
Continue until you reach the other end of the handle. Periodically slide the knots toward the top by:
- Pulling down on the center cords
- Pulling up on the weave
This “sliding” technique keeps tension even and prevents loose spots.
Step 13 — Flip and Insert Through HK Clip
Flip the project around. Insert both ends of the paracord through the HK clip — in through the top, out through the bottom.
Step 14 — Second Pass
Do this once more. Now there should be a total of 6 cords going through the base of the HK clip (two from the cores + four from the two working cords passed twice).
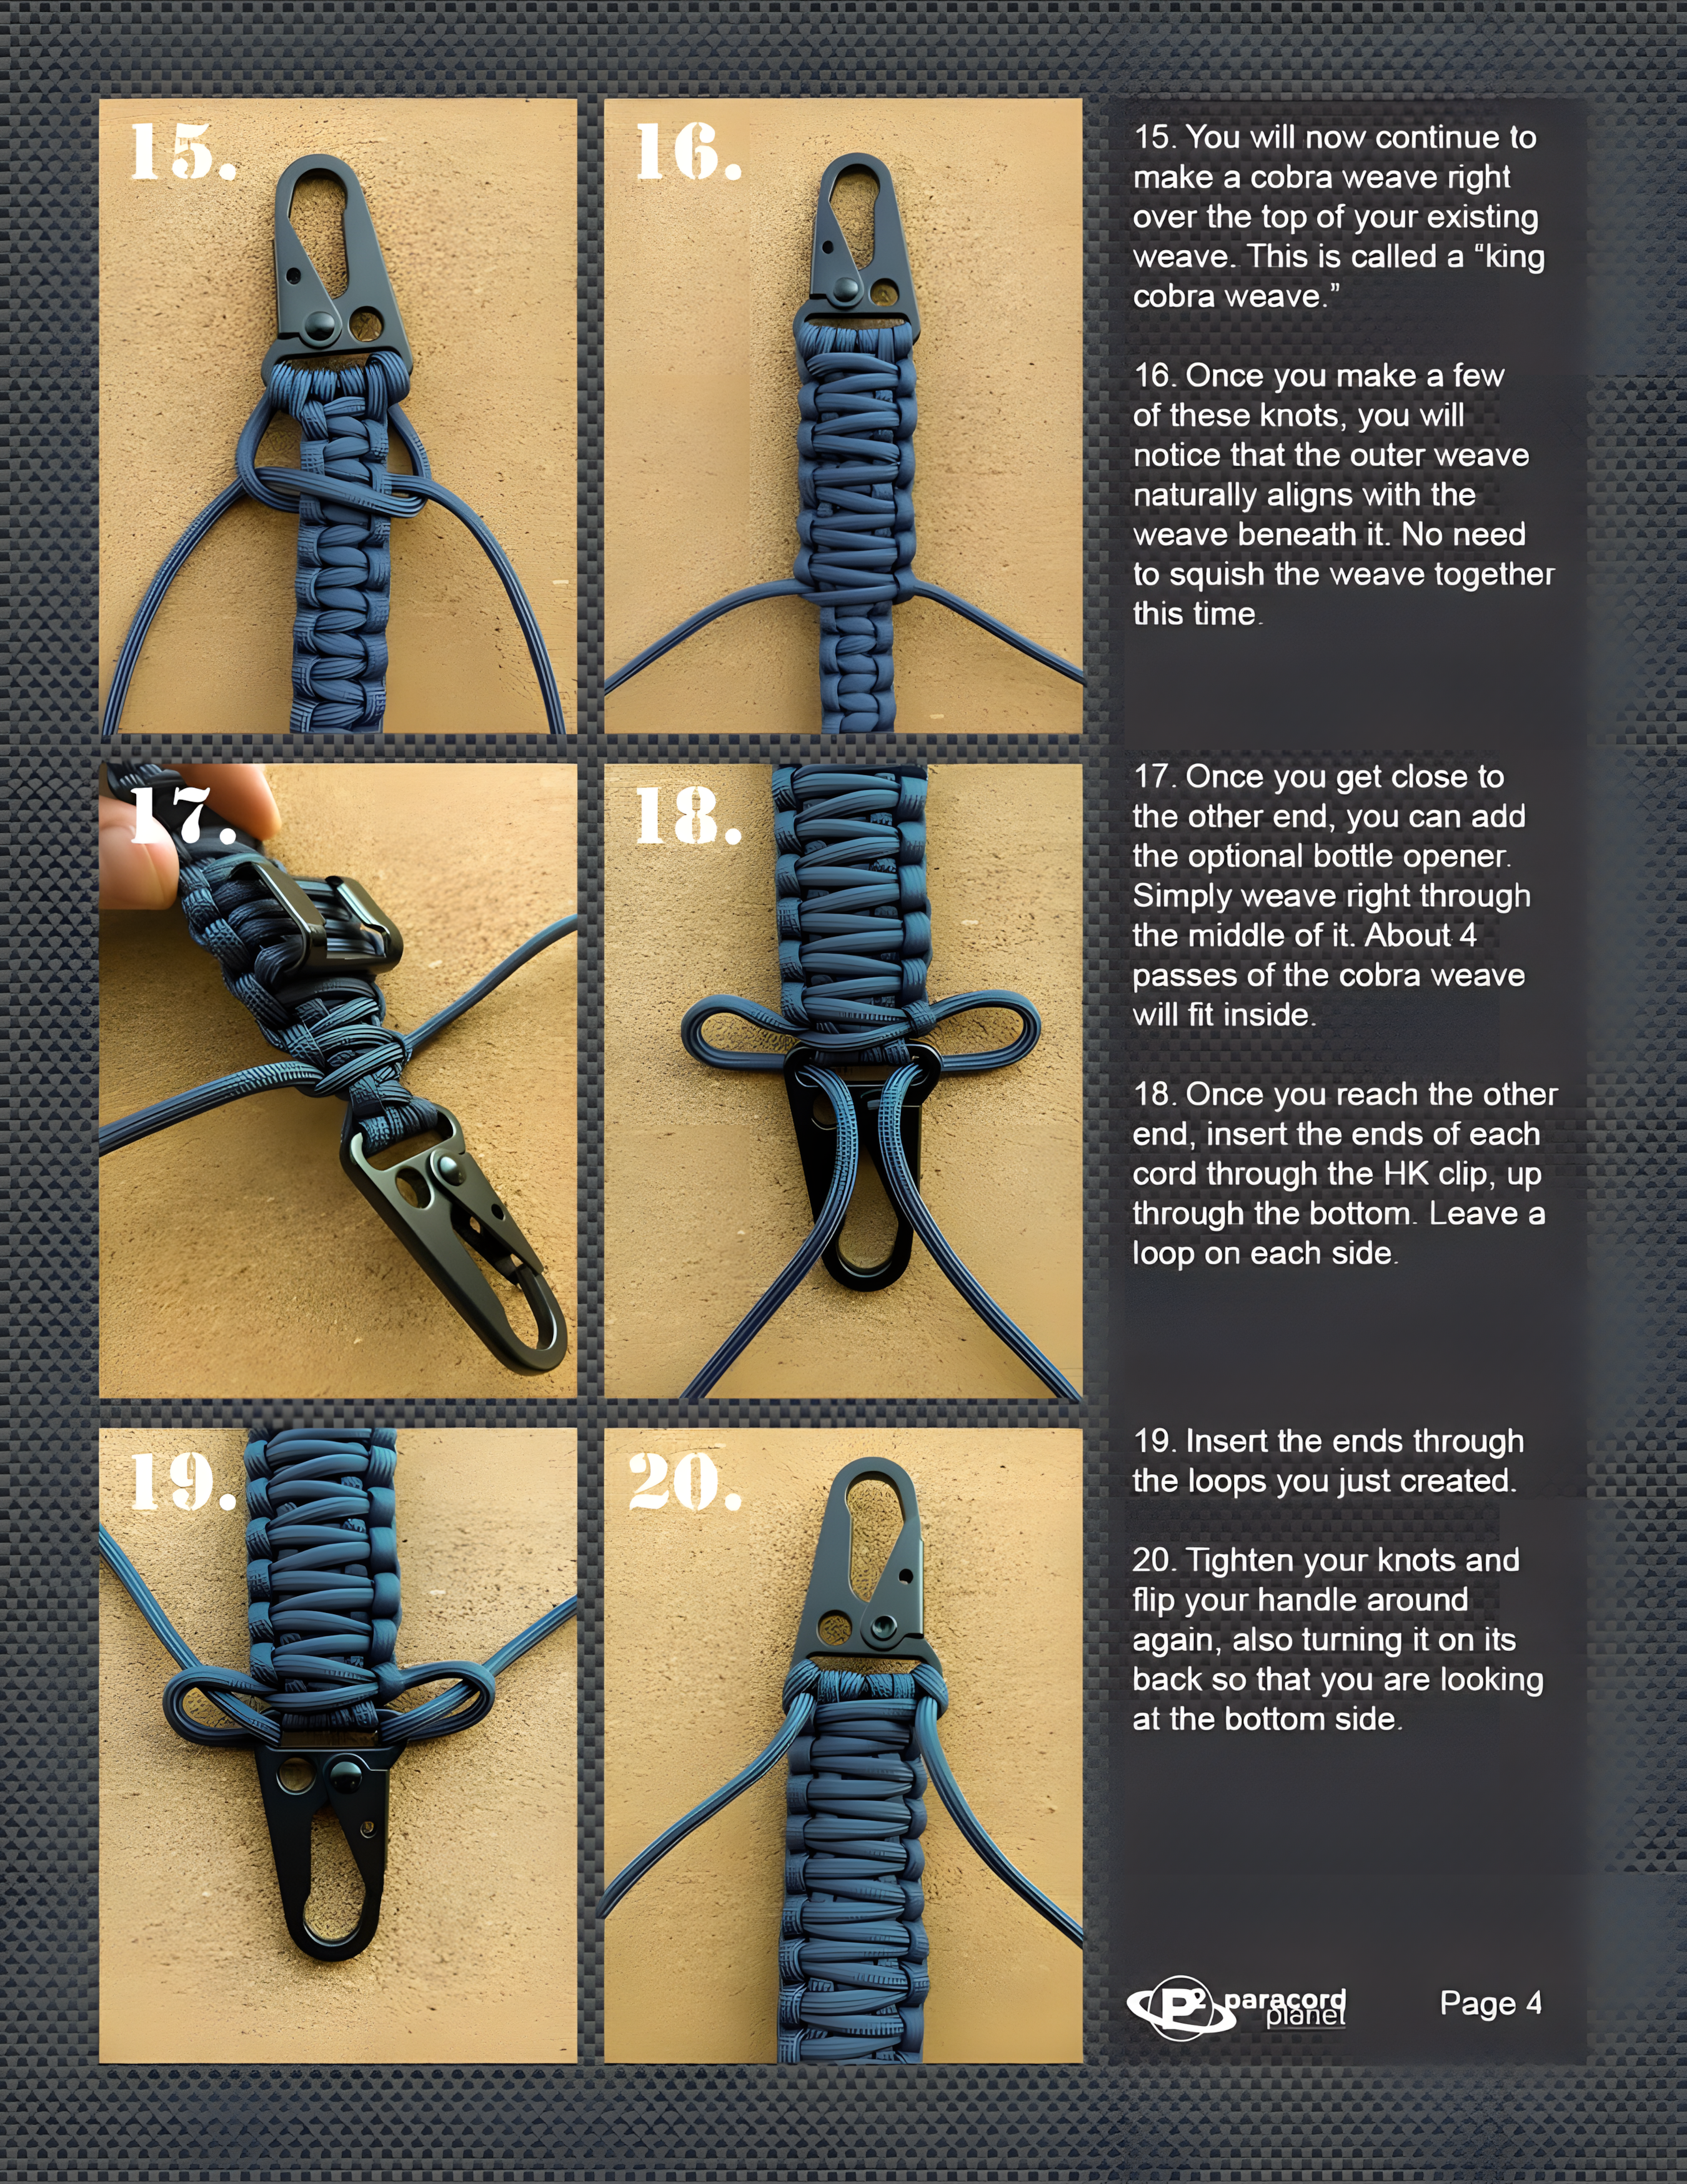
Step 15 — Start the King Cobra Weave
Continue making a cobra weave directly over the top of your existing weave. This is the king cobra. The outer weave will naturally align with the weave beneath it — no need to squish or force it.
Step 16 — Let It Self-Align
After a few knots, you will see the new knots settle into the valleys of the base layer. Trust the process.
Step 17 — Add Optional Bottle Opener
If using a bottle opener:
- Weave the paracord right through the middle of the bottle opener
- About 4 passes of the cobra weave will fit inside the opener’s opening
Step 18 — Reach the Other End
Once you reach the opposite end:
- Insert the ends of each cord through the HK clip — up through the bottom
- Leave a small loop on each side
Step 19 — Lock the Loops
Insert the ends through the loops you just created. This forms a cinching or locking mechanism similar to a sliding knot.
Step 20 — Final Tightening and Flip
Tighten your knots. Flip the handle around again, also turning it onto its back so you are looking at the bottom side. Trim and melt any excess cord.
Complete Summary: Full Understanding of the Entire Process
| Phase | Steps | Purpose |
|---|---|---|
| Setup | (Steps 1–8, illegible) | Attach cords to HK clip or handle base |
| Base cobra | 9–12 | Create first layer of grip |
| HK clip insertion | 13–14 | Secure the clip into the weave |
| King cobra | 15–17 | Add second layer for thickness and smoothness |
| Bottle opener (optional) | 17 | Integrate a tool into the wrap |
| Finishing | 18–20 | Lock ends through HK clip loops and trim |
Why This Is Called “Artisanal”
Like the purple macrame bracelet, a king cobra paracord wrap is hand-tied with consistent tension. The difference is:
- Macrame uses soft cord for jewelry
- Paracord uses nylon kernmantle rope for durability and load-bearing (tools, handles, survival gear)
Common Mistakes & Fixes for King Cobra
| Mistake | Cause | Fix |
|---|---|---|
| King cobra twists | Base layer is uneven | Re-do base cobra with consistent right-left rhythm |
| HK clip falls out | Only passed cords once | Must pass twice (step 14) for 6 total strands |
| Bottle opener moves | Not woven tight enough | Weave 4 full passes through the opener’s center |
| Loose final loops | Did not pull ends through loops before tightening | Follow step 19 carefully — loops lock the cord |
Final Pro Tip
For a professional finish:
- Melt all cut ends with a lighter and press flat (not shown in steps but essential)
- Use contrasting colors for base vs. king cobra (e.g., black base, purple king cobra) to match your artisanal bracelet theme


