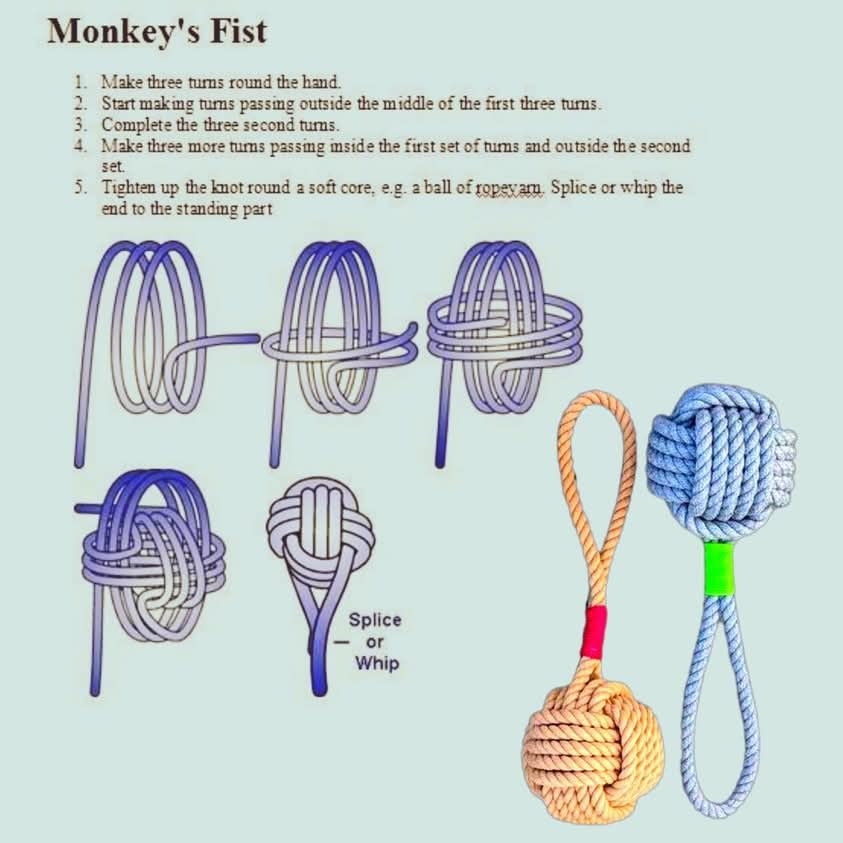
How to Tie a Monkey’s Fist Knot: 5-Step Diagram & Guide
Master the classic Monkey’s Fist knot with this easy 5-step diagram tutorial. Perfect for making weighted keychains, rope toys, and nautical decor. Includes pro-tips for finishing!
Introduction: The Timeless Nautical Knot
If you have ever admired the heavy, perfectly rounded knot at the end of a ship’s heaving line, you were looking at a Monkey’s Fist. Historically, sailors tied this knot to add weight to the end of a rope so it could be thrown accurately from ship to shore.
Today, the Monkey’s Fist has sailed far beyond the docks. It is a beloved staple in the world of paracord crafting, home décor, and DIY gifts. It makes an incredible keychain, a heavy-duty tug toy for dogs, or a stylish, nautical curtain tie-back.
As the diagram above shows, this knot is surprisingly simple. It is constructed using a series of three distinct “turns” wrapped around your hand, followed by a tightening process around a soft core. Let’s break down the 5 steps to mastering the Monkey’s Fist! 🪢✨
What You Will Need
To tie this knot successfully, gather these simple supplies:
- Rope or Cord: Paracord (Type 550) is the most popular choice for its durability and vibrant colors. You can also use thick twisted cotton rope (as seen in the completed examples) for a thicker, more rustic result. You will need approximately 3 to 4 feet of cord.
- A “Soft Core”: The diagram advises tightening the knot around a soft core. This is crucial! Without a core, the knot will collapse into a flat pancake. Use a rubber ball, a glass marble, or even a tightly wound ball of rope yarn to give the knot its signature spherical shape.
- Scissors and a Lighter: For trimming and sealing the ends of synthetic rope.
Step-by-Step Instructions (Following the 5-Step Diagram)
Follow the text instructions alongside the visual panels to weave this classic knot.
Step 1: The First Turn (Create the Vertical Loops)
- Take the rope and hold the tail (short end) against the palm of your non-dominant hand.
- Use the working end (the long end) to wrap the rope around your fingers (index, middle, and ring fingers) three times.
- Keep these wraps flat and side-by-side. Do not let them overlap. (See Panel 1 of the diagram).
Step 2: The Second Turn (Start the Middle Weave)
- Keep your fingers inside the loops. Take the working end and start making passes around the loops.
- You are wrapping horizontally. The diagram instructs you to pass the rope outside the middle of your first three loops.
- Complete this horizontal wrap three times. (See Panel 2).
Step 3: Complete the Second Turn
- Once you have completed the three horizontal wraps, the diagram shows the rope making a 90-degree turn and starting to weave back.
- Pay close attention to the “over and under” path. The working end should weave between the first and second sets of loops to begin locking the structure together. (See Panel 3).
Step 4: The Third Turn (The Locking Pass)
- This is the final weaving stage. You will make three more turns with the working end.
- Pass the rope inside the first set of turns and outside the second set of turns.
- At the end of this step, you will have a criss-crossing basket of rope loops. (See Panel 4).
Step 5: Insert the Core and Tighten (The Magic Moment)
- Carefully remove your fingers from the loops. The structure will feel loose and floppy.
- Insert your soft core (a ball of rope yarn, a marble, or a rubber ball) into the center hole of the basket.
- Tightening: This is the most important step. Do not pull on one end aggressively. Instead, gently pull the loops on each side of the knot, working your way around the sphere.
- As you slowly pull the slack out of the loops, the knot will shrink and tighten around the core, forming a dense, perfect sphere. (See Panel 5).
Finishing the Knot: Splice or Whip
Once your knot is tight, look at the completed examples on the right side of the diagram. Notice that the tails are not just left loose.
- The Loop: The completed knots feature a loop at the top. To create this, you simply use the long working end and the short tail to tie the final knot around your core. Leave a loop of rope sticking out of the top.
- Whipping or Splicing: To secure the loop and make it usable, the diagram suggests you “Splice or Whip” the end to the standing part.
- For Paracord: Simply trim the tails and melt them with a lighter to seal them.
- For Cotton Rope: Take a smaller piece of contrasting thread (like the red and green bands shown in the image) and wrap it tightly around the base of the knot and the loop. This is called “whipping,” and it locks the rope together securely so it never unravels.
Pro-Tips for a Perfect Monkey’s Fist
- Practice Without a Core First: When learning, skip Step 5’s core and simply tie the knot loosely to practice the wrapping pattern. Once you memorize the “three turns” sequence, graduate to adding the core.
- Tension is Everything: If you wrap too tightly in Steps 1-3, your fingers will get stuck. If you wrap too loosely, the final knot will look sloppy and misshapen. Aim for a firm, moderate tension.
- Use a Board: If you find it difficult to hold the loops with your hands, lay the rope on a corkboard and use four push pins to hold the vertical loops in place while you weave the horizontal passes. This makes the process much easier!
Creative Uses for Your Monkey’s Fist
Once you have tightened your perfect knot, here are some amazing ways to use it:
- Weighted Keychain: Attach the loop to a metal keyring. The heavy knot makes your keys easy to find and adds a rugged, tactical look.
- Curtain Tie-Back: Use a long rope with a large Monkey’s Fist on both ends to elegantly hold back heavy drapes.
- Dog Tug Toy: Tie two large Monkey’s Fists on either end of a length of rope. It creates a durable, safe, and fun tug-of-war toy for your furry friend.
- Nautical Décor: Hang a cluster of Monkey’s Fists from a wooden anchor or a driftwood piece for a beautiful coastal wall display.
Conclusion
The Monkey’s Fist is a rite of passage for anyone interested in knot-tying. It combines mathematical precision with practical functionality. With just three sets of turns and a soft core, you can transform a piece of rope into a stunning, weighted sphere.
Save this guide to your Pinterest board for your next DIY project! Let me know in the comments: What are you planning to make with your first Monkey’s Fist?
Happy Knotting!