Learn how to set up a 16-strand Kumihimo braid using this visual guide and numerical sequence chart. Perfect for creating detailed colorwork designs!
Introduction: Leveling Up Your Kumihimo Skills
If you have mastered the basic 8-strand round braid, you are probably looking for your next challenge. Enter the 16-strand Kumihimo braid.
While the 8-strand braid gives you a lovely, simple spiral, the 16-strand braid opens up a world of complex color patterns, intricate chevrons, and even beautiful geometric designs. It requires more threads and a slightly more detailed setup, but the result is a thicker, luscious cord with crisp, defined color changes.
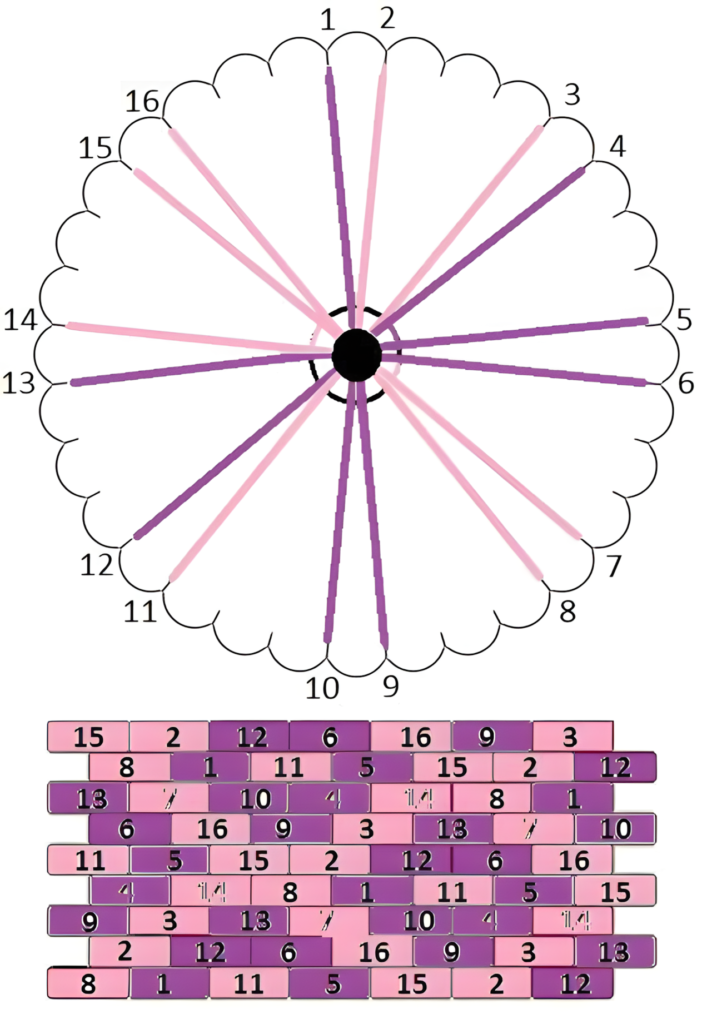
The image above provides a complete roadmap for a 16-strand pattern. It features a visual thread-placement diagram on a standard 16-slot disk, paired with a numerical sequence chart that tells you exactly which slots to move next.
Today, we are going to demystify these two tools. Let’s learn how to set up this beautiful pink and purple braid and follow the sequence to perfection!
Understanding the Setup Diagram (Top Image)
Before you can braid, you must “load” your disk. Let’s look at the top image in the graphic.
The Tools:
- The Disk: A 16-slot Kumihimo disk, numbered 1 through 16 clockwise.
- The Center: The black circle represents the center hole where your braided cord will eventually emerge.
Loading Your Threads:
This specific pattern uses 16 threads total, divided into two colors: 8 Pink threads and 8 Purple threads. To set this up according to the diagram:
- The Purples: Notice the dark purple lines extending from the center to the outer edge. You place a purple thread in slots 1, 3, 5, 7, 9, 11, 13, and 15. This creates an alternating star pattern.
- The Pinks: Next, place a pink thread in the remaining alternating slots: 2, 4, 6, 8, 10, 12, 14, and 16.
Pro-Tip: Place each thread with a bobbin attached and pull them slightly taut. Take a moment to ensure they are alternating perfectly—this exact “star” formation is what creates the beautiful color distribution in the final braid.
Decoding the Sequence Chart (Bottom Image)
Once your threads are loaded, the braiding begins. But with 16 threads, you can’t just “go left and right.” You need a sequence map.
The bottom image in the graphic is a color-coded grid that tells you exactly which threads to move to which slots. Here is how to read it:
- The Columns: Each column represents a step in the braiding process. You move from left to right as you braid.
- The Numbers: The numbers (1, 2, 5, 6, 16, etc.) correspond to the slot numbers on your physical disk.
- The Colors: The colored blocks (Pink and Purple) simply help you visualize which color thread you are moving at that step.
- The Slash (/): You will see ” / ” in some boxes. In these sequences, the slash often represents a resting step, a skip move, or a placeholder to indicate where the thread came from before being moved to its new destination.
How to Use the Chart:
- Start at the far left of the first row (Step 1).
- Look at the first box:
15. Find Slot 15 on your loaded disk. - Look at the second box:
2. Take the thread currently sitting in Slot 15 and move it to Slot 2. - Look at the third box:
12. Take the thread in Slot 12 and move it to a new location (as directed by the next box in the sequence). - Continue scanning the row from left to right, following the thread placements step-by-step.
- When you finish Row 1, move to Row 2, and so on.
Breaking Down the Rhythm (How to Actually Move)
When working with a 16-strand chart like this, the most common braiding technique is the “One-Over-One” or “Step” move.
Here is a general rule of thumb for moving 16 threads:
- Top Down: Take a thread from the top half (Slots 1-8) and move it diagonally down to a slot in the bottom half (Slots 9-16).
- Bottom Up: Take a thread from the bottom half (Slots 9-16) and move it diagonally up to a slot in the top half (Slots 1-8).
- Rotate: Rotate the disk a quarter-turn clockwise.
- Repeat: Perform the top-down, bottom-up moves again.
Note: The chart provided in the image is a specific, calculated pattern. Following it precisely is the secret to achieving the exact layered color effect shown in the alternating pink and purple bands of this specific braid.
Pro-Tips for 16-Strand Braiding Success
- Use a “Bead Stopper”: 16 threads are a lot to hold at once! Tie a knot in the bottom of your threads and add a bead or a weight. This keeps them from slipping back up through the center hole while you work.
- Color is King: The setup diagram is entirely based on spatial color placement. If you were to swap the pink for turquoise and the purple for yellow, the exact same sequence chart would produce a completely different-looking braid.
- Check Your Disk: There are different types of Kumihimo disks (Round, Octagon, Square). This specific setup uses a standard 16-slot round/octagonal disk. Make sure you are using the right tool!
- Mark Your Threads: Because 16 threads can get tangled, it is highly recommended to use small bobbins or mark the ends of your threads with tiny pieces of tape until you get them loaded into the right slots.
Practice Patience
The jump from 8-strand to 16-strand braiding does require a little more patience and focus. You will be checking your chart frequently in the beginning.
However, here is the magic secret: once you complete the sequence a few times, you will start to see the rhythm. Your hands will learn the moves, and the braid will begin to form beautifully below the disk. The satisfaction of watching those complex pink and purple stripes grow is absolutely worth the extra effort!
Conclusion
The 16-strand Kumihimo braid is a fantastic next step for any braider. By using the visual setup diagram and following the numerical sequence chart, you can produce stunning, high-quality cords that look professionally manufactured.
Don’t forget to save this chart to your Pinterest board for your next craft night! Let us know in the comments: What color palette would you use for this 16-strand setup?
Happy Braiding! 🧵🌀✨


