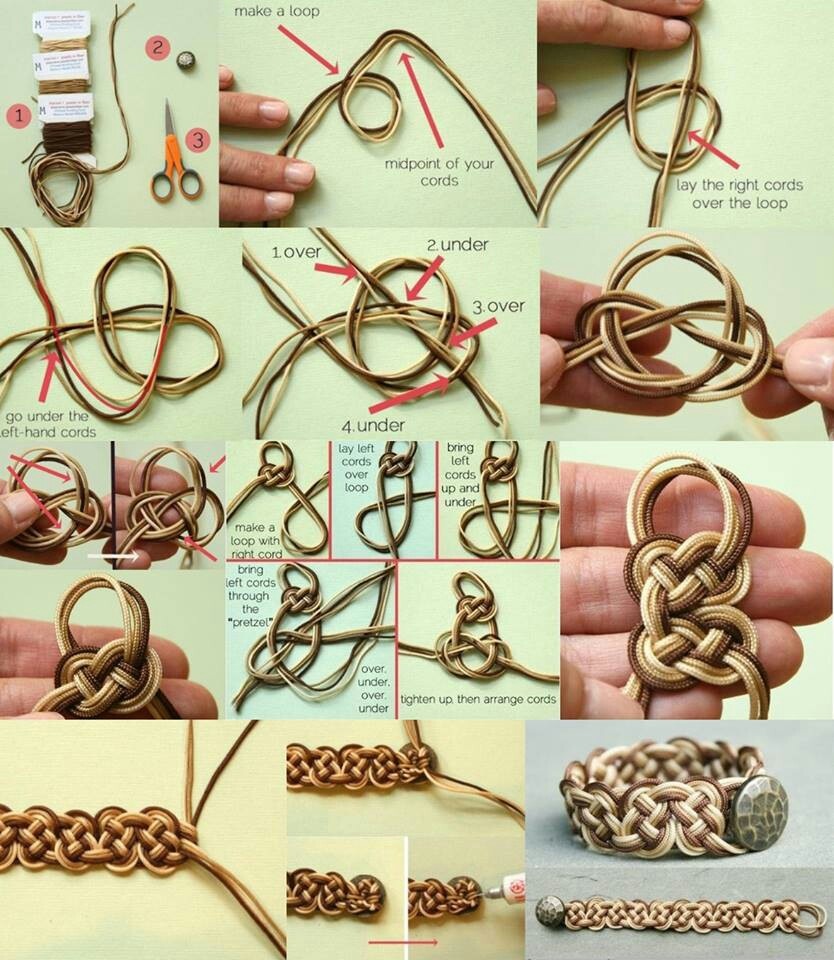
This guide provides the full meaning, step-by-step instructions, and a deep understanding of this particular knotting technique — which appears to be a woven loop start or a pretzel-style knot commonly used in macrame and paracord projects to create a secure, decorative loop at the beginning of a bracelet or keychain.
How to Make a Pretzel Loop Start for Macrame & Paracord: Complete Guide
Introduction: The Perfect Loop Start
When making a macrame bracelet, keychain, or lanyard, the way you start your project determines how secure and professional the finished piece looks. The pretzel loop start (sometimes called a “woven loop” or “figure-eight loop”) creates a strong, adjustable, or fixed loop at the beginning of your work without needing a separate clasp.
In this guide, you will learn:
- The full meaning of each step in the diagram
- Step-by-step instructions with clear explanations
- How to arrange your cords for a perfect result
- Common mistakes and how to fix them
Why Use a Pretzel Loop Start?
| Benefit | Explanation |
|---|---|
| No metal clasp needed | Creates a built-in loop that can act as a button closure or attachment point |
| Strong and secure | The woven structure distributes tension evenly |
| Professional appearance | Looks neat and finished on both sides |
| Adjustable | Can be made larger or smaller depending on your needs |
| Works with any cord | Paracord, macrame cord, satin cord, or jade thread |
Part 1: Understanding the Diagram Text
Your image contains fragmented instructions. Let me decode each line:
| Original Text | Full Meaning |
|---|---|
| make a loop | Create a loop with your cords (this will become the top of your bracelet or keychain) |
| midpoint of your cords | Find the center point of your cord(s) — fold the cord in half |
| lay the right cords over the loop | Take the right-side working cords and place them across the loop you made |
| 1. over 2. under 3. over | Weave the right cord: go over the left cord, then under, then over — a classic over-under-over pattern |
| go under the left-hand cords | Pass the working cord underneath the left-side cords |
| 4. under | Fourth step: pass under |
| lay left cords over | Take the left-side working cords and place them over the structure |
| bring left cords loop up and under | Bring the left cords up through the loop and then under |
| make a loop with right cord | Form a new loop using the right cord |
| bring left cords through the “pretzel” | Pass the left cords through the pretzel-shaped woven structure |
| over, under, over, under | Continue the over-under weave to lock the knot |
| tighten up. then arrange cords | Pull all strands firmly to tighten the knot, then arrange the cords neatly |
The word “pretzel” is used because the woven loops resemble a pretzel shape before tightening.
Part 2: Step-by-Step How-To (Complete)
Materials
- 2 or more strands of cord (macrame, paracord, or 72号玉线)
- Length: For a bracelet, use approximately 4–5 feet per strand
- A flat surface or clipboard to hold your work
Step 1 — Find the Midpoint
Take your cord(s) and find the exact midpoint. Fold the cord(s) at this point.
Step 2 — Make a Loop
Create a loop at the midpoint. This loop will become the top of your project (e.g., where a button or clasp will attach).
Step 3 — Lay Right Cords Over the Loop
Take the right-side cords (the tails on the right side of the loop) and lay them across the loop you just made.
Step 4 — Weave: Over, Under, Over
Weave the right cord following this pattern:
- Over the left cord
- Under the next cord
- Over the following cord
This creates the first part of the “pretzel” weave.
Step 5 — Go Under the Left-Hand Cords
Pass the right working cord underneath all the left-side cords.
Step 6 — Fourth Pass: Under
Complete a fourth pass going under the next cord.
Step 7 — Lay Left Cords Over
Now take the left-side cords and lay them over the structure you have built.
Step 8 — Bring Left Cords Loop Up and Under
Take the left cords, bring them up through the loop, and then pass them under the adjacent cords.
Step 9 — Make a Loop with the Right Cord
Form a new, small loop using the right cord. This will be part of the locking mechanism.
Step 10 — Bring Left Cords Through the “Pretzel”
Pass the left cords through the center of the pretzel-shaped woven structure.
Step 11 — Continue the Weave: Over, Under, Over, Under
Weave the cords following this sequence:
- Over
- Under
- Over
- Under
This locks the entire knot.
Step 12 — Tighten
Slowly and evenly pull all four cord ends to tighten the knot. The pretzel shape will collapse into a neat, compact loop.
Step 13 — Arrange Cords
Once tightened, arrange the cords so they exit the knot cleanly. You should have:
- A secure loop at the top
- Four cords (or however many you started with) exiting downward, ready for the main body of your project
Part 3: Visualizing the “Pretzel”
Before tightening, the knot resembles a pretzel or a figure-eight with multiple over-under crossings. Here is the path:
    ┌─────┐
    │     │
───┘  ┌──┴──┐
      │     │
───┐  └──┬──┘
    │     │
    └─────┘
The over-under-over-under sequence creates a self-locking structure. When you pull the ends, the loops cinch evenly from both sides.
Part 4: Full Meaning of Each Action
| Action | Why It Matters |
|---|---|
| Find the midpoint | Ensures the loop is centered and both sides are equal length |
| Make a loop | Creates the attachment point (for a button, hook, or key ring) |
| Weave over, under, over | Creates friction that will lock the knot when tightened |
| Go under left-hand cords | Crosses the working cord to the opposite side, creating symmetry |
| Bring left cords through the “pretzel” | Completes the weave so all strands interlock |
| Tighten up | Cinches the entire structure into a compact, professional knot |
| Arrange cords | Ensures the exiting cords are not twisted and lie flat |
Part 5: What to Do After the Pretzel Loop Start
Once you have tightened and arranged your cords, you are ready to begin the main body of your project:
| Project Type | Next Steps |
|---|---|
| Bracelet | Begin square knots, cobra weave, or snake knots down the length |
| Keychain | Continue with a series of diamond knots or a monkey’s fist at the end |
| Lanyard | Add a sliding knot or a lobster clasp to the loop |
| Zipper pull | Work a few centimeters of knots, then finish with a stopper knot |
Part 6: Common Mistakes & Fixes
| Mistake | Cause | Fix |
|---|---|---|
| Loop is too large or too small | Did not adjust loop size before tightening | Before pulling tight, adjust the loop to your desired size |
| Knot becomes lopsided | Pulled one side harder than the other | Pull all four ends evenly and simultaneously |
| Cords are twisted after tightening | Did not arrange cords before final cinch | Before the final pull, straighten all cords so they lie flat |
| Forgot the over-under sequence | Lost track of the weave | Practice on a scrap cord first; use two colors to see the path |
| “Pretzel” collapses before tightening | Let go of the structure | Pin the loop to a foam board as you weave |
Part 7: Variations of the Pretzel Loop Start
| Variation | Modification | Best For |
|---|---|---|
| Single cord | Use one thick cord instead of multiple strands | Simple keychains, drawstring ends |
| Two colors | Use two different colored cords to see the weave path | Learning the knot, decorative two-tone loops |
| Four strands | Standard version shown in the diagram | Bracelets, lanyards |
| Eight strands | Double the cords for a thicker, more substantial loop | Heavy-duty keychains, bag handles |
Vocabulary Cheat Sheet
| Term | Meaning |
|---|---|
| Midpoint | The center of your cord (folded in half) |
| Working cord | The cord you are actively weaving |
| Loop | The circular opening at the top of the knot |
| Pretzel | The woven, figure-eight shape before tightening |
| Over-under weave | Alternating passing above and below other cords |
| Tighten | Pull cords evenly to cinch the knot |
| Arrange cords | Straighten and position the exiting cords |
Quick Reference: The Over-Under Sequence
| Step | Action |
|---|---|
| 1 | Over |
| 2 | Under |
| 3 | Over |
| 4 | Under |
| 5 | Over |
| 6 | Under |
This alternating pattern is what makes the pretzel loop self-locking.
What to Make with This Technique
| Project | Why This Loop Start Works |
|---|---|
| Button closure bracelet | The loop goes over a wooden or metal button at the other end |
| Keychain | The loop attaches to a split ring or keychain hardware |
| Zipper pull | The loop is just the right size for a zipper tab |
| Lanyard | The loop snaps onto a badge holder or phone case |
| Bag charm | The loop hangs from a bag strap or D-ring |
SEO Blog Post Optimization
| Meta Tag | Suggested Content |
|---|---|
| Title | How to Make a Pretzel Loop Start for Macrame & Paracord (Over-Under Weave) |
| Meta Description | Learn the pretzel loop start — a woven over-under-over-under knot that creates a secure loop for bracelets, keychains, and lanyards. Step-by-step guide. |
| URL slug | /pretzel-loop-start-macrame-guide |
| Keywords | pretzel knot, macrame loop start, over under weave, paracord loop, bracelet loop, figure eight loop, woven loop |
| Alt text for image | Diagram showing pretzel loop start with over-under-over-under weaving sequence for macrame and paracord projects |
Final Pro Tip: Practice with Two Colors
The hardest part of the pretzel loop start is tracking which cord goes over and which goes under. Use two different colored cords (e.g., purple and yellow) for your first few attempts. You will clearly see:
- Purple over yellow
- Yellow under purple
- The “pretzel” shape becomes obvious
Once you master it with two colors, switch to a single color or multiple strands of the same color.
Summary: You Can Now Make a Pretzel Loop Start
| Step | You Can Now… |
|---|---|
| 1 | Find the midpoint and make a loop |
| 2 | Weave right cords over, under, over |
| 3 | Pass under left-hand cords |
| 4 | Lay left cords over and bring through the pretzel |
| 5 | Complete the over-under sequence |
| 6 | Tighten evenly |
| 7 | Arrange cords for the main project |
This loop start is a foundational skill for advanced macrame and paracord work. Practice it 3–4 times on scrap cord, and it will become second nature.


