This guide provides the full meaning, step-by-step instructions, and a deep understanding of how to crochet a magic circle (also called a magic ring or adjustable loop) — an essential technique for starting projects in the round without leaving a hole in the center.
Introduction: Why the Magic Circle Changes Everything
The magic circle (also known as the magic ring, magic loop, or adjustable loop) is one of the most valuable techniques in crochet. It allows you to start a round project — such as a hat, amigurumi (stuffed toy), coaster, or mandala — with a center hole that can be pulled completely closed. Unlike the traditional method of chaining 4 and joining with a slip stitch, the magic circle leaves no gap.
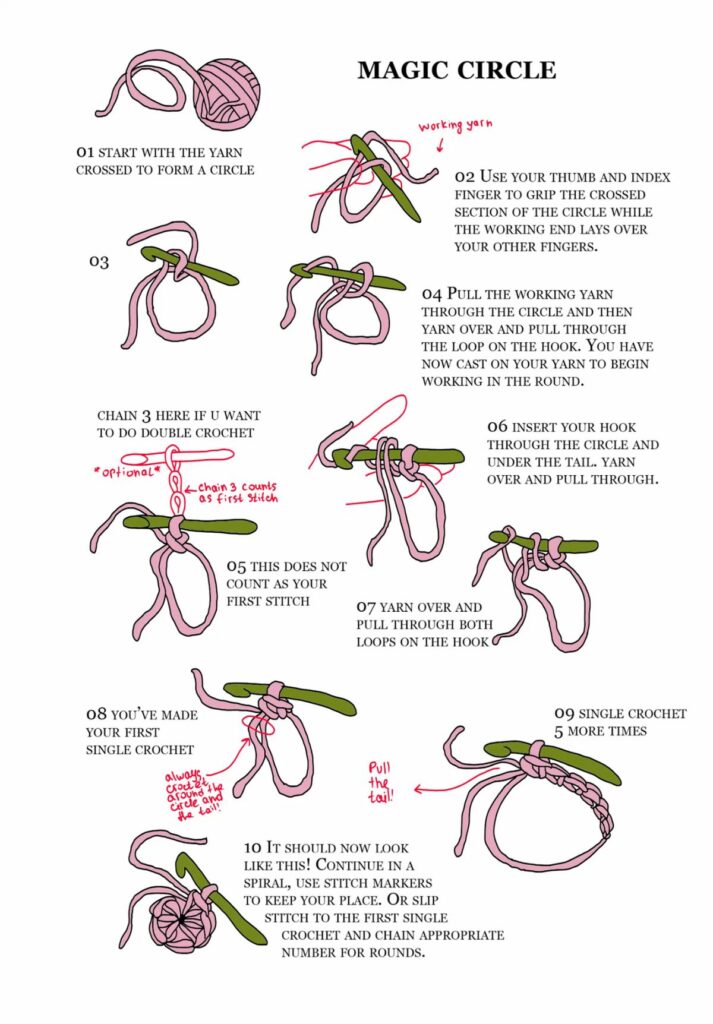
In this guide, you will learn:
- The full meaning of each step in the magic circle process
- Step-by-step instructions with clear explanations
- How to work single crochet and double crochet into the magic circle
- Common mistakes and how to fix them
Why Use a Magic Circle?
| Benefit | Explanation |
|---|---|
| No center hole | Pull the tail to close the ring completely |
| Adjustable size | Make the ring larger or smaller before tightening |
| Professional finish | Amigurumi and hats look much neater |
| Works for any stitch | Single crochet, double crochet, treble — all work |
| Easy to learn | Follow these 10 steps and practice 2–3 times |
When to Use a Magic Circle vs. a Chain Loop
| Feature | Magic Circle | Chain Loop (ch 4, sl st) |
|---|---|---|
| Center hole | Closable (no hole) | Permanent hole |
| Best for | Amigurumi, hats, coasters | Doilies, motifs that want a hole |
| Difficulty | Slightly harder | Very easy |
| Adjustability | Yes (pull tail to tighten) | No (fixed size) |
Rule of thumb: If you do NOT want a hole in the center of your work, use a magic circle.
Part 1: Step-by-Step Instructions (Expanded)
Your image breaks the magic circle into 10 clear steps. Below is the complete, detailed explanation of each step.
Step 1: Start with the Yarn Crossed to Form a Circle
| Action | Detail |
|---|---|
| What you do | Cross the yarn to form a circle (loop) |
| Why | This creates the structure of the ring before you insert your hook |
How to do it:
- Hold the yarn tail in your non-dominant hand.
- Wrap the working yarn (the strand attached to the ball) over the tail to form a loop.
- The yarn should look like a circle with a crossed section.
Step 2: Grip the Crossed Section
| Action | Detail |
|---|---|
| What you do | Use your thumb and index finger to grip the crossed section of the circle while the working end lays over your other fingers |
| Why | This holds the ring in place while you work |
How to do it:
- Pinch the crossed section (where the yarn overlaps) between your thumb and index finger.
- Let the working yarn (from the ball) drape over your other fingers for tension.
- The tail end should hang down freely.
Step 3: Insert Hook (implied from typical magic circle instructions)
| Action | Detail |
|---|---|
| What you do | Insert your hook through the center of the circle, from front to back |
| Why | This positions the hook to grab the working yarn |
How to do it:
- With your left hand holding the crossed section, insert your crochet hook through the center of the circle.
- The hook should go under the first strand and over the second.
Step 4: Pull the Working Yarn Through the Circle
| Action | Detail |
|---|---|
| What you do | Pull the working yarn through the circle |
| Why | This creates the first loop on your hook |
How to do it:
- Yarn over (catch the working yarn with your hook).
- Pull the yarn through the center of the circle.
- You now have 1 loop on your hook.
Then yarn over and pull through the loop on the hook — this is actually a chain stitch that secures the ring.
Clarification: Step 4 in your image combines two actions: pulling the working yarn through the circle, then yarning over and pulling through the loop on the hook. This creates a chain stitch that anchors the ring.
You have now cast on your yarn to begin working in the round.
Step 5: Chain 3 Here if You Want to Do Double Crochet
| Action | Detail |
|---|---|
| What you do | If you are making double crochet stitches, chain 3 |
| Why | The chain 3 acts as the turning chain / first double crochet |
How to do it:
- For single crochet (sc): Chain 1 (or chain 0 and work directly into the ring)
- For half double crochet (hdc): Chain 2
- For double crochet (dc): Chain 3
Step 6: This Does NOT Count as Your First Stitch
| Action | Detail |
|---|---|
| What you do | Remember that the chain(s) you just made do not count as your first stitch |
| Why | In magic circle work, the chain is just a height adjuster; the first real stitch is worked into the ring |
How to do it:
- Do not count the turning chain as a stitch.
- Your first stitch will be made in the next step.
Step 7: Insert Your Hook Through the Circle and Under the Tail
| Action | Detail |
|---|---|
| What you do | Insert your hook through the center of the circle and under the tail |
| Why | This captures the tail inside your stitches so you can pull it later to close the ring |
How to do it:
- Insert your hook into the center hole of the magic circle.
- Make sure the hook goes under the yarn tail as well as under the circle.
- This ensures the tail is woven through your first round of stitches.
Yarn over and pull through — you now have 2 loops on your hook.
Step 8: Yarn Over and Pull Through Both Loops on the Hook
| Action | Detail |
|---|---|
| What you do | Yarn over and pull through both loops |
| Why | This completes a single crochet stitch |
How to do it:
- Yarn over.
- Pull through both loops on your hook.
- You have made one single crochet.
Step 9: You’ve Made Your First Single Crochet
| Action | Detail |
|---|---|
| What you do | Celebrate! You have successfully worked one stitch into the magic circle |
| Why | The ring is now anchored with its first real stitch |
Step 10: Single Crochet 5 More Times
| Action | Detail |
|---|---|
| What you do | Work 5 more single crochet stitches into the same magic circle |
| Why | A typical amigurumi start is 6 single crochets in the magic ring |
How to do it:
- Repeat steps 7–9 five more times.
- You will have a total of 6 single crochet stitches worked into the ring.
Step 11: It Should Now Look Like This!
| Action | Detail |
|---|---|
| What you do | Examine your work — you should have a small semi-circle of 6 stitches attached to the ring |
| Why | You are ready to close the ring |
Step 12: Continue in a Spiral or Join with a Slip Stitch
| Action | Detail |
|---|---|
| What you do | Choose your method for continuing in the round |
Option A: Continue in a spiral (for amigurumi)
- Do not join; simply work the next stitch into the first stitch of the round.
- Use a stitch marker to keep track of the beginning of each round.
Option B: Join with a slip stitch (for hats, doilies)
- Insert hook into the first single crochet of the round.
- Yarn over and pull through both the stitch and the loop on your hook (slip stitch).
- Then chain the appropriate number (ch 1 for sc, ch 3 for dc) to start the next round.
Step 13: Pull the Tail to Close the Circle (Missing from your image but essential)
| Action | Detail |
|---|---|
| What you do | Gently pull the yarn tail to close the center of the ring |
| Why | This eliminates the hole completely |
How to do it:
- Locate the yarn tail (the short end, not the working yarn).
- Gently but firmly pull the tail.
- Watch the center hole close completely.
- Do not pull so hard that the yarn breaks or the stitches distort.
Part 2: Complete Summary Table of Steps
| Step | Action |
|---|---|
| 1 | Cross the yarn to form a circle |
| 2 | Grip the crossed section with thumb and index finger |
| 3 | Insert hook through the center of the circle |
| 4 | Pull working yarn through the circle, then chain 1 to secure |
| 5 | Chain 3 (for double crochet) or appropriate turning chain |
| 6 | Remember: chains do not count as your first stitch |
| 7 | Insert hook through the circle and under the tail |
| 8 | Yarn over and pull through both loops (complete 1 sc) |
| 9 | First single crochet made |
| 10 | Single crochet 5 more times (total 6 sc) |
| 11 | Check your work — it should look like a small semi-circle |
| 12 | Continue in a spiral (with stitch markers) or join with slip stitch |
| 13 | Pull the tail to close the center hole |
Part 3: Common Mistakes & Fixes
| Mistake | Cause | Fix |
|---|---|---|
| Ring will not close | Did not crochet over the tail | Make sure you insert your hook through the center and under the tail |
| Ring unravels after tightening | Did not secure with a chain | Always chain 1 after pulling up the first loop |
| Hole remains in center | Did not pull the tail firmly enough | Pull the tail more firmly — it should close completely |
| Stitches are twisted | Inserted hook incorrectly | Make sure the loop is not twisted before you start |
| Can’t find the ring after step 4 | Let go of the loop | Keep holding the crossed section until step 7 |
| Too many or too few stitches | Lost count | Count after each stitch; use stitch markers |
| Chain 3 counted as a stitch | Misunderstood step 6 | Chain 3 is only for height; work your first real stitch into the ring |
Part 4: Magic Circle for Different Stitches
| Stitch Type | Turning Chain | Typical First Round | Best For |
|---|---|---|---|
| Single crochet (sc) | Chain 1 | 6 sc | Amigurumi |
| Half double crochet (hdc) | Chain 2 | 8 hdc | Coasters, hats |
| Double crochet (dc) | Chain 3 | 12 dc | Hats, mandalas |
| Treble crochet (tr) | Chain 4 | 12–15 tr | Lace doilies |
Part 5: What to Make with a Magic Circle
| Project | Magic Circle First Round |
|---|---|
| Amigurumi (stuffed toy) | 6 sc in magic ring |
| Beanie / hat crown | 12 dc in magic ring |
| Coaster | 8 hdc in magic ring |
| Mandala | 12 dc or tr in magic ring |
| Granny circle | 12 dc in magic ring |
| Flower center | 6 sc in magic ring |
SEO Blog Post Optimization
| Meta Tag | Suggested Content |
|---|---|
| Title | How to Crochet a Magic Circle: Complete Step-by-Step Guide for Beginners |
| Meta Description | Learn to crochet a magic circle (magic ring) with this step-by-step guide. Close the center hole completely — perfect for amigurumi, hats, and coasters. |
| URL slug | /how-to-crochet-magic-circle |
| Keywords | magic circle crochet, magic ring crochet, adjustable loop crochet, how to start amigurumi, close center hole crochet |
| Alt text for image | Step-by-step magic circle tutorial showing 10 steps: cross yarn to form circle, grip crossed section, pull yarn through, chain 3 for double crochet, insert hook through circle and under tail, complete first single crochet, work 5 more, continue in spiral or join |
Final Pro Tip: Practice with Thick Yarn
If you are struggling with the magic circle, practice first with thick, smooth yarn (e.g., worsted weight cotton or acrylic) and a larger hook (5mm or 6mm). The larger materials make the circle and the loops easier to see. Once you master it with thick yarn, downsize to thinner yarn and smaller hooks (e.g., 2mm hook with embroidery thread for fine jewelry).
Summary: You Can Now Crochet a Magic Circle
| Step | Skill Learned |
|---|---|
| 1–2 | Form and grip the crossed circle |
| 3–4 | Insert hook and pull yarn through |
| 5 | Chain to the correct height |
| 6 | Understand that chains are not stitches |
| 7–9 | Work single crochet into the ring (capturing the tail) |
| 10 | Complete a full round of 6 sc |
| 11 | Recognize a correctly formed magic circle |
| 12 | Choose spiral or joined rounds |
| 13 | Pull tail to close the center hole |
Practice the magic circle 3–5 times on scrap yarn. Within 10 minutes, it will become second nature — and your amigurumi, hats, and coasters will look professionally made with no center hole.


