How to Make a Beaded Pearl Cube: Easy Beading Tutorial
Learn how to make a beautiful 3D beaded pearl cube with this easy step-by-step tutorial. Perfect for making elegant beaded beads, earrings, and jewelry components!
Introduction: The Magic of Beaded Cubes
Have you ever seen a stunning piece of beaded jewelry and wondered how the artisan created those perfectly square, geometric shapes? The secret lies in the Beaded Cube Stitch, also known as a beaded bead. 🪢✨
Despite its complex, 3D appearance, this technique is surprisingly simple. Using just pearl beads, a needle, and thread, you weave a simple grid that transforms into a beautiful, three-dimensional cube. It’s a technique that feels like magic—a flat piece of beadwork lifts into a perfect square right before your eyes.
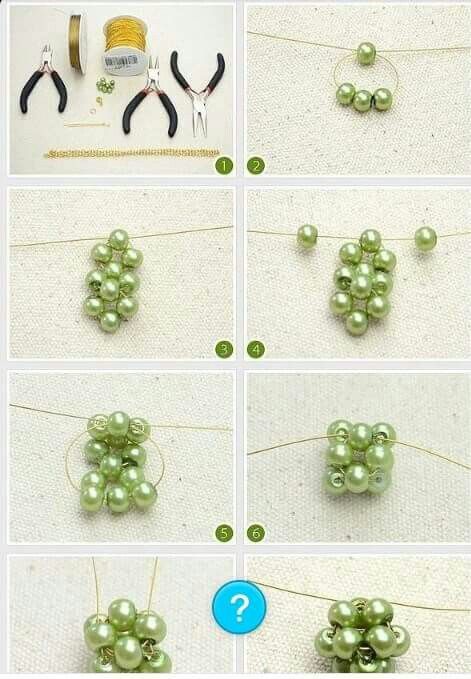
The image above breaks this process down into eight easy-to-follow panels. You will start with a basic wire loop, build a grid of green pearl beads, and then watch it transform into a stunning, dimensional bead perfect for jewelry making. Whether you are a complete beginner or an experienced beadworker, this project is satisfying, versatile, and incredibly rewarding. 🪢✨
What You Will Need
Gather these simple supplies before you start (as shown in Panel 1 of the image):
- Beads: A uniform size of round pearl beads (about 4mm to 6mm). The example uses a soft, glossy green color. You will need approximately 8 to 10 beads per cube.
- Beading Wire or Thread: Flexible beading wire or strong nylon thread (like Nymo or Fireline).
- Beading Needle: A thin needle (size 10 or 12) that fits easily through the holes of your pearls.
- Round Nose Pliers: For closing loops (shown in Panel 1).
- Wire Cutters: For cutting the wire (shown in Panel 1).
- A Headpin or Eye Pin (Optional): If you want to turn your cube into an earring or a charm.
Step-by-Step Tutorial: Building the Pearl Cube
Follow these steps, referencing the numbered panels in the image. The trick is to follow the thread path carefully.
Step 1: Prepare Your Supplies (Panel 1)
- Lay out all your tools: Pliers, wire cutters, beads, and a beading wire.
- Cut a piece of beading wire about 12 inches long.
Step 2: Create the Base Loop (Panel 2)
- Take your wire and string 3 green pearl beads onto it.
- Form a loop by bringing the two ends of the wire together.
- Add 1 green pearl bead to the top of the loop, threading both ends of the wire through it.
- Pull this tight. You now have a tiny “diamond” or rhombus shape. (This is the top of your future cube).
Step 3: Build the Foundation Grid (Panel 3)
- This step creates the structure. You are going to build a 3×3 grid.
- Take the right end of your wire and add 1 pearl bead.
- Take the left end of the wire and add 1 pearl bead.
- Cross both ends of the wire through a new pearl bead. Pull tight.
- Repeat this process one more time. You now have a rectangular column of beads.
- Add one final bead to the right end of the wire.
Step 4: Add the Spacers (Panel 4)
- The diagram shows adding two single spacer beads to the left and right sides of your column.
- These beads are crucial—they help the flat sheet of beadwork transition into a 3D shape later on.
- String 1 bead onto the right wire, and 1 bead onto the left wire.
Step 5: The First Fold (Panel 5)
- This is where the magic begins!
- Bring the left wire and the right wire around to the back of your grid.
- Cross them both through the bead at the very top of your column (the bead from Panel 2/Step 2).
- As you pull the wires tight, watch the flat grid begin to fold upward and inward. It is starting to form the shape of a cube!
Step 6: Completing the Cube Shape (Panel 6)
- Your beadwork is now folding into a 3D box.
- Continue weaving the wire through the edge beads to lock the corners of the cube together.
- You will see the bottom, sides, and top of the cube forming beautifully.
Step 7: The Finished Bead (Panel 7 & 8)
- Tighten the wires completely. You will have a perfect, 3D beaded pearl cube!
- The green pearls create a beautifully textured, geometric shape.
- The Finishing Touch: The image shows a blue question mark in the center of Panel 7. This represents the “core” of the cube. You can leave the cube hollow, or you can fill it with a small bead of stuffing or a contrasting bead to give it extra weight and stability.
- Tie a secure knot with your wires and trim the excess.
Pro-Tips for Perfect Beaded Cubes
- Uniform Beads are Key: The success of this project depends entirely on using beads that are perfectly uniform in size. If one bead is slightly larger, your cube will look lopsided. High-quality glass pearls are the best choice.
- Tight Tension: As you weave the final sides (Panels 5 and 6), pull your threads tight. The tighter you weave, the more defined and geometric your cube will look.
- Watch Your Wire: If you are using nylon thread, be careful not to pull it too hard against the sharp edges of the bead holes, or it might break. Use a smooth beading wire for extra durability.
- Make Multiple Cubes: Once you master the first cube, it becomes addictive! Make 5 or 6 in different colors and sizes.
Creative Uses for Your Beaded Pearl Cubes
These versatile beaded beads can be used in a variety of jewelry and craft projects:
- Dangle Earrings: Thread a beaded cube onto a headpin, create a wire loop at the top, and attach it to an earring hook. (Just like the project in Panel 1!).
- Bracelet Charms: String a few cubes onto a stretchy bracelet band alongside other beads or charms.
- Necklace Pendants: Use a single, large beaded cube as the centerpiece for a simple chain necklace.
- Embellishments: Sew them onto handbags, fabric belts, or the cuffs of jackets for a unique, textured look.
Conclusion
The Beaded Pearl Cube stitch is a fantastic example of how a few simple moves can create something truly impressive. From a flat wire loop to a beautiful, 3D geometric bead, this project is the perfect way to elevate your beading skills.
Save this guide to your Pinterest board for your next jewelry-making session! Let me know in the comments: What size and color of pearls are you planning to use for your first cube?
Happy Beading!