The Beading spiral rope (also called a twisted rope or spiral stitch) is one of the most popular and versatile bead-weaving techniques. By combining core beads (typically larger) and outer spiral beads (typically smaller), you create a naturally twisting, flexible rope that resembles a candy cane or barber pole. This technique is perfect for necklaces, bracelets, lanyards, and watch bands.
In this guide, you will learn:
- The full meaning of each step in the spiral rope process
- Step-by-step instructions for creating the foundation and continuing the spiral
- How to calculate how many times to thread through your core beads
- Materials needed for your first piece
Best for beginners: Size 8 and size 11 seed beads are ideal for making your first spiral rope.
Why Make a Beaded Spiral Rope?
| Benefit | Explanation |
|---|---|
| Endless experimentation | Change colors, bead sizes, and ratios for infinite variations |
| Naturally twisting | The stitch creates a beautiful, organic spiral |
| Flexible and comfortable | Moves like fabric, not stiff |
| Fast to learn | The repeating pattern is easy to memorize |
| Versatile | Use for necklaces, bracelets, keychains, lanyards |
Part 1: Materials Needed
| Material | Specification | Notes |
|---|---|---|
| Core beads | Size 8/0 seed beads | Larger beads (approximately 2.5mm) |
| Outer spiral beads | Size 11/0 seed beads | Smaller beads (approximately 1.5mm) |
| Beading thread | Nylon (Nymo, FireLine, or Wildfire) | Strong, flexible |
| Beading needle | Size 10 or 12 | Fine enough to pass through size 11 beads |
| Scissors | Sharp | For cutting thread |
Why size 8 and size 11? The size difference (2.5mm vs. 1.5mm) creates the dramatic spiral effect. Using beads of the same size will not produce a visible twist.
Part 2: Understanding the Structure
Core vs. Outer Spiral Beads
| Component | Role | Size | Quantity per Step |
|---|---|---|---|
| Core beads | Form the central “backbone” of the rope | Size 8/0 | 3 beads in foundation, 1 new bead per step |
| Outer spiral beads | Wrap around the core, creating the visible twist | Size 11/0 | 5 beads per step |
The Basic Ratio
| Step | Core Beads | Outer Spiral Beads |
|---|---|---|
| Foundation | 3 | 5 |
| Each repeat | +1 | +5 |
How the Spiral Forms
The spiral is created because the outer beads (size 11) are smaller than the core beads (size 8). As you add each new set, the outer beads sit at an angle, forcing the rope to twist naturally.
Part 3: Step-by-Step Instructions
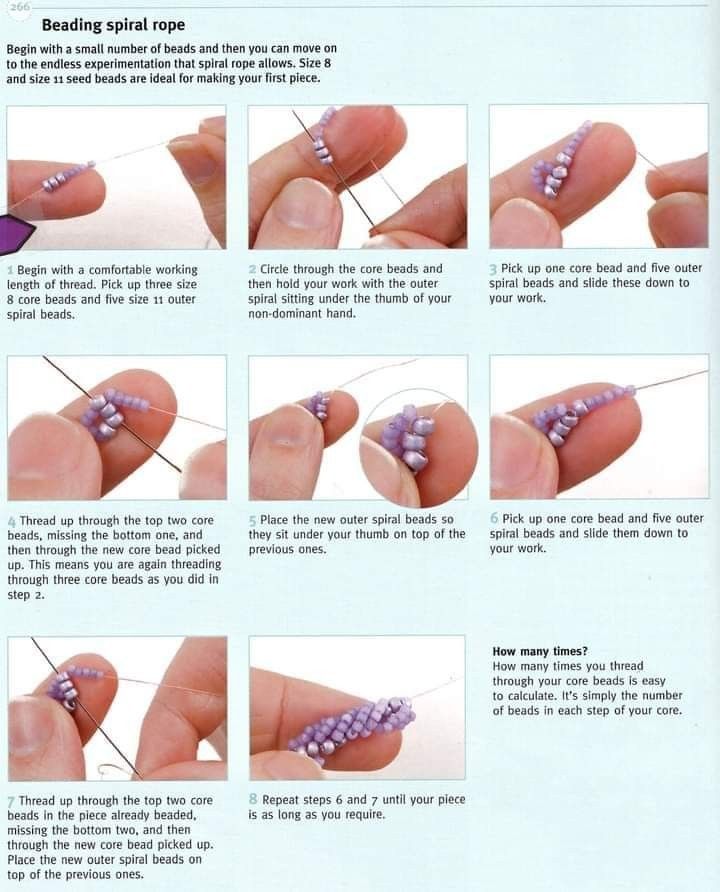
Step 1: Create the Foundation
| Action | Detail |
|---|---|
| Begin with a comfortable working length of thread | Approximately 2–3 feet (60–90 cm) |
| Pick up three size 8 core beads | These form the backbone |
| Pick up five size 11 outer spiral beads | These will wrap around the core |
Result: Your needle has 8 beads total (3 large + 5 small).
Step 2: Circle Through the Core Beads
| Action | Detail |
|---|---|
| Pass your needle back through the three core beads | Form them into a small circle |
| Hold your work with the outer spiral sitting under the thumb of your non-dominant hand | This keeps the spiral in place |
Result: The 3 core beads form a small ring, with the 5 outer beads sitting to the side.
Important: The outer spiral beads should be positioned under your thumb — this will become the top of your work.
Step 3: Pick Up the Next Set
| Action | Detail |
|---|---|
| Pick up one core bead (size 8) | This will extend the backbone |
| Pick up five outer spiral beads (size 11) | These will form the next twist |
| Slide these beads down to your work | Position them against the previous beads |
Result: You have 1 new core bead + 5 new outer beads ready to add.
Step 4: Thread Through the Core Beads (First Method)
| Action | Detail |
|---|---|
| Thread up through the top two core beads | In the piece already beaded |
| Miss the bottom one | Do not go through the lowest core bead |
| Then thread through the new core bead you just picked up | This locks the new bead into the backbone |
Result: You have now added one new core bead to the backbone.
Why skip the bottom core bead? This is what creates the spiral. You are effectively moving your thread up through the core stack, not down.
Step 5: Position the New Outer Spiral Beads
| Action | Detail |
|---|---|
| Place the new outer spiral beads so they sit under your thumb | On top of the previous ones |
| They should nestle against the previous spiral beads | Creating a continuous twist |
Result: The spiral is growing.
Step 6: Repeat the Pattern
| Action | Detail |
|---|---|
| Pick up one core bead (size 8) | Same as Step 3 |
| Pick up five outer spiral beads (size 11) | Same as Step 3 |
| Slide them down to your work | Same as Step 3 |
Step 7: Thread Through the Core Beads (Second Method — Longer Core)
| Action | Detail |
|---|---|
| Thread up through the top two core beads in the piece already beaded | Count from the top |
| Miss the bottom two | Skip the lowest two core beads |
| Then thread through the new core bead picked up | Lock it in place |
Result: You have added another core bead to the backbone.
Why skip two beads now? As the core gets longer, you need to adjust how many beads you skip to maintain the spiral tension. The general rule is: skip the same number of beads as you started with, minus one? Let me explain in the next section.
Step 8: Repeat Until Desired Length
| Action | Detail |
|---|---|
| Continue repeating Steps 6 and 7 | Until your piece is as long as you require |
| The pattern is highly repetitive | You will quickly memorize the rhythm |
Result: A beautiful, twisting spiral rope!
Part 4: The “How Many Times” Calculation
This is the most important concept in spiral rope. Your image explains it clearly:
“How many times you thread through your core beads is easy to calculate. It’s simply the number of beads in each step of your core.”
Core Bead Count Explanation
| Foundation core | 3 beads |
| Each new step | +1 core bead |
When you thread up through the core beads, you always thread through all but one of the core beads in your current core stack.
| Step Number | Core Beads in Stack | Thread Through (top) | Skip (bottom) |
|---|---|---|---|
| Foundation | 3 | 2 | 1 |
| After adding 1 | 4 | 3 | 1 |
| After adding 2 | 5 | 4 | 1 |
| After adding N | 3+N | 2+N | 1 |
Simplified rule: Always go through the top two core beads in the existing stack, then through your new core bead. The “skip” count (how many you skip at the bottom) increases as your core gets longer, but the pattern of going through the top two remains constant in this design.
Alternative Interpretation (from step 7)
Some spiral rope patterns instruct you to:
- Thread through the top two core beads
- Skip the bottom two
- Then through the new core bead
This works when your core has at least 4 beads. For consistency, pick one method and stick with it throughout your project.
Part 5: Visual Summary of the Thread Path
Foundation (Step 2)
Core beads:    [8] — [8] — [8]
Outer beads:   (11) (11) (11) (11) (11)
Thread path:   Through all 3 core beads (forming a circle)
Adding a New Segment (Steps 4 & 7)
Existing core: [8] — [8] — [8] — [8] (length varies)
New core:      [8]
Thread path:   ↑ through top 2 core beads → through new core bead
Outer beads:   (11) (11) (11) (11) (11) (nestled on top)
Part 6: Color Ideas & Design Variations
Color Patterns
| Pattern | Core Color | Outer Spiral Color | Effect |
|---|---|---|---|
| Solid | One color | Same color | Subtle texture (spiral is less visible) |
| Contrast | Dark | Light | Bold, graphic spiral |
| Gradient | Light to dark | Matching gradient | Ombre effect |
| Striped | Alternating colors | One color | Color-block spiral |
| Rainbow | White | Rainbow sequence | Candy cane effect |
Purple Artisanal Version
| Component | Color |
|---|---|
| Core beads (size 8) | Deep eggplant (dark purple) |
| Outer spiral beads (size 11) | Lavender and amethyst (alternating or mixed) |
Bead Size Variations
| Core Size | Outer Size | Effect |
|---|---|---|
| 8/0 | 11/0 | Standard, dramatic twist |
| 6/0 | 8/0 | Larger, chunkier rope |
| 11/0 | 15/0 | Delicate, fine rope |
Part 7: Finishing the Spiral Rope
Adding a Clasp
| Step | Action |
|---|---|
| 1 | When the rope reaches desired length, weave the thread back through several core beads |
| 2 | Attach a jump ring to the end core beads |
| 3 | Attach a lobster clasp or toggle clasp |
| 4 | Repeat on the other end |
Securing Thread Ends
| Action | Detail |
|---|---|
| Weave the tail back through 5–6 beads | Go in different directions |
| Tie a surgeon’s knot | Between beads (invisible) |
| Weave through 5–6 more beads | To hide the tail |
| Trim close to the bead | Be careful not to cut the thread holding the rope together |
Part 8: Common Mistakes & Fixes
| Mistake | Cause | Fix |
|---|---|---|
| Spiral is not twisting | Bead sizes too similar | Use size 8 and size 11 (or a 3-size difference) |
| Rope is stiff | Tension too tight | Loosen slightly; the rope should be flexible |
| Rope is floppy / gappy | Tension too loose | Pull each new set snugly |
| Core beads show unevenly | Skipped inconsistent number of beads | Always skip the same number of bottom core beads |
| Thread breaks | Tension too tight or old thread | Use fresh thread; relax tension |
| Needle won’t pass through size 11 beads | Needle too large | Use a size 12 or 13 beading needle |
| Losing count of beads | Forgot how many outer beads | Always pick up exactly 5 outer beads |
Part 9: Project Ideas
| Project | Length | Notes |
|---|---|---|
| Bracelet | 6–8 inches | Use a clasp or make it continuous |
| Necklace | 16–20 inches | Longer rope, more dramatic |
| Lanyard | 18–24 inches | Attach to ID badge or phone |
| Keychain | 4–6 inches | Add a key ring to one end |
| Watch band | Adjustable | Attach to watch lugs |
SEO Blog Post Optimization
| Meta Tag | Suggested Content |
|---|---|
| Title | Beading Spiral Rope Tutorial: How to Make a Twisted Beaded Rope |
| Meta Description | Learn to make a beaded spiral rope with size 8 and size 11 seed beads. Step-by-step instructions for the classic twisted rope technique. Perfect for necklaces and bracelets. |
| URL slug | /beading-spiral-rope-tutorial |
| Keywords | beading spiral rope, spiral rope stitch, twisted beaded rope, size 8 seed beads, size 11 seed beads, bead weaving tutorial |
| Alt text for image | Beading spiral rope tutorial showing foundation with 3 size 8 core beads and 5 size 11 outer beads, then repeating with one core bead and five outer beads |
Final Pro Tip: Practice with Two Contrasting Colors
For your first spiral rope, use high-contrast colors for the core and outer beads:
- Core: Black (size 8)
- Outer: White (size 11)
You will clearly see the spiral form and easily spot any mistakes. Once you master the technique, switch to beautiful purple artisanal color combinations.
Summary: You Can Now Make a Beaded Spiral Rope
| Step | Skill Learned |
|---|---|
| 1 | Pick up 3 core + 5 outer beads (foundation) |
| 2 | Circle through the 3 core beads |
| 3 | Pick up 1 new core + 5 new outer beads |
| 4 | Thread through top 2 core beads, skip bottom, through new core |
| 5 | Position outer beads under your thumb |
| 6–7 | Repeat until desired length |
| 8 | Finish and add a clasp |
This beautiful, twisting rope is endlessly customizable. Change colors, bead sizes, and lengths to create unique pieces for every occasion.


