Learn to make an adjustable crochet flower bracelet (pulseira de flores em crochê) using the puff stitch. Step-by-step guide with 2.0 mm hook, cotton yarn, and sliding closure.
Introduction
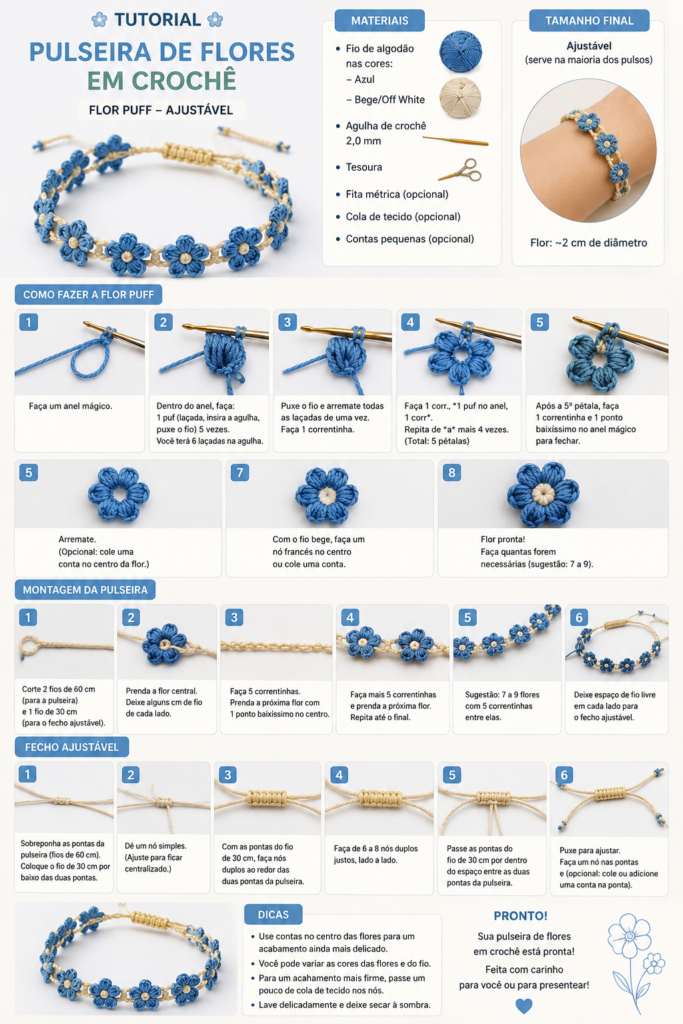
The Crochet Flower Bracelet (Pulseira de Flores em Crochê) is a delicate, feminine accessory that combines the beauty of puff flowers with an adjustable sliding closure. Each flower measures approximately 2 cm in diameter, and the bracelet is made by connecting multiple flowers with chains. The result is a lightweight, comfortable bracelet that fits most wrists thanks to the adjustable knot closure.
In this tutorial, you will learn:
- How to make the puff flower (flor puff) using a magic ring
- How to connect flowers with chains
- How to create an adjustable sliding closure (fecho ajustável)
- Optional: adding beads to flower centres for extra elegance
Colours shown: Blue (azul) and Beige/Off White (bege/off white). Use any colours you love!
Difficulty & Time
| Aspect | Details |
|---|---|
| Level | Intermediate (requires basic crochet knowledge – magic ring, puff stitch) |
| Time | 2–3 hours for a bracelet with 7–9 flowers |
| Technique | Puff stitch (puf), magic ring (anel mágico), chains (correntinhas) |
Materials & Tools
| Category | Item | Notes |
|---|---|---|
| Yarn | Cotton yarn (algodão) – Blue + Beige/Off White | Thin weight (fingering or size 10 crochet thread) |
| Hook | 2.0 mm crochet hook (agulha de crochê 2,0 mm) | |
| Bracelet cords | Cotton yarn – 2 pieces of 60 cm each | For the bracelet structure |
| Closure cord | Cotton yarn – 1 piece of 30 cm | For the adjustable sliding knot |
| Tools | Scissors (tesoura), tape measure (fita métrica – optional) | |
| Optional | Fabric glue (cola de tecido), small beads (contas pequenas) | For centre decoration and securing knots |
Yarn thickness: Use thin cotton yarn (size 5 or 10 crochet thread). Thicker yarn will produce larger flowers (3–4 cm diameter).
Understanding the Puff Stitch (Ponto Puf)
The puff stitch creates a raised, fluffy petal. For this pattern, each puff is made by:
| Step | Action |
|---|---|
| 1 | Yarn over (laçada) |
| 2 | Insert hook into the magic ring |
| 3 | Pull up a loop (puxe o fio) |
| 4 | Repeat steps 1–3 five times |
| 5 | You will have 6 loops on the hook (5 unfinished + 1 initial) |
| 6 | Yarn over and pull through all 6 loops at once |
Each puff becomes one petal. Five puffs = one complete flower.
Step-by-Step Instructions
Part 1: How to Make the Puff Flower (Como Fazer a Flor Puff)
Step 1: Create a Magic Ring (Anel Mágico)
| Action | Details |
|---|---|
| 1 | Wrap the yarn around your fingers to form a loop. |
| 2 | Insert your 2.0 mm hook into the loop. |
| 3 | Pull up a loop of yarn. |
| 4 | Chain 1 to secure. |
The magic ring allows you to pull the centre tight later, leaving no hole.
Step 2: Make the First Puff (Inside the Magic Ring)
| Action | Details |
|---|---|
| 1 | Yarn over (laçada). |
| 2 | Insert hook into the magic ring. |
| 3 | Pull up a loop (puxe o fio) – you now have 2 loops on hook? Wait, count carefully. |
| 4 | Repeat (yarn over, insert, pull up) 5 times total. |
| 5 | You will have 6 loops on your hook (the initial chain loop + 5 incomplete puff loops). |
This is the most important step. Do not pull through until you have 6 loops.
Step 3: Close the Puff
| Action | Details |
|---|---|
| 1 | Yarn over (laçada). |
| 2 | Pull through all 6 loops on the hook at once (puxe o fio e arremate todas as laçadas de uma vez). |
| 3 | Chain 1 (faça 1 correntinha) to close the puff. |
Congratulations – you have made one petal!
Step 4: Repeat for All 5 Petals
| Action | Details |
|---|---|
| 1 | Chain 1 (1 corr.) |
| 2 | Make another puff inside the magic ring (1 puf no anel). |
| 3 | Chain 1 (1 corr.) |
| 4 | Repeat from * to * 4 more times (total of 5 puffs / 5 petals). |
Pattern: 1 puff, 1 chain – repeat 5 times total.
Step 5: Close the Flower
| Action | Details |
|---|---|
| 1 | After the 5th petal, make 1 chain (1 correntinha). |
| 2 | Make 1 slip stitch (ponto baixíssimo) into the magic ring to close. |
| 3 | Pull the magic ring tail tightly to close the centre hole. |
| 4 | Weave in the ends or cut, leaving a tail for attaching to the bracelet. |
Optional: Add a small bead (conta pequena) to the centre of the flower with fabric glue (cola de tecido).
Step 6: Repeat for All Flowers
| Number of Flowers | Bracelet Length |
|---|---|
| 7 flowers | Short (fits small wrists, approx. 14–15 cm) |
| 8 flowers | Medium (average wrist, approx. 16–17 cm) |
| 9 flowers | Long (larger wrist or looser fit, approx. 18–19 cm) |
Make all flowers before starting assembly.
Part 2: Assembling the Bracelet (Montagem da Pulseira)
Step 1: Prepare the Bracelet Cords
| Action | Details |
|---|---|
| 1 | Cut 2 pieces of yarn, each 60 cm long – for the bracelet structure. |
| 2 | Cut 1 piece of yarn, 30 cm long – for the adjustable closure (fecho ajustável). |
| 3 | (Optional) Lightly glue the ends to prevent fraying. |
Use the same colour as your flowers or a contrasting colour for the cords.
Step 2: Attach the First (Central) Flower
| Action | Details |
|---|---|
| 1 | Take the two 60 cm cords and hold them together as one. |
| 2 | Place the central flower at the middle point of the cords. |
| 3 | Use the flower’s tail (or a new piece of yarn) to sew or slip stitch the flower to the cords. |
| 4 | Leave a few cm of cord free on each side of the flower (for the adjustable closure). |
Deixe alguns cm de fio de cada lado – leave a few cm of thread on each side.
Step 3: Chain Between Flowers
| Action | Details |
|---|---|
| 1 | From the centre flower, work to the left side. |
| 2 | Make 5 chains (5 correntinhas) . |
| 3 | Attach the next flower using 1 slip stitch (1 ponto baixíssimo) through the centre of the flower. |
| 4 | Make another 5 chains. |
| 5 | Attach the next flower. |
| 6 | Repeat until you have attached half of the flowers (e.g., 3 flowers on left side + centre + 3 on right = 7 total). |
Sugestão: 7 a 9 flores com 5 correntinhas entre elas – 7 to 9 flowers with 5 chains between them.
Step 4: Complete Both Sides
| Side | Number of Flowers | Chains Between |
|---|---|---|
| Left of centre | 3 flowers | 5 chains each |
| Centre | 1 flower | – |
| Right of centre | 3 flowers | 5 chains each |
| Total | 7 flowers |
For 9 flowers: 4 left + centre + 4 right.
Step 5: Leave Space for the Adjustable Closure
| Action | Details |
|---|---|
| 1 | After attaching the last flower on each end, do not cut the cords. |
| 2 | Leave the two 60 cm cords extending freely on both ends (about 10–15 cm each side). |
| 3 | These will be used to create the sliding knot closure. |
Deixe espaço de fio livre em cada lado para o fecho ajustável – leave free thread space on each side for the adjustable closure.
Part 3: Adjustable Closure (Fecho Ajustável)
The adjustable closure allows the bracelet to fit most wrists without a metal clasp.
Step 1: Overlap the Two Ends (Sobreponha as pontas)
| Action | Details |
|---|---|
| 1 | Bring the two ends of the bracelet together so they overlap by about 3–4 cm. |
| 2 | The two 60 cm cords from each end should lie parallel to each other. |
Step 2: Position the 30 cm Cord
| Action | Details |
|---|---|
| 1 | Take the 30 cm cord. |
| 2 | Place it underneath the overlapped bracelet cords (por baixo das duas pontas). |
| 3 | Centre the 30 cm cord so equal lengths hang on both sides. |
Step 3: Tie a Simple Knot (Dê um nó simples)
| Action | Details |
|---|---|
| 1 | Tie a simple overhand knot with the 30 cm cord around the two bracelet cords. |
| 2 | Adjust so the knot is centred over the overlap. |
Step 4: Make Double Knots (Nó Duplos)
| Action | Details |
|---|---|
| 1 | Using the two ends of the 30 cm cord, tie double knots (two overhand knots stacked) around the two bracelet cords. |
| 2 | Make 6 to 8 double knots (de 6 a 8 nó duplos). |
| 3 | Push each knot tightly against the previous one so they sit side by side (lado a lado). |
These knots will slide along the bracelet cords when you pull them.
Step 5: Pass Ends Through the Gap
| Action | Details |
|---|---|
| 1 | Take the two ends of the 30 cm cord. |
| 2 | Pass them through the space between the two bracelet cords (por dentro do espaço entre as duas pontas da pulseira). |
| 3 | Pull gently to tighten. |
Step 6: Final Adjustments & Finish
| Action | Details |
|---|---|
| 1 | Pull the ends to adjust the bracelet size – the sliding knots will move along the cords. |
| 2 | When satisfied, tie a final overhand knot at the very ends of the 30 cm cord. |
| 3 | Optional: Add a small bead to each end of the 30 cm cord for decoration. |
| 4 | Optional: Apply a tiny drop of fabric glue (cola de tecido) to the final knots to secure them. |
| 5 | Cut any excess cord, leaving about 1 cm beyond the final knot. |
Puxe para ajustar – pull to adjust. Your bracelet is now adjustable!
Pro Tips (Dicas)
| Tip | Why It Matters |
|---|---|
| Use contas no centro das flores (add beads to flower centres) | Beads hide the magic ring tail and add sparkle. |
| Varie as cores (vary the colours) | Make each flower a different colour for a rainbow effect. |
| Passe um pouco de cola de tecido nos nós (add a little fabric glue to the knots) | Prevents the closure from loosening over time. |
| Lave delicadamente (wash gently) | Hand wash in cool water and dry in the shade (deixe secar à sombra). |
| Use fio de algodão (use cotton yarn) | Cotton holds its shape better than acrylic for puff stitches. |
Troubleshooting Common Problems
| Problem | Cause | Solution |
|---|---|---|
| Puff stitch is flat, not puffy | Not enough loops on hook | Count: you need 6 loops before pulling through. |
| Centre hole is large | Magic ring not pulled tight enough | Pull the tail firmly after closing the flower. |
| Flowers are different sizes | Inconsistent tension | Practice 2–3 flowers before making the final set. |
| Bracelet twists | Chains between flowers are too tight | Make chains loosely – 5 chains should be about 1.5 cm long. |
| Closure won’t slide | Knots too tight or too many wraps | Use 6–8 double knots only. Test slide before cutting ends. |
Variations to Try
| Variation | How To |
|---|---|
| Single colour | Make all flowers the same colour (e.g., all white or all blue). |
| Gradient | Use light blue → medium blue → dark blue across the bracelet. |
| Longer bracelet | Add more flowers (10–12) and longer cords (70 cm). |
| Anklet version | Make 12–14 flowers and use 80 cm cords + 40 cm closure cord. |
| Beaded centres | Sew a small pearl or crystal bead into each flower centre. |
Frequently Asked Questions
Q: What is a magic ring (anel mágico)?
A: It is an adjustable loop that lets you close the centre of the flower completely. If you don’t know it, you can chain 4 and join into a ring – but the centre will have a small hole.
Q: My puff stitch keeps unravelling – what am I doing wrong?
A: After pulling through all 6 loops, immediately chain 1 to lock the stitch. Do not skip the chain.
Q: Can I use a larger hook?
A: Yes – a 2.5 mm or 3.0 mm hook will produce larger, fluffier flowers. Adjust the number of flowers (6–7 may be enough for a bracelet).
Q: How do I wash the bracelet?
A: Hand wash in cool water with mild soap. Do not wring – press gently in a towel. Lay flat to dry in the shade (sombras). Avoid direct sunlight.
Q: Is this bracelet suitable for children?
A: Yes – but use fewer flowers (5–6) and shorter cords. Ensure no small beads are used if the child is young (choking hazard).
Finished Look & Dimensions
When completed correctly, your Crochet Flower Bracelet will have:
| Feature | Measurement / Description |
|---|---|
| Flower diameter | Approximately 2 cm each |
| Number of flowers | 7–9 (suggested) |
| Distance between flowers | 5 chains (approx. 1.5 cm) |
| Bracelet length (closed) | Adjustable – fits most wrists (approx. 15–20 cm) |
| Closure type | Sliding double knots (fecho ajustável) |
| Colours | Blue + Beige/Off White (or your choice) |
The bracelet is lightweight, flexible, and lies flat on the wrist. Each puff flower stands out in relief, creating a textured, dimensional look.
Conclusion
The Crochet Flower Bracelet (Pulseira de Flores em Crochê) is a beautiful handmade accessory that makes a perfect gift or a treat for yourself. By mastering the puff stitch and the magic ring, you can create delicate 2 cm flowers and connect them with simple chains. The adjustable sliding closure (fecho ajustável) ensures a perfect fit without metal clasps.
Key steps to remember:
- Make a magic ring.
- Create 5 puff stitches inside the ring (1 puff + 1 chain, repeat).
- Close with a slip stitch and tighten the ring.
- Make 7–9 flowers total.
- Attach flowers to two 60 cm cords using 5 chains between flowers.
- Overlap the ends and create 6–8 double knots with a 30 cm cord.
- Adjust, tie final knots, and add beads or glue if desired.
el


