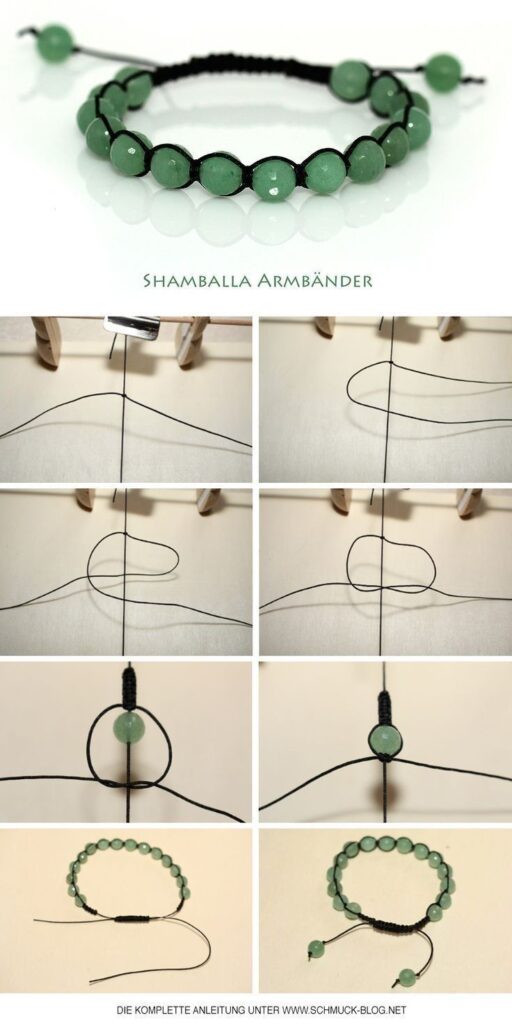
Learn to make a Shamballa bracelet (Shamballa Armband) with this complete step-by-step guide. Macrame knots, bead placement, and adjustable closure – perfect for beginners.
Introduction
The Shamballa bracelet (Shamballa Armband) is a stunning piece of macrame jewellery that originated from the Shamballa Buddhist tradition. It typically features a series of beads – often made of lava stone, onyx, or jade – held in place by symmetrical square knots. The design is masculine yet elegant, making it popular for both men and women.
This complete tutorial will teach you:
- How to set up your cords for a Shamballa bracelet
- How to tie square knots (the foundation of the design)
- How to add beads between knot sections
- How to create an adjustable sliding knot closure
Difficulty & Time
| Aspect | Details |
|---|---|
| Level | Beginner (no prior macrame experience needed) |
| Time | 30–45 minutes per bracelet |
| Technique | Square knots (quadruple knots), sliding knot closure |
What Is a Shamballa Bracelet?
| Feature | Description |
|---|---|
| Origin | Inspired by Tibetan Buddhist Shamballa bracelets |
| Structure | A central core cord with beads, surrounded by two working cords that tie square knots |
| Closure | Adjustable sliding knot (no metal clasp needed) |
| Beads | Typically 3–7 beads, often natural stones (lava, onyx, howlite, tiger eye) |
| Look | Symmetrical, clean, modern – works with casual or formal wear |
Materials & Tools
| Category | Item | Notes |
|---|---|---|
| Core cord | Waxed cotton cord or nylon cord – 1 mm thickness | Length: approx. 50 cm (colour: black or brown is traditional) |
| Working cords | Waxed cotton cord – 1 mm thickness | Length: 2 pieces of 120–150 cm each (same colour as core, or contrasting) |
| Beads | 3–7 beads with hole large enough for 2 cords | Recommended: 6–8 mm diameter (lava stone, onyx, jade, howlite) |
| Tools | Scissors, lighter (to seal ends), tape or clipboard (to hold work) | |
| Optional | Glue (fabric glue), bead stopper |
All cords should be the same thickness (1 mm) for uniform knots.
Understanding the Square Knot (Doppelknoten / Quadruple Knot)
The Shamballa bracelet uses the square knot (also called a quadruple knot or double half-hitch). Each complete square knot consists of two half-knots:
| Half-Knot | Action |
|---|---|
| Left over right | Left working cord goes over the core cords, right working cord goes over left, under cores, up through the loop. Pull tight. |
| Right over left | Right working cord goes over the core cords, left working cord goes over right, under cores, up through the loop. Pull tight. |
One left-over-right + one right-over-left = one complete square knot.
Step-by-Step Instructions
Step 1: Prepare Your Cords
| Action | Details |
|---|---|
| 1 | Cut one core cord – 50 cm long. |
| 2 | Cut two working cords – 120–150 cm each. |
| 3 | If using nylon or polyester, seal the ends with a lighter to prevent fraying. |
| 4 | Fold the core cord in half to find the centre. |
| 5 | Fold the working cords in half to find their centres. |
Step 2: Set Up Your Workspace
| Action | Details |
|---|---|
| 1 | Place the core cord vertically in front of you. |
| 2 | Tape the top end of the core cord to a table or clipboard. |
| 3 | Place the two working cords horizontally across the core cord at the centre point. |
| 4 | The working cords should be perpendicular to the core cord (forming a cross). |
You can also use a macrame board with pins.
Step 3: Tie the First Square Knot (Left Side)
| Action | Details |
|---|---|
| 1 | Take the left working cord (both ends together) and lay it over the core cords. |
| 2 | Take the right working cord (both ends together) and lay it over the left working cord. |
| 3 | Pass the right working cord under the core cords. |
| 4 | Bring the right working cord up through the loop created by the left working cord. |
| 5 | Pull both working cords tight. |
You have completed the first half of the square knot.
Step 4: Complete the Square Knot (Right Side)
| Action | Details |
|---|---|
| 1 | Take the right working cord and lay it over the core cords. |
| 2 | Take the left working cord and lay it over the right working cord. |
| 3 | Pass the left working cord under the core cords. |
| 4 | Bring the left working cord up through the loop created by the right working cord. |
| 5 | Pull both working cords tight. |
You have now completed ONE full square knot. It should sit snugly against the centre point.
Step 5: Tie 3–5 Square Knots (Starting Section)
| Action | Details |
|---|---|
| 1 | Repeat Steps 3 and 4 to make additional square knots. |
| 2 | For the starting section (before the first bead), tie 3 to 5 square knots. |
| 3 | Push each knot up tightly against the previous one. |
| 4 | Keep tension even – all knots should look identical. |
This creates the “tail” section of the bracelet (one side of the beads).
Step 6: Add Your First Bead
| Action | Details |
|---|---|
| 1 | Take one bead and thread it onto the two core cords only. |
| 2 | Do NOT thread the working cords through the bead. |
| 3 | Push the bead up so it sits directly against the last square knot. |
| 4 | Hold the bead in place with your finger. |
Step 7: Tie Square Knots Around the Bead
| Action | Details |
|---|---|
| 1 | Tie 1 square knot (left-over-right + right-over-left) directly against the bead. |
| 2 | The working cords will wrap around the outside of the bead. |
| 3 | Pull tight so the knot hugs the bead. |
| 4 | For a larger bead (8 mm), tie 2 square knots before adding the next bead. |
Most Shamballa bracelets have 1 knot between beads. For a looser, more modern look, use 2 knots.
Step 8: Add Remaining Beads
| Action | Details |
|---|---|
| 1 | Add the next bead onto the core cords only. |
| 2 | Tie 1–2 square knots after the bead. |
| 3 | Repeat until all beads are placed. |
| 4 | Typical bead count: 3, 5, or 7 beads (odd numbers look most balanced). |
For a 3-bead bracelet: start knots → bead → knots → bead → knots → bead → ending knots.
Step 9: Tie the Ending Section (After the Last Bead)
| Action | Details |
|---|---|
| 1 | After the last bead, tie 3 to 5 square knots (the same number as the starting section). |
| 2 | This creates symmetry – both ends of the bracelet should look identical. |
| 3 | Pull the final knot very tight. |
Step 10: Finish the Knotted Section
| Action | Details |
|---|---|
| 1 | Cut the working cords (the two outer cords) close to the last knot. |
| 2 | Leave about 3–4 mm of cord beyond the knot. |
| 3 | Use a lighter to carefully melt the ends – the melted cord will form a small bead that locks against the knot. |
| 4 | Do NOT cut the core cords yet – they will be used for the adjustable closure. |
You should now have two core cord tails extending from each end of the knotted section (4 tails total).
Part 2: Adjustable Sliding Knot Closure (Schiebeverschluss)
The Shamballa bracelet uses a sliding knot closure – no metal clasp needed. This makes the bracelet adjustable and comfortable.
Step 11: Overlap the Two Ends
| Action | Details |
|---|---|
| 1 | Bring the two ends of the bracelet together so they overlap by about 2–3 cm. |
| 2 | The four core cord tails should lie parallel to each other (two from left, two from right). |
Step 12: Create the Sliding Knot
| Action | Details |
|---|---|
| 1 | Take a small piece of cord (approx. 15–20 cm, same colour as the bracelet) – or use the cut working cord tails if long enough. |
| 2 | Place this cord underneath the four overlapped core cords. |
| 3 | Tie a series of square knots (3–5 knots) around all four core cords. |
| 4 | Use the same square knot technique: left over right → right over left. |
| 5 | Pull each knot tight. |
These square knots will slide along the core cords when you pull the ends.
Step 13: Test the Sliding Mechanism
| Action | Details |
|---|---|
| 1 | Gently pull the two outer core tails (one from each end) in opposite directions. |
| 2 | The sliding square knots should move along the cords, opening and closing the bracelet. |
| 3 | If the knots are too tight, loosen them slightly. If too loose, add 1–2 more knots. |
Step 14: Finish the Ends
| Action | Details |
|---|---|
| 1 | Cut the core cord tails to your desired length. |
| 2 | Common lengths: 2–3 cm beyond the sliding knot. |
| 3 | Carefully melt the ends with a lighter to seal. |
| 4 | (Optional) Add a small bead to each tail end before melting for a decorative finish. |
Complete Shamballa Bracelet – Summary Diagram
| Section | Length / Number |
|---|---|
| Starting square knots | 3–5 knots |
| Bead 1 | 1 bead |
| Square knots | 1–2 knots |
| Bead 2 | 1 bead |
| Square knots | 1–2 knots |
| Bead 3 | 1 bead |
| Ending square knots | 3–5 knots |
| Total knotted length | Approximately 16–20 cm (adjustable by adding/removing beads or knots) |
| Closure | Sliding square knots (3–5 knots) over overlapped core cords |
Pro Tips for a Perfect Shamballa Bracelet
| Tip | Why It Matters |
|---|---|
| Use waxed cotton cord | Waxed cord holds knots tighter and doesn’t fray. |
| Pull knots firmly | Loose knots will shift over time and look messy. |
| Keep tension even | Every knot should feel the same when you pull. |
| Seal all cut ends | Melted ends prevent unravelling and look professional. |
| Test fit before cutting | Slide the closure to check the fit on your wrist before cutting the final tails. |
| Work on a clipboard | Taping the core cord keeps tension constant. |
Colour & Bead Combinations
| Bracelet Style | Core & Working Cord Colour | Bead Type | Bead Colour |
|---|---|---|---|
| Classic Men’s | Black | Lava stone, onyx | Black / dark grey |
| Bohemian | Brown | Howlite, turquoise | White with grey veins / blue |
| Elegant | White or cream | Jade, aventurine | Green |
| Modern | Grey | Hematite, pyrite | Metallic silver / gold |
| Romantic | Pink | Rose quartz | Soft pink |
| Healing | Natural (beige) | Tiger eye, amethyst | Brown-gold / purple |
Troubleshooting Common Problems
| Problem | Cause | Solution |
|---|---|---|
| Knots are uneven | Inconsistent tension | Practice 10 square knots on scrap cord first. |
| Beads won’t stay in place | Not enough knots around the bead | Tie 2 square knots directly against each bead. |
| Sliding knot is stuck | Knots tied too tightly | Loosen the sliding knots slightly before sealing ends. |
| Cords fray | Poor quality cord or not sealed | Use waxed cotton and melt ends with a lighter. |
| Bracelet is too long/short | Wrong number of knots or beads | Adjust: more beads = longer; more knots between beads = wider spacing. |
Frequently Asked Questions
Q: Why is it called a Shamballa bracelet?
A: The design is inspired by bracelets worn by monks in the mythical kingdom of Shamballa (also spelled Shambhala), a Buddhist spiritual realm.
Q: Can I use silk or satin cord instead of waxed cotton?
A: Yes, but silk is slippery. Tie knots tighter and consider using a drop of glue on each knot.
Q: How many beads should I use?
A: Odd numbers (3, 5, 7) are traditional for Shamballa bracelets. Even numbers (4, 6) look less balanced.
Q: What size beads are best?
A: 6 mm to 8 mm diameter is ideal for a 1 mm cord. Larger beads (10 mm) require thicker cords (1.5 mm).
Q: Can I make a Shamballa necklace?
A: Yes – use longer cords (200 cm working cords, 80 cm core cord) and 9–15 beads.
Where to Find the Complete German Instructions
The original complete tutorial (Die komplette Anleitung) for this Shamballa bracelet is available at:
www.schmuck-blog.net
The site offers detailed step-by-step photos, additional patterns, and tips in German. Many instructions include video tutorials and printable PDFs.
Conclusion
The Shamballa bracelet (Shamballa Armband) is a timeless macrame design that combines the elegance of natural stone beads with the structure of square knots. By following this complete step-by-step guide, you can create a professional-looking bracelet in under an hour – even as a beginner.
Key steps to remember:
- Set up one core cord and two working cords.
- Tie 3–5 square knots for the starting section.
- Thread a bead onto the core cords only.
- Tie 1–2 square knots around the bead.
- Repeat for 3–7 beads.
- Tie 3–5 square knots for the ending section.
- Cut and seal the working cords.
- Overlap the ends and tie sliding square knots for the closure.
- Seal all cord ends.


