Learn to make a beautiful loop knot bracelet (pulsera nudo tipo lazo) with two coloured cords. Step-by-step tutorial from start to finish – adjustable sliding closure included.
Introduction
The Loop Knot Bracelet (Pulsera Nudo Tipo Lazo) is a stunning handmade accessory that combines simplicity with elegance. Using just two cords of different colours, you can create a textured, adjustable bracelet that fits any wrist size. The technique produces a series of interconnected loops that look like tiny bows or flowers – hence the name “beautiful loop knot.”
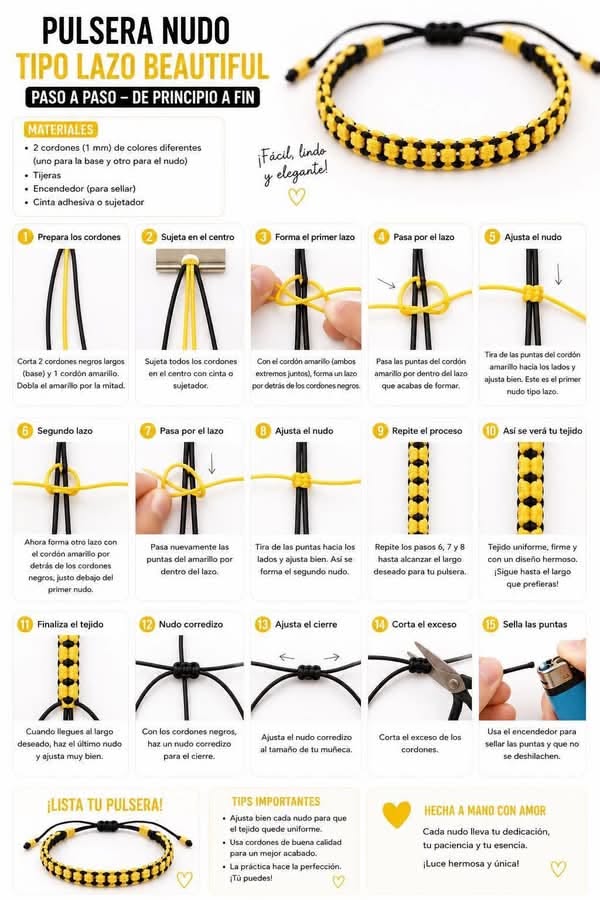
This tutorial will guide you from start to finish – from preparing your cords to sealing the final ends with a lighter. You will also learn how to make an adjustable sliding knot closure (nudo corredizo) , so no clasp is needed.
Note: The example uses a yellow cord for the knotting and a black cord for the base, but you can choose any colour combination.
Difficulty & Time
| Aspect | Details |
|---|---|
| Level | Beginner (no prior knotting experience needed) |
| Time | 20–30 minutes for a 15–18 cm bracelet |
| Technique | Loop knot (nudo tipo lazo) – a variation of the sliding loop knot |
Materials & Tools
| Category | Item | Notes |
|---|---|---|
| Cord 1 (base) | 1 mm cord – black (or any colour) | Length: approx. 50 cm |
| Cord 2 (knotting) | 1 mm cord – yellow (or contrasting colour) | Length: approx. 120–150 cm |
| Tools | Scissors (tijeras) | |
| Tools | Lighter (encendedor) – to seal ends | |
| Tools | Tape or clip (cinta adhesiva o sujetador) | To hold work in place |
| Optional | Measuring tape | To check wrist size |
Cord thickness: 1 mm is ideal. Use waxed cotton, polyester, or nylon cord for durability.
Understanding the Loop Knot (Nudo Tipo Lazo)
The loop knot creates a series of connected loops that form a textured, braid-like pattern. Each knot is made by:
- Forming a loop behind the base cords
- Passing the working cord ends through the loop
- Pulling tight to create a “bow” or “lazo” shape
When repeated, these knots stack neatly, producing a flexible, slightly stretchy bracelet that lies flat on the wrist.
Step-by-Step Instructions
Step 1: Prepare the Cords (Prepara los cordones)
| Action | Details |
|---|---|
| 1 | Cut the base cord (black) to approximately 50 cm. |
| 2 | Cut the knotting cord (yellow) to approximately 120–150 cm. |
| 3 | If using nylon or polyester, carefully melt the cut ends with a lighter to prevent fraying. |
| 4 | Secure the cords – Use tape or a clip (cinta adhesiva o sujetador) to hold the base cord flat on a table. Alternatively, tape it to a clipboard. |
You can also tape the cords to your trouser leg or a cushion – anywhere that keeps tension.
Step 2: Find the Centre & Position Cords (Sujeta en el centro)
| Action | Details |
|---|---|
| 1 | Fold the knotting cord (yellow) in half to find its centre point. |
| 2 | Place the yellow cord behind the base cords (black) at the centre. |
| 3 | Both ends of the yellow cord should hang evenly on either side. |
The black cords stay straight and act as the “core.” The yellow cords do all the knotting.
Step 3: Form the First Loop (Forma el primer lazo)
| Action | Details |
|---|---|
| 1 | Take both ends of the yellow cord and bring them forward over the black cords. |
| 2 | Cross them to form a loop behind the black cords. |
| 3 | The loop should sit just above the black cords. |
Think of this as making a “P” shape behind the base.
Step 4: Pass Through the Loop (Pasa por el lazo)
| Action | Details |
|---|---|
| 1 | Take the two ends of the yellow cord (both together). |
| 2 | Pass them through the loop you just formed – from front to back. |
| 3 | Pull them all the way through so they emerge behind the black cords again. |
This is the key motion. The yellow ends go over, then through, then behind.
Step 5: Tighten the First Knot (Ajusta el nudo)
| Action | Details |
|---|---|
| 1 | Pull the two yellow ends firmly to the sides (left and right). |
| 2 | As you pull, the loop will tighten into a neat bow or lazo shape around the black cords. |
| 3 | Adjust so the knot sits snugly against the black cords. |
| 4 | Make sure the yellow loops are symmetrical (equal size on both sides). |
This completes your first loop knot. Congratulations!
Step 6: Form the Second Loop (Segundo lazo)
| Action | Details |
|---|---|
| 1 | Move down the black cords about 5–8 mm (the gap can be adjusted for tighter or looser pattern). |
| 2 | Repeat Steps 3–5: form a loop behind the black cords, pass the yellow ends through, and pull tight. |
The second knot should sit directly below the first, with consistent spacing.
Step 7: Pass Through the Loop Again (Pasa por el lazo – repeat)
- Same motion as Step 4 – both yellow ends go through the new loop.
- Pull the ends to the sides.
Step 8: Tighten the Second Knot (Ajusta el nudo – repeat)
- Pull firmly and evenly.
- Adjust so the second knot matches the first in size and tightness.
Step 9: Repeat the Process (Repite el proceso)
| Step | Action |
|---|---|
| 6 | Form a loop |
| 7 | Pass ends through |
| 8 | Tighten |
| 9 | Move down the black cords |
Continue repeating Steps 6, 7, and 8 until the knotted section reaches your desired bracelet length.
For a standard 15–18 cm bracelet (excluding the sliding closure), you will need approximately 25–35 knots.
Step 10: See Your Finished Pattern (Así se verá tu tejido)
After several knots, you will notice:
- A uniform, firm texture (tejido uniforme, firme)
- A beautiful loop design (diseño hermoso)
- The yellow knots forming a zigzag or floral pattern along the black core
Continue knotting until you reach the length that fits your wrist comfortably when the bracelet is slightly stretched.
Step 11: Finish the Knotting Section (Finaliza el tejido)
| Action | Details |
|---|---|
| 1 | When you reach the desired knotted length, tie a final loop knot. |
| 2 | Pull it very tight – this will be the last decorative knot. |
| 3 | Cut the yellow knotting cord ends, leaving about 3–4 cm on each side. |
| 4 | Melt the cut yellow ends with a lighter to seal (be careful not to burn the black cords). |
You now have a knotted section with two yellow tails at the top and two black tails at the ends.
Step 12: Make the Sliding Knot Closure (Nudo corredizo)
The sliding knot (nudo corredizo) allows the bracelet to be adjustable without a metal clasp.
| Action | Details |
|---|---|
| 1 | Take the two black cords (the base cords) from one end of the bracelet. |
| 2 | Form a loop with both cords together (as if making a simple overhand loop). |
| 3 | Wrap the two ends around the standing part 2–3 times. |
| 4 | Pass the ends through the initial loop. |
| 5 | Pull tight to form a sliding knot. |
| 6 | Repeat on the other end of the bracelet with the remaining two black cords. |
You now have two sliding knots – one at each end. They will slide along the black cords to open and close the bracelet.
Step 13: Adjust the Closure Size (Ajusta el cierre)
| Action | Details |
|---|---|
| 1 | Slide the two knots toward or away from each other. |
| 2 | Test the fit on your wrist. |
| 3 | The bracelet should be snug but not tight – you should be able to slip it over your hand. |
Adjust the nudo corredizo al tamaño de tu muñeca – the sliding knot to your wrist size.
Step 14: Cut the Excess Cord (Corta el exceso)
| Action | Details |
|---|---|
| 1 | After tightening the sliding knots, cut the remaining black cord ends. |
| 2 | Leave about 1–2 cm beyond each sliding knot. |
| 3 | Cut the yellow ends (if not already done) to the same length. |
Step 15: Seal the Ends (Sella las puntas)
| Action | Details |
|---|---|
| 1 | Use a lighter (encendedor) to carefully melt the cut ends of both black and yellow cords. |
| 2 | Hold the flame about 1 cm away – the cord will melt into a small rounded bead. |
| 3 | Do not touch the melted cord – it is extremely hot. |
| 4 | Allow to cool for 10 seconds. |
Sealing prevents fraying and gives a professional finish. If using cotton cord (which does not melt), apply a drop of clear glue instead.
Your Bracelet Is Ready (¡Lista tu pulsera!)
Congratulations! You have completed a Beautiful Loop Knot Bracelet (Pulsera Nudo Tipo Lazo) . The finished piece features:
- A textured, uniform knot pattern
- Two contrasting colours (yellow knots on black base)
- Adjustable sliding closure (no metal parts)
- Sealed ends for durability
Wear it yourself, give it as a handmade gift, or make multiple bracelets in different colour combinations.
Important Tips (Tips Importantes)
| Tip | Why It Matters |
|---|---|
| Ajusta bien cada nudo (tighten each knot well) | Loose knots make the bracelet floppy and uneven. |
| Usa cordones de buena calidad (use good quality cords) | Cheap cords fray, break, or lose colour. |
| Mantén la misma tensión (keep consistent tension) | Every knot should feel the same when pulled. |
| Deja espacio entre nudos (leave space between knots) | About 5–8 mm is ideal – too close = stiff bracelet; too far = gappy. |
| Practica primero (practice first) | Try 5–10 knots on scrap cord before making the final bracelet. |
La práctica hace la perfección. ¡Tu puedes! (Practice makes perfect. You can do it!)
Colour Combination Ideas
| Base Cord (Core) | Knotting Cord (Loops) | Effect |
|---|---|---|
| Black | Yellow (as shown) | Classic, high contrast |
| White | Pastel pink | Feminine, soft |
| Brown | Turquoise | Earthy, bohemian |
| Navy blue | Gold | Elegant, festive |
| Grey | Neon green | Modern, edgy |
| Red | White | Patriotic, sporty |
Troubleshooting Common Problems
| Problem | Cause | Solution |
|---|---|---|
| Knots are uneven | Inconsistent tension | Pull each knot with the same force. Count “one-Mississippi” per pull. |
| Loops are different sizes | Not centering the yellow cord | Always find the centre of the yellow cord before each knot. |
| Bracelet twists | Pulling harder on one side | Pull both yellow ends equally to left and right. |
| Sliding knots won’t slide | Wrapped too tight or too many wraps | Use 2–3 wraps only. Test slide before cutting ends. |
| Cord frays at ends | No sealing | Always melt or glue cut ends immediately. |
Finished Look & Dimensions
When completed correctly, your Loop Knot Bracelet will have:
| Feature | Measurement / Description |
|---|---|
| Knotted section length | 15–18 cm (adjustable by adding/removing knots) |
| Total bracelet length | 18–22 cm (including sliding knots) |
| Knot width | Approximately 8–10 mm (depends on cord thickness) |
| Loop size | Approximately 5–7 mm per loop (left and right) |
| Colour pattern | Alternating, symmetrical bow shapes along a straight core |
The bracelet lies flat, is slightly flexible, and fits most wrist sizes thanks to the sliding closure.
Frequently Asked Questions
Q: How much cord do I need for a longer bracelet?
A: For every additional 1 cm of knotted length, add approximately 5–7 cm of knotting cord (yellow). The base cord (black) needs only 1 cm extra per 1 cm of bracelet length.
Q: Can I use three colours?
A: Yes – use two colours for the knotting cord (one on each side) or alternate knotting cords every few knots. The base cord remains one colour.
Q: Why does my bracelet curl?
A: You may be pulling the yellow ends too much to one side. Pull left and right equally. Also, check that the yellow cord is centred behind the black cords.
Q: How do I wash this bracelet?
A: Hand wash in cool water with mild soap. Air dry. Do not machine wash or dry.
Q: Can I sell bracelets made with this technique?
A: Yes – this is a traditional knotting technique, not a copyrighted pattern. You may sell your finished bracelets.
Conclusion
The Beautiful Loop Knot Bracelet (Pulsera Nudo Tipo Lazo) is a rewarding project for beginners and experienced crafters alike. With just two cords, scissors, and a lighter, you can create a professional-looking, adjustable bracelet in under 30 minutes.
Key steps to remember:
- Prepare and secure your cords (base + knotting cord).
- Form a loop behind the base cords.
- Pass both knotting ends through the loop.
- Pull tight to the sides.
- Repeat until desired length.
- Finish with a sliding knot closure on both ends.
- Cut and seal all ends with a lighter.
Each knot carries your dedication, patience, and essence – hecho a mano con amor (handmade with love). Wear it proudly or gift it to someone special.


