A calotte (also called a clamshell knot cover, knot cup, or bead tip) is a small, two-part metal finding used to conceal and protect knots or crimps at the ends of beaded jewelry. Traditionally, calottes are used with flexible beading wire (cable) or thread to create a professional, finished look.
However, there are two different methods for attaching calottes:
| Method | Description | Security |
|---|---|---|
| Folded-wire method (traditional) | The wire is folded back on itself, creating a double layer inside the crimp | ✅ Highly secure |
| Single-wire method (shown online) | The calotte is placed on a single strand of wire, with no fold | ⚠️ Less secure — risk of falling apart |
In this guide, you will learn:
- The full meaning of each step in the single-wire method
- Why this method is not recommended for everyday wear
- How to do it correctly if you choose to use it
- The traditional, more secure alternative
Important Warning: The single-wire method is shown here for educational purposes because it appears in many online tutorials. However, the original source explicitly warns that jewelry made this way often falls apart because the wire can slip out during wear.
Why Use a Calotte?
| Benefit | Explanation |
|---|---|
| Professional finish | Hides knots or crimps for a clean look |
| Protects thread | Prevents fraying at the clasp connection |
| Easy to attach | Simply close the two halves with pliers |
| Available in many metals | Silver, gold, brass, copper |
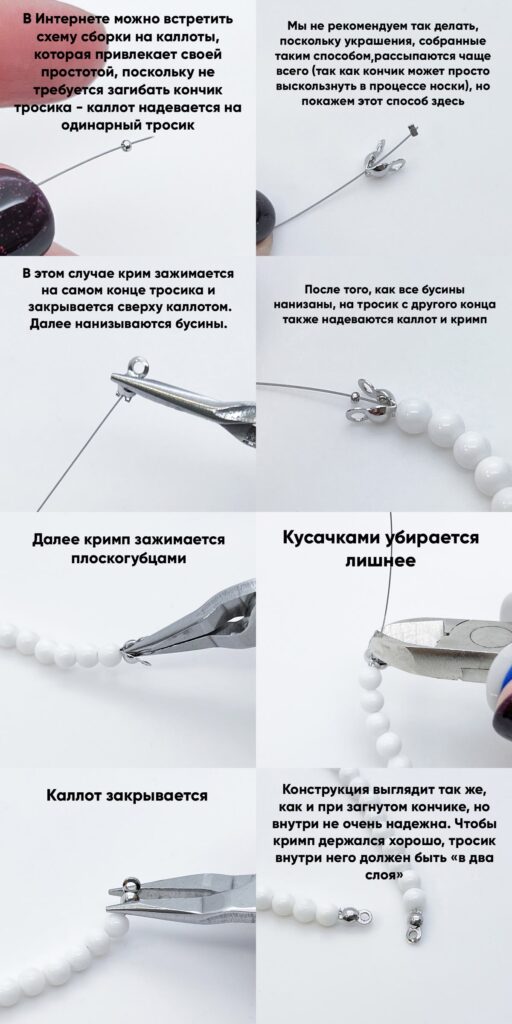
Part 1: The Single-Wire Method (Shown Online)
This method appeals to beginners because it appears simpler — there is no need to fold the wire end back.
Step-by-Step Instructions
Step 1: Place the Calotte on a Single Wire
| Action | Detail |
|---|---|
| Slide the calotte onto the beading wire | The wire passes through the hole in the calotte (just like a bead) |
| The calotte sits on a single strand of wire | The wire end is not folded back |
Result: The calotte is threaded onto the wire like a large bead.
Step 2: Place a Crimp at the Very End of the Wire
| Action | Detail |
|---|---|
| Slide a crimp bead onto the wire | Place it at the very end of the wire |
| The crimp sits inside the calotte | The calotte will close over it |
Result: The crimp is positioned at the wire tip, inside the calotte’s cavity.
Step 3: String the Beads
| Action | Detail |
|---|---|
| Continue stringing beads onto the wire | After the calotte and crimp are in place |
| Work from one end to the other | String all your design beads |
Step 4: Repeat on the Other End
| Action | Detail |
|---|---|
| After all beads are strung | Place a calotte and crimp on the other end |
| Same single-wire method | No folding |
Result: Both ends of the bracelet have calottes in place.
Step 5: Crimp the Crimp with Pliers
| Action | Detail |
|---|---|
| Use flat-nose pliers or crimping pliers | Flatten the crimp bead |
| The crimp should grip the wire | It must be tight enough not to slide |
Result: The crimp is flattened, theoretically holding the wire in place.
Step 6: Trim the Excess Wire
| Action | Detail |
|---|---|
| Use wire cutters (nippers / cutters) | Cut the excess wire close to the crimp |
| Leave no sharp protrusions | The wire end should be inside the calotte |
Result: The wire end is trimmed flush.
Step 7: Close the Calotte
| Action | Detail |
|---|---|
| Fold the calotte’s two halves together | Using flat-nose pliers |
| The crimp should be completely enclosed | The calotte now looks like a small bead or cup |
Result: A finished end that looks identical to the traditional method — but with a weak internal structure.
Part 2: Why This Method Is Not Recommended
The original source states:
“Мы не рекомендуем так делать, поскольку украшения, собранные таким способом, рассыпаются чаще всего (так как кончик может просто выскользнуть в процессе носки)”
Translation: “We do not recommend doing this, because jewelry assembled this way falls apart most often (since the tip can simply slip out during wear).”
Why Does It Fail?
| Problem | Explanation |
|---|---|
| Single wire has no friction | A single strand of beading wire can slide through the crimp |
| Crimp cannot grip a single strand securely | Most crimps are designed for folded wire (double thickness) |
| Wire memory works against you | Beading wire wants to straighten, which can pull the end through the crimp |
| No redundancy | If the wire slips 1–2mm, the entire bracelet unravels |
When Might It Work?
| Condition | Likelihood of Success |
|---|---|
| Very thick, textured wire (e.g., tiger tail with heavy coating) | Low — still risky |
| Very light beads (no weight pulling on the end) | Slightly better |
| Short-term wear only (one evening) | Acceptable for temporary use |
| Permanent jewelry | ❌ Not recommended |
Part 3: The Traditional (Secure) Method
For comparison, here is the recommended method that creates a secure, double-wire layer inside the crimp.
Step-by-Step Secure Method
| Step | Action |
|---|---|
| 1 | Thread the calotte onto the beading wire (just like a bead) |
| 2 | Pass the wire back through the calotte in the opposite direction |
| 3 | Fold the wire end back, creating a double strand |
| 4 | Slide a crimp bead over both layers of wire |
| 5 | Crimp the crimp with pliers — it now grips two wire strands |
| 6 | Pull the wire to seat the crimp inside the calotte |
| 7 | Trim the excess wire after the crimp |
| 8 | Close the calotte |
Result: The crimp holds two layers of wire, making it nearly impossible for the wire to slip out.
Visual Comparison
| Feature | Single-Wire Method (Not Recommended) | Double-Wire Method (Secure) |
|---|---|---|
| Wire inside crimp | 1 strand | 2 strands (folded) |
| Crimp grip | Weak | Strong |
| Risk of slipping | High | Very low |
| Time to make | Fast | Slightly slower |
| Professional quality | ❌ No | ✅ Yes |
Part 4: Tools Needed
| Tool | Use |
|---|---|
| Flat-nose pliers | Closing calottes and flattening crimps |
| Crimping pliers (optional) | Creates a folded crimp (more secure) |
| Wire cutters | Trimming excess wire |
| Beading wire (cable / tiger tail) | The stringing material |
| Calottes (clamshells) | The knot covers |
| Crimp beads | The compression beads |
| Beads | Your design elements |
Part 5: Common Mistakes & Fixes
| Mistake | Cause | Fix |
|---|---|---|
| Calotte won’t close | Crimp is too large for the calotte | Use smaller crimp beads or larger calottes |
| Wire slips through crimp | Only one strand inside crimp | Use the double-wire (folded) method |
| Calotte has a gap after closing | Calotte halves misaligned | Use pliers to gently squeeze from both sides |
| Crimp visible after closing | Positioned too close to the calotte edge | Push crimp deeper into calotte before closing |
| Wire breaks at crimp | Sharp edge on crimp or wire fatigue | Use crimp covers or file sharp edges |
Part 6: When to Use the Single-Wire Method (If At All)
| Scenario | Acceptable? |
|---|---|
| Practice piece (not for wearing) | ✅ Yes |
| Temporary display piece | ⚠️ Maybe |
| Gift for someone | ❌ No |
| Jewelry for sale | ❌ No |
| Everyday wear | ❌ No |
| Children’s jewelry (lightweight) | ⚠️ Not recommended |
| Earrings (no tension on wire) | ✅ Possibly acceptable |
SEO Blog Post Optimization
| Meta Tag | Suggested Content |
|---|---|
| Title | How to Use Calottes (Clamshell Knot Covers) on Single Beading Wire: Method, Risks & Best Practices |
| Meta Description | Learn the single-wire method for attaching calottes (clamshells) to beading wire — and why it’s not recommended for everyday jewelry. Includes secure alternatives. |
| URL slug | /calottes-single-wire-method |
| Keywords | calottes, clamshell knot covers, beading wire, crimp beads, how to finish beaded jewelry, secure beading methods |
| Alt text for image | Step-by-step diagram showing single-wire calotte method: calotte on single wire, crimp at end, beads strung, second calotte, crimping, trimming, closing calotte |
Final Pro Tip: Always Test Your Ends
Before finishing a piece of jewelry made with the single-wire method, perform a pull test:
- Hold the clasp in one hand and the beads in the other
- Gently but firmly pull
- If the wire slips even 1mm, the method has failed
- If it slips, redo the end using the double-wire (folded) method
A few extra minutes of work will save hours of repairing a broken bracelet.
Summary: You Can Now Understand the Single-Wire Calotte Method
| Aspect | What You Learned |
|---|---|
| The method | Calotte on single wire → crimp at end → beads → second calotte → crimp → trim → close |
| The risk | Wire can slip out during wear; jewelry falls apart |
| Why it’s popular online | Looks simpler (no wire folding) |
| The secure alternative | Fold wire back for double strand inside crimp |
| When to use | Only for practice or temporary pieces |
The single-wire method is shown here for educational purposes because it appears in many online tutorials. For jewelry that lasts, always use the double-wire (folded) method — your customers, friends, and family will thank you.


