How to Tie a Gyokusui (Jade Room) Knot: 15-Step Japanese Flower Knot Guide
Learn how to tie the beautiful Gyokusui knot, also known as the Jade Room knot. This Japanese flower knot is perfect for decorative cords, keychains, and handmade ornaments.
Introduction: The Beauty of Japanese Knotting
If you have ever admired traditional Japanese Mizuhiki cords or ancient Chinese knotting, you know the mesmerizing effect of an intricately woven, symmetrical knot. Today, we are diving into one of the most stunning examples of this art form: the Gyokusui Knot (玉房結び).
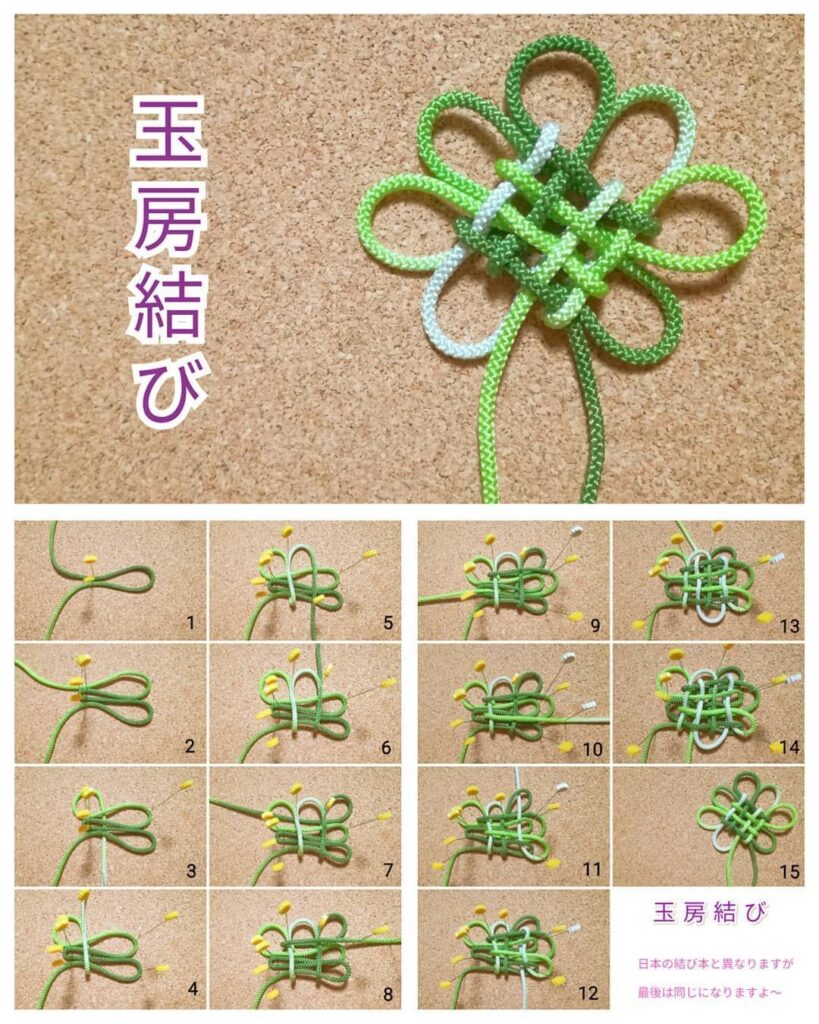
Translated roughly as the “Jade Room” Knot, this beautiful design features four main interlocking loops radiating outward from a densely woven square center, finished with a delicate, contrasting interweave. It looks like a blooming flower or a four-leaf clover.
While it looks incredibly complex, the image above provides a perfect 15-step visual guide. By using a simple corkboard, a few push pins, and a long piece of paracord or satin cord, you can master this knot in under an hour.
Let’s gather our supplies, set up our pins, and start weaving this gorgeous flower knot!
What You Will Need
To follow this tutorial exactly as shown in the grid, you will need a few specific tools:
- Cord: A thick, smooth cord works best. The example uses a green satin or paracord for the main flower, and a smaller piece of white/silver cord for the accent weave. You will need one long piece of green cord (about 3 feet) and one shorter piece of white (about 1 foot).
- A Corkboard: The background of the tutorial is a corkboard. This is essential for holding the pins.
- Push Pins: You will need 4 yellow push pins to hold the four outer loops, and a few white push pins to hold the inner weaves as you work.
- Patience: This knot requires careful “over and under” weaving. Do not rush!
Step-by-Step Instructions (Following the 15-Panel Grid)
We will follow the panels, numbered 1 through 15, to build this knot step-by-step.
Part 1: Building the Outer Frame (Panels 1-4)
- Panel 1: Take your long green cord. Fold it in half and place the loop at the top. Hold it in place with a yellow push pin at the very top of the loop.
- Panel 2: Take the two tails of the cord. Pull them down and outward to the sides to create a distinct “V” or heart shape. Place a yellow pin on the far left and a yellow pin on the far right to hold these loops open.
- Panel 3: Take the loop on the right side, cross it over the center, and tuck it under the left loop. Pin it temporarily.
- Panel 4: Take the loop on the left side, cross it over the center, and tuck it under the right loop. You now have a basic 4-petal frame pinned into the board.
Part 2: Weaving the Center Base (Panels 5-8)
- Panel 5 & 6: Pull the two hanging tails up into the center. Thread them under the bottom horizontal cross and over the top horizontal cross. Pin them down with yellow pins in the center of the knot.
- Panel 7: Take the right side of the hanging green cord, and thread it horizontally across the center, weaving it over and under the vertical strands.
- Panel 8: Repeat on the left side. Thread the left cord horizontally across the center, weaving it over and under the vertical strands. Your center is now a tight, 4×4 basket weave.
Part 3: Adding the Accent Weave (Panels 9-10)
- Panel 9 & 10: This is where the magic happens! Take your white accent cord. Thread it through the center weave, starting from the bottom, and loop it around the top right outer loop.
- Tip: Use white push pins to hold the white accent cord in place as you weave it through the green knot.
Part 4: The Final Loop Interweave (Panels 11-15)
- Panel 11: Continue the white cord, threading it through the top center of the knot.
- Panel 12: Bring the white cord down and loop it around the bottom right corner of the knot. Pin it securely.
- Panel 13 & 14: Follow the white cord as it threads through the center of the green basket weave. It creates a beautiful, contrasting diamond shape in the center.
- Panel 15: Pull the cords completely through the center. Remove all the yellow and white push pins from the corkboard.
- The Final Adjust: Gently pull the loops one by one to take up the slack and tighten the knot into a perfect, symmetrical flower.
Pro-Tips for a Perfect Gyokusui Knot
- Pinning is Key: The corkboard and pins are not just for show—they are essential for this knot. Because the cord is smooth, it will slip out of shape if you don’t pin it at every turn.
- Keep the Tension Even: As you pull the final adjustments in Panel 15, do not just pull one end. Work your way around the flower, pulling a little bit from the left loop, then the right loop, then the top, and the bottom. This ensures your flower stays circular.
- Accent Colors: The beauty of this knot is the contrast. You can use any color combination: a deep blue flower with a gold accent, a red flower with a white accent, or a soft pink flower with a silver accent.
What to Make With Your Gyokusui Knot
This ornate knot is a statement piece on its own. Here is how you can use it:
- Ornamental Keychain: Keep the long tails, loop them together, and attach them to a metal keyring. It makes a beautiful, lucky keychain.
- Curtain Tie-Back: Thread a long piece of matching cord through two of these knots and use them to elegantly hold back curtains in a bedroom or living room.
- Decorative Pendant: Attach a jump ring to the top loop and wear it as a striking pendant necklace.
- Bags and Wallets: Sew the flat knot onto the front of a canvas tote bag or a leather wallet for a unique, handmade accent.
Conclusion
The Gyokusui Knot is a wonderful example of how a few simple loops and a precise over-and-under weave can create a masterpiece. While the 15 steps look daunting at first glance, following the grid row-by-row takes you on a surprisingly relaxing journey to a stunning final product.
Save this guide to your Pinterest board for your next craft night! Let me know in the comments: What color combination are you going to try for your first Gyokusui knot?
Happy Knotting! 🪢🌸✨