Learn to tie a stunning Celtic Flower Knot with this easy-to-follow, lettered diagram guide. Perfect for decorative crafts, jewelry, and paracord projects!
Introduction: The Art of the Celtic Knot
Have you ever been captivated by the endless, weaving loops of Celtic art? These ancient designs, famous for their lack of a beginning or an end, symbolize eternity, interconnectedness, and protection.
Today, we are unlocking the secret to one of the most beautiful decorative knots: the Celtic Flower Knot. It looks like a complex, woven four-leaf clover or a blooming green flower—and while it definitely requires patience, it is surprisingly accessible when broken down step-by-step.
The diagram above takes you through the entire process using lettered labels (A, Б, В, Г, etc.) and black arrows. Whether you are making a paracord keychain, a decorative hanging ornament, or simply practicing the art of knot-tying, this guide will help you master the Celtic Flower Knot in no time.
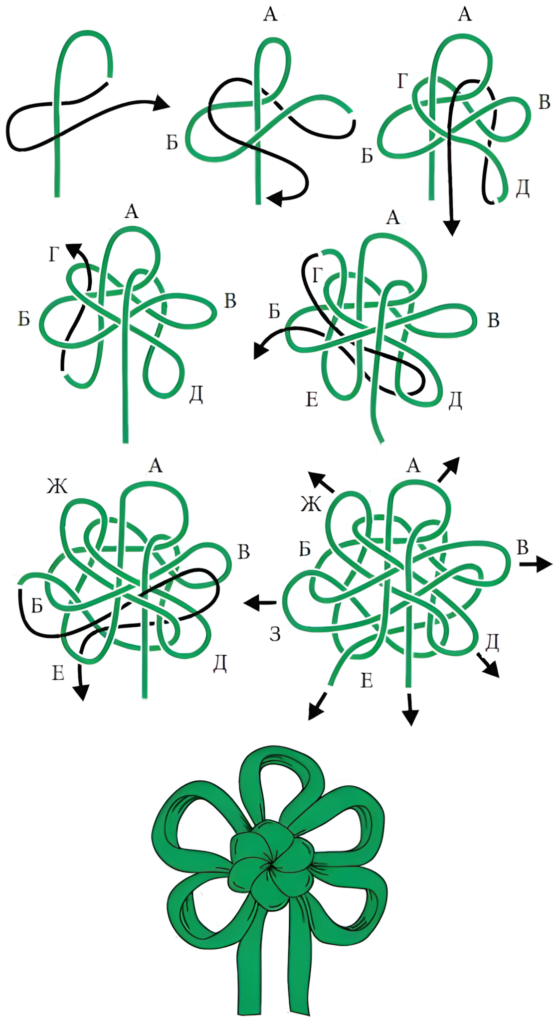
Let’s grab our cord and follow the arrows!
What You Will Need
To tie this knot, you don’t need a lot of expensive materials.
- Rope or Cord: For your first attempt, use a smooth, slightly thick cord (like twisted cotton rope or satin cord). Thicker cords make it easier to see the loops and understand the “over and under” weave.
- Paracord (Type 325 or 550) also works wonderfully if you plan to make this into a bracelet or keychain later.
- Patience: This knot requires reading the diagram carefully and adjusting the loops at the end. Take your time, and don’t rush!
Understanding the Diagram’s Labels
Before we begin the weaving, let’s understand the map provided in the image.
- Cyrillic Letters (A, Б, В, Г, Д, Е, Ж, З): These letters mark the specific loop points, bends, and tails of the rope. Following their path in order is the key to building the structure.
- Black Arrows: These indicate the exact direction the rope needs to travel. Always follow the arrow head.
- Step-by-Step Flow: Each panel in the image shows a new stage of the knot. You build the outer “petals” first, then weave the center to lock everything together.
Step-by-Step Tutorial: Tying the Celtic Flower Knot
Follow this 8-step breakdown based on the diagram. Remember, the magic is in the “over and under” passes!
Step 1: Form the Initial Loop (Panel 1)
- Begin with your cord. Fold it over to create a large, vertical teardrop loop at the top.
- Let the two long tails drop straight down. (You will use these tails for the weaving later).
Step 2: Create the First Side Petal (Panel 2)
- Take the tail on the left side.
- Curl it upward and around to create a “loop” on the left side. Let the tail cross over the main vertical standing end.
- The diagram labels this left loop area Б.
- Notice the top portion of the original loop is marked A.
Step 3: Create the Right Petal (Panel 3)
- Now, take the tail on the right side.
- Curl it upward to create a loop on the right side, crossing it over the main vertical standing end.
- The right loop area is labeled В.
- You will also notice a new inner loop being formed near the center, labeled Г. Take the tail and tuck it under the center according to the arrow.
Step 4: Start the Lower Loops (Panel 4)
- Now, bring the right tail down and to the left to create a lower loop labeled Д.
- Weave this tail over and under the existing center lines. Follow the downward-pointing arrow to guide the tail through the center.
Step 5: Interlock the Bottom (Panel 5)
- Take the left-hand tail and bring it down to create the bottom-left loop labeled Е.
- Look closely at the black arrow at the center (pointing left). You must weave the tail over one thread, under the next, and over the third to interlock the bottom section properly.
Step 6: The Center Loop (Panel 6)
- Take the original tail and create a new, small inner loop labeled Ж near the top center.
- Weave the long tail under the right loop, then through the center and out. This is creating the dense “seed” in the middle of the flower.
Step 7: The Final Pass (Panel 7)
- This is the final step of weaving. You will have a tail labeled З on the left side.
- Pass this tail under the left side, over the bottom loops, and finish threading it out to the right.
- Crucial Tip: At this stage, look at the four arrows pointing outward. These indicate the four loops that should be visible at the four corners of the knot.
Step 8: Adjust and Tighten (The Final Result)
- The bottom image shows the finished Celtic Flower Knot.
- You have a beautiful, circular weaved center with four distinct loops (petals) pointing outward, and two tails dropping down.
- How to Finish: Do not pull tightly on one single end. Instead, gently pull the loops (A, B, В, Г, etc.) one by one to take up the slack. Work your way around the knot pulling a little bit at a time. As you pull, the flower will tighten and take a perfectly round, symmetrical shape.
- Trim the bottom tails to your desired length.
Pro-Tips for a Beautiful Celtic Knot
- Use a Template: If you are struggling with the “over and under” direction, lay your cord on a flat surface and physically place it over and under your fingers to follow the path.
- Patience at the End: Step 8 is the difference between a messy tangle and a beautiful knot. Be very gentle when adjusting. Pull just a millimeter of slack from each loop, moving clockwise around the flower. It takes a few minutes, but it’s incredibly rewarding.
- Pin it Down: If you are using a smooth cord, it may try to slip out of shape while you weave it. Use a few sewing pins or small clips to hold the loops in place as you work.
Creative Uses for the Celtic Flower Knot
Once you have mastered this beautiful shape, put it to use!
- Paracord Ornaments: Leave the long tails, loop them together, and hang it as a decorative ornament for your car, bag, or keyring.
- Decorative Button: This knot can be sewn onto a jacket, a backpack, or a canvas tote bag as a beautiful, handmade Celtic accent.
- Jewelry Pendants: Tie the knot with a metallic wire or a colorful satin cord, add a jump ring to the top, and wear it as a stunning pendant necklace.
- Bookmarks: Tie a Celtic Flower Knot at the end of a long braided piece of cord to make a heavy, beautiful bookmark.
Conclusion
The Celtic Flower Knot is a beautiful way to connect with ancient art forms while creating something practical and decorative. It may take a few practice runs before the “over and under” patterns become muscle memory, but the final result is absolutely worth the effort.
Save this step-by-step guide to your Pinterest board for your next craft night! Let me know in the comments: What color cord are you going to use to make your Celtic flower?
Happy Knotting! 🪢🍀✨


