Learn how to tie the classic Monkey’s Fist knot with this easy step-by-step tutorial. Perfect for keychains, paracord projects, and decorative nautical crafts!
Introduction: The Classic Nautical Knot
If you have ever seen a heavy, perfectly round knot at the end of a rope, you were likely looking at a Monkey’s Fist. This iconic knot is historically famous as a weight tied to the end of a heaving line, thrown between ships to secure them to docks.
Today, the Monkey’s Fist has evolved into a beloved decorative craft. It is widely used to make stylish keychains, cute paracord zipper pulls, unique curtain tie-backs, and even weighted toggles for jackets.
While it looks incredibly complex and intricate, the Monkey’s Fist is actually made by wrapping rope or cord around your fingers in a simple, repetitive pattern. With the right technique, you can create this beautiful, spherical knot in just a few minutes.
Let’s grab some paracord and follow this simple 6-step guide!
What You Will Need
To make a Monkey’s Fist, you don’t need much—just the right cord and an optional “core” to give it weight and shape.
- Cord / Rope: Paracord (Type 550) is the most popular choice because it is durable, colorful, and easy to work with. You will need about 3 to 4 feet of cord for a small knot. For a larger knot, use thicker rope.
- A Core (Optional): While you can make a hollow Monkey’s Fist, adding a core makes it hold its perfectly round shape. In Step 6, the tutorial suggests using a marble, a small rubber ball, or a steel bearing.
- Patience and Steady Hands: The knot requires a bit of dexterity to keep the loops neat!
Step-by-Step Tutorial: Tying the Knot
Follow these 6 steps carefully, paying close attention to the “wraps” and “passes” to ensure your knot comes out perfectly round.
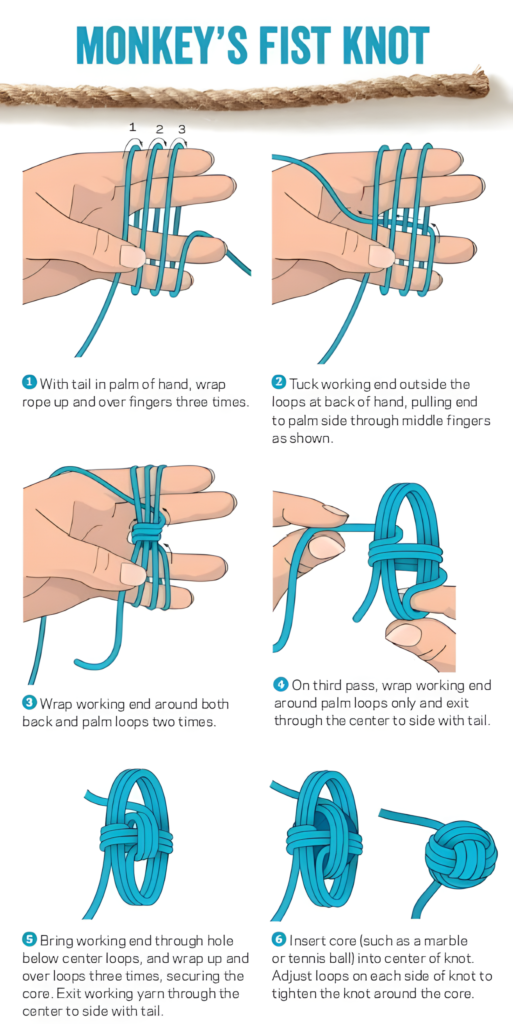
Step 1: The First Wrap (Around Your Fingers)
- Take the tail (the short end) of your cord and hold it in the palm of your hand.
- Bring the long, working end of the cord up and over your fingers (specifically your index, middle, and ring fingers).
- Wrap the cord three times around your fingers. Keep these wraps tight and side-by-side, not overlapping. (See Image #1).
Step 2: Tuck and Pull to the Palm Side
- Take the working end of the cord and tuck it outside the three loops you just created on the back of your hand.
- Pull the cord through the gap between your fingers, bringing it to the palm side.
- Pull it through the middle fingers to the palm side as shown in the diagram. (See Image #2).
Step 3: The Second Wrap (Around Front and Back)
- This step creates the second layer of the knot.
- Take your working end and wrap it around both the loops on the back of your hand AND the loops resting in your palm.
- Wrap around both sets of loops two times (two passes). Keep these wraps snug against the previous ones. (See Image #3).
Step 4: The Third Pass (The Final Wrap)
- For the third and final pass, you will only wrap around the loops sitting in your palm.
- Wrap around the palm loops two times.
- To finish this step, push the working end through the center of the bundle. Let the tail exit out to the side of the knot. (See Image #4).
Step 5: Prepare the Core Hole
- Carefully remove the knot from your fingers. You should now have a criss-crossing basket of cord loops.
- Bring the working end of the cord through the hole situated below the center loops.
- Wrap the working end up and over the center loops three times to secure the core.
- Exit the working end through the center to the side to finish the weaving process. (See Image #5).
Step 6: Insert the Core and Tighten (The Magic Step!)
- Now for the satisfying part! Take your core (a marble, ball, or pebble) and carefully insert it into the center hole of the knot. Make sure it sits right in the middle of the loops. (See Image #6).
- Tightening: This is the most delicate part of the process. Do not pull on one end aggressively. Instead, gently adjust the loops on each side of the knot, working your way around the sphere.
- Pull the loops one by one to tighten the knot snugly around the core.
- As you pull, the knot will shrink and form a tight, perfectly round ball.
Finishing:
- Trim the short tail end flush against the knot.
- Take the long working end and use it to make a lanyard, a keychain loop, or simply tuck it inside the knot to hide it entirely.
Pro-Tips for a Perfect Monkey’s Fist
- Tension is Everything: When you are first wrapping the cord around your fingers, keep the tension even. Do not pull the loops too tight, or you won’t be able to slide the core in later!
- Work on the Core: If you are making a keychain, you can weigh it down with a steel ball bearing. For a decorative curtain tie-back, simply use a hollow foam ball as a core to save weight.
- Use a Lighter (Paracord Tip): If you are using nylon paracord, the very ends will fray. Use a lighter to briefly melt the ends of the cord and press them flat to seal them before you start tying.
- Practice Makes Perfect: The first Monkey’s Fist you tie will likely look a little lopsided. That is completely normal! The more you tie, the more your brain memorizes the sequence and the easier it becomes to tighten it evenly.
Creative Ways to Use Your Monkey’s Fist
Now that you have mastered the knot, what do you do with it?
- Keychain: Attach the long tail to a metal keyring. The heavy knot makes your keys easy to find in a bag.
- Curtain Tie-Back: Thread a long piece of rope through two Monkey’s Fists and use them as decorative weights to hold back curtains.
- Zipper Pull: Make a tiny Monkey’s Fist with thin embroidery thread and add it to the zipper of your favorite jacket or backpack.
- Weighted Ends: Add them to the end of a leather belt or a drawstring bag for a rugged, nautical look.
Conclusion
The Monkey’s Fist is a classic knot that never goes out of style. Its unique, bulbous shape makes it an instant conversation starter.
Don’t get discouraged if your first attempt feels messy. Like all crafts, knot-tying requires practice. Once you tighten that third wrap and feel the knot solidify around the core, you will be hooked on this fun and practical skill!
Save this guide to your Pinterest board for your next weekend project! Let us know in the comments: What are you planning to make with your first Monkey’s Fist?
Happy Knotting! 🪢🧵


