Learn how to tie the classic, decorative Button Knot with this easy step-by-step tutorial. Perfect for paracord, bracelets, and historical knot craft!
Introduction: The Knot of Good Luck and History
If you are a fan of knot-tying, paracord crafts, or nautical history, the Button Knot is an essential skill to add to your repertoire. Unlike the bulky Monkey’s Fist, the Button Knot is a flat, interwoven, circular knot that creates an elegant, braided disc.
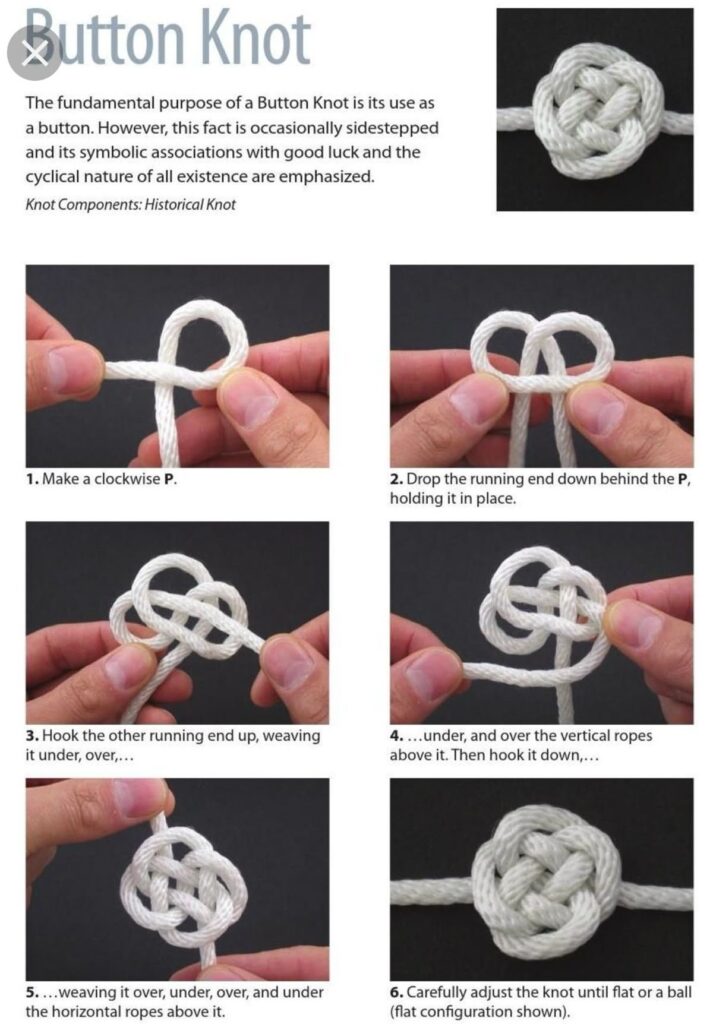
As the image notes, the fundamental purpose of a Button Knot is its use as a functional button. However, throughout history, this knot has taken on a deeper meaning. It is often associated with good luck and the symbolic, cyclical nature of existence. It’s a knot that feels almost meditative to tie.
In modern times, the Button Knot is a favorite among paracord enthusiasts. It is frequently used to create the closure on a paracord bracelet, or as a decorative stopper at the end of a lanyard. It looks complex—like a braided Celtic knot—but as you will see in the six steps below, it is created through a simple, repeating under-and-over weave.
Let’s grab some rope and learn how to tie this beautiful, historical knot!
What You Will Need
One of the best things about the Button Knot is its minimal material requirements:
- Cord / Rope: Paracord (Type 325 or 550) is the best choice for beginners. The example in the image uses a thick, white twisted cotton rope, which makes the over/under weave very easy to see.
- Patience: Because this knot relies on a precise “over, under, over, under” weave, it requires a bit of patience and a steady hand.
Step-by-Step Tutorial: Tying the Button Knot
Follow these 6 steps very carefully. Pay close attention to the “overs” and “unders,” as the final pattern relies on this exact sequence.
Step 1: Make a Clockwise “P”
- Take your rope and create a small loop at the top, letting the working end (the long piece) fall to the right.
- Cross the working end over the standing end to form the shape of a capital letter “P”.
- Hold the cross point firmly between your thumb and index finger. (See Image #1).
Step 2: Drop the Running End Behind
- Take the running end (the long tail) and drop it down behind the “P” loop you just created.
- Hold it in place with your fingers. (See Image #2).
Step 3: The Upward Hook (First Weave)
- Take the running end and hook it upwards.
- You will now begin the “weaving” process that creates the knot’s braided appearance.
- Bring the tail under, then over, in a serpentine motion through the center of the loops. (See Image #3).
Step 4: Over and Under (The Vertical Ropes)
- Continue the weave by bringing the tail under and over the vertical ropes directly above it.
- Once you have passed over the vertical ropes, hook the tail back down toward the bottom of the knot structure. (See Image #4).
Step 5: Finish the Weave (The Horizontal Ropes)
- Now you need to pass the tail through the horizontal ropes at the bottom.
- Bring the tail over, then under, then over, and finally under the horizontal ropes.
- This completes the “over, under, over, under” pattern that locks the braid in place. (See Image #5).
Step 6: Adjust and Tighten (The Magic Moment)
- Now you have a beautifully tangled, braided disc!
- This is the most critical step. Do not pull one end tightly—the knot will crumple.
- Instead, carefully adjust the knot by pulling the loops gently, one by one.
- As you pull the slack out of the center, the knot will tighten and form a perfect, flat disc. If you pull it tighter, it will form a small ball shape. The image shows a flat configuration. (See Image #6).
Finishing:
- Trim the tail ends close to the knot.
- If you are using nylon paracord, use a lighter to melt the ends slightly and press them flat to secure them permanently.
Pro-Tips for a Perfect Button Knot
- Follow the “Over/Under” Rhythm: The diagram in Step 5 is incredibly clear. Read the path of the tail carefully. If you miss one “under” and do an “over” instead, the whole Celtic pattern will unravel. Take it slowly!
- Use a Larger Cord for Practice: The white rope in the picture is much thicker than standard paracord. When learning, start with a thicker cord. The increased size makes the loops easier to see and your fingers easier to maneuver.
- Wet It Before Tightening: If you are using twisted cotton rope (like in the image), getting the knot slightly damp before you tighten it will make it much easier to pull the loops into a uniform shape.
- Don’t Overthink Step 6: The “adjustment” stage is simply about pulling the slack out of the loop sequence. Start by pulling the loop closest to the end, and work your way around the entire circle.
Creative Uses for the Button Knot
Now that you have mastered this beautiful knot, here are a few ways to incorporate it into your projects:
- Bracelet Closures: The Button Knot is the absolute best way to make an adjustable, slip-on closure for a paracord bracelet.
- Decorative Stopper: Tie one at the end of a drawstring bag, a leather belt, or a zipper pull.
- “Good Luck” Charms: Because of its historical symbolism, a small Button Knot makes a wonderful, handmade good luck charm to attach to a keychain or a rearview mirror.
- Decorative Buttons: As the historical purpose suggests, you can sew a flat Button Knot onto a coat or a knapsack for a rugged, handmade touch.
Conclusion
The Button Knot is a beautiful blend of function and art. It looks like an ancient Celtic design, yet it is surprisingly simple to create with just a few passes of the rope. With a little patience and careful attention to the over/under weave, you can create a durable, lucky, and professional-looking knot in just a few minutes.
Save this guide to your Pinterest board for your next paracord project! Let us know in the comments: Have you tied a Button Knot before, or is this your first time trying it?
Happy Knotting! 🪢🧵✨


