How to Make a Multi-Strand Beaded Leather Bracelet: 15-Step DIY Guide
Learn how to make a beautiful, multi-strand beaded leather bracelet with this easy 15-step tutorial. Perfect for using up extra beads and creating a delicate, boho-chic accessory!
Introduction: The Art of Layered Beading
If you are looking for a jewelry project that combines a rustic texture with delicate, elegant details, this Multi-Strand Beaded Leather Bracelet is the perfect match. 🪢✨
This stunning accessory features a mixture of thin, light-colored leather cords, interspersed with dainty pale green and white pearl beads, silver spacer beads, and ornate flower charms. The final result is a delicate, airy bracelet that looks beautifully complex—but it is surprisingly easy to construct.
The 15-step tutorial above breaks this project down into two main phases: creating the individual beaded components and assembling them into a unified strand with a professional clasp finish. Whether you are a seasoned jewelry maker or a beginner looking to elevate your skills, this is a rewarding and satisfying project.
What You Will Need
Before you begin, gather the following supplies (as shown across the panels):
For the Beaded Components:
- Beads: Pale green round beads (pearls or glass), small white pearl beads, and small silver spacer beads.
- Eye Pins & Head Pins: Thin silver wire pins to create the beaded dangles.
- Charms: Small silver flower or daisy charms.
- Tools: Round nose pliers and flat nose pliers (for bending wire and closing loops).
For the Bracelet Assembly:
- Leather Cord: Thin, light beige or natural-colored leather cord (approximately 1mm). You will need multiple strands.
- Clasps & Findings:
- 1 x Magnetic Tube Clasp (the silver cylinder shown in Panel 12).
- 1 x Lobster Clasp (for the adjustable closure).
- 2 x Large Jump Rings.
- Tools: Wire cutters (for trimming cord) and clear craft glue (to secure knots).
Step-by-Step Tutorial: Building the Bracelet
This 15-step guide is split into two parts. First, we make the delicate beaded dangles, and then we assemble the leather strands.
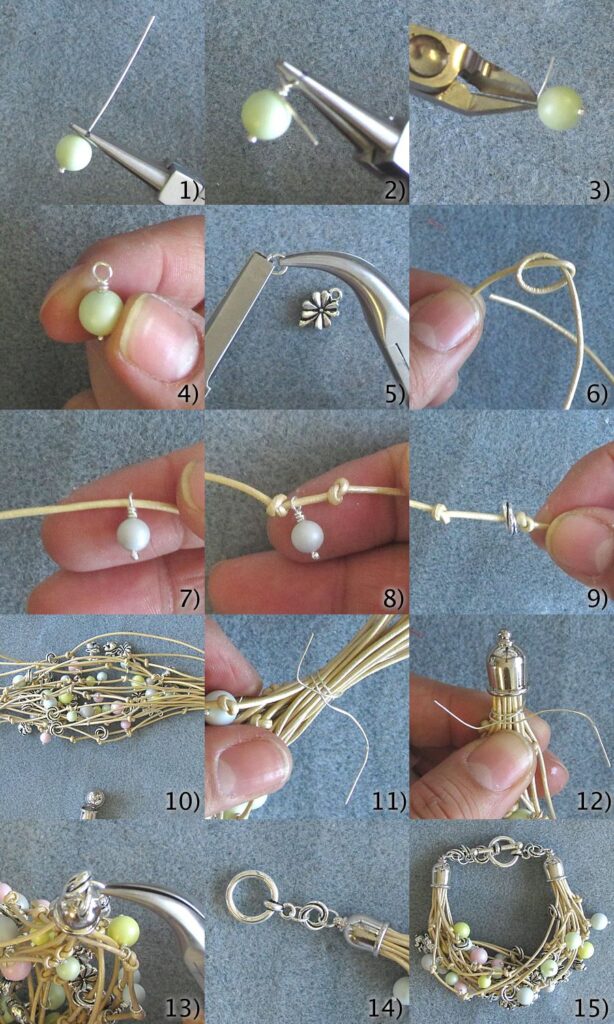
Part 1: Creating the Beaded Dangles (Panels 1-5)
Panel 1 & 2: The Eye Pin Loop
- Take an eye pin (a thin wire with a loop at one end).
- Thread a pale green bead onto the pin.
- Using your round nose pliers, bend the straight wire end at a 90-degree angle right above the bead. (Panel 1).
- Grip the very tip of the wire with your pliers and roll it back to form a small, tight loop. This secures the bead. (Panel 2).
Panel 3: Closing the Loop
- Use your flat nose pliers or chain nose pliers to gently squeeze the loop closed. Make sure the loop is perfectly centered on top of the bead. (Panel 3).
Panel 4 & 5: The Finished Component
- You now have a completed beaded dangle.
- Panel 4 shows the finished dangle with a loop at the top to attach to the bracelet.
- Panel 5 shows the tools and a small silver flower charm. You can repeat the bead-looping process to make multiple dangles—some with the pale green beads, others with the small white pearls.
Part 2: Assembling the Multi-Strand Bracelet (Panels 6-15)
Panel 6 & 7: Start the Leather Cord
- Take a long strand of your light beige leather cord.
- Make a small loop at one end of the cord using an overhand knot. (Panel 6).
- Thread a white pearl bead onto the cord, leaving a small gap below the loop knot. (Panel 7).
Panel 8 & 9: The Knot and Bead Pattern
- Tie an overhand knot immediately below the white pearl bead to hold it in place. (Panel 8).
- String a silver spacer bead onto the cord.
- Tie another overhand knot below the silver spacer. (Panel 9).
- Pro-Tip: This is your repeating pattern: Knot, white pearl, knot, silver spacer, knot. Continue this pattern along the length of the cord, leaving about 1.5 inches empty at the end.
Panel 10: Add the Charms and Dangles
- Now, attach the beaded dangles and flower charms you made in Part 1.
- Use your pliers to open the loops of the dangles slightly and thread them onto the leather cord. Close the loops back up.
- Space the dangles and charms intermittently between the beaded sections of the cord. This adds the beautiful, dangling texture shown in Panel 10.
Panel 11: Gather the Ends
- To give the bracelet a luxurious, layered look, you will be making multiple parallel strands of this beaded and knotted cord (about 5 to 6 strands).
- Gather the ends of all your strands together.
- Take a new, separate piece of cord (about 4 inches long). Wrap it tightly around the gathered bundle of strands about 3 to 4 times.
- Tie a tight knot to secure the wrapping. (Panel 11).
Panel 12: Attach the Magnetic Clasp
- Take one half of your magnetic tube clasp.
- Thread the wrapped bundle of leather cords through the loop at the bottom of the clasp.
- Fold the bundle back and tuck the excess cord inside the clasp tube.
- Crucial Step: Add a drop of clear craft glue inside the tube to permanently bond the leather to the clasp. Let it dry. (Panel 12).
Panel 13 & 14: The Adjustable Closure
- Repeat the wrapping and gluing process (Steps 11 & 12) for the other end of your bracelet bundle to attach the other half of the magnetic clasp.
- Make it Adjustable: Take a lobster clasp. Attach it to a large jump ring. Connect this jump ring to one end of the bracelet’s magnetic clasp. (Panel 14).
- Take a second large jump ring and attach it to the opposite end of the magnetic clasp. This jump ring acts as the “receiver” for the lobster clasp, allowing you to adjust the length.
Panel 15: The Finished Masterpiece
- Your Multi-Strand Beaded Leather Bracelet is now complete!
- You have a beautiful, boho-chic bracelet with an elegant magnetic closure, delicate dangling beads, and a comfortable adjustable fit. Wear it with pride! ✨
Pro-Tips for a Professional Finish
- Seal Your Knots: Leather cord is slippery! Before you trim the tails of the knots you tie (in Steps 8, 9, and 11), add a tiny drop of clear craft glue to the knot and let it dry completely. This ensures your knots never come undone.
- Vary Your Pattern: For a truly “artisan” look, do not make each leather strand exactly the same. Add more beads to one strand, use different sized pearls on another, and leave one strand relatively empty. This organic variation makes the bracelet look beautifully handmade.
- Stagger the Dangles: When adding the beaded dangles (Panel 10), avoid clustering all of them in the center. Stagger them along the length of the bracelet so they move and dangle beautifully when you wear it.
- Use Waxed Cotton as an Alternative: If you find plain leather cord too slippery, use waxed cotton cord. It has a slightly tacky surface that grips the knots perfectly.
Creative Ways to Wear Your Bracelet
This delicate, boho bracelet is incredibly versatile. Here is how to style it:
- Stack with Others: Layered bracelets are in style! Stack this with a thin silver chain bracelet, a simple gold bangle, or even a leather cuff.
- Summer Boho: Wear it with a flowy white sundress, strappy sandals, and a wide-brimmed straw hat for the ultimate summer festival look.
- Casual Chic: It pairs beautifully with a simple white t-shirt and distressed jeans. The bracelet adds a touch of elegance to a relaxed outfit.
- The Perfect Gift: Because of its delicate nature and high-end finish, this bracelet makes an incredible handmade gift for a friend, mother, or daughter.
Conclusion
The Multi-Strand Beaded Leather Bracelet is a wonderful example of how simple knotting and beading techniques can come together to create something truly beautiful. By mixing textures—smooth pearls, rustic leather, and silver accents—you create a piece of jewelry that is both modern and timeless.
Save this 15-step guide to your Pinterest board for your next DIY jewelry day! Let me know in the comments: What color leather and bead combination are you planning to use for your bracelet?
Happy Beading and Knotting!