How to Make a Beaded Daisy Pearl Necklace: Easy Step-by-Step Guide
Learn how to make a gorgeous beaded daisy pearl necklace with this easy step-by-step tutorial. Uses simple wire techniques and beautiful turquoise, pearl, and yellow beads for a stunning summer accessory!
Introduction: Vintage Charm Meets Boho Style
If you love jewelry that feels fresh, cheerful, and effortlessly elegant, this Beaded Daisy Pearl Necklace is going to become your new favorite handmade accessory. 🌼✨
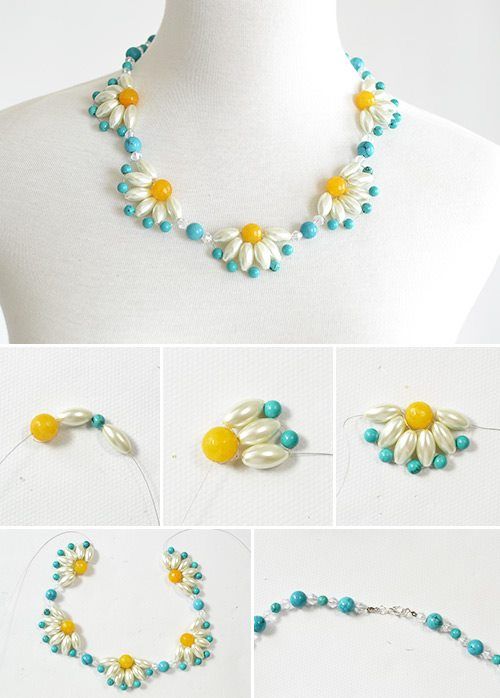
The finished necklace in the image is a beautiful example of classic beading techniques. It features stunning, dimensional white pearl daisies with sunny yellow centers, interspersed with vibrant turquoise spacer beads and finished with a sleek silver clasp. It has a distinct vintage, yet boho-chic vibe that makes it perfect for spring and summer outfits.
The best part? The tutorial below breaks this seemingly complex design down into 6 simple, visual steps. If you can thread a needle and tie a knot, you can absolutely make this beautiful daisy chain necklace. Let’s get started! 🪢✨
What You Will Need
To create this beautiful floral necklace, gather these essential supplies:
- Beads: You will need a mix of shapes and colors:
- Yellow Beads: Round, smooth beads for the daisy centers.
- Pearl Beads: Teardrop or rice-shaped white pearls for the flower petals.
- Turquoise Beads: Small, round turquoise or teal beads for the spacers and the necklace chain.
- Crystal Beads: Small clear or faceted crystal beads (optional, but adds a lovely sparkle between the turquoise).
- Beading Wire: Flexible, thin beading wire (0.3mm or 0.4mm) in a silver color.
- Beading Needle: A thin, sharp needle (size 10 or 12).
- Clasps & Findings:
- 1 x Lobster Clasp.
- 2 x Jump Rings.
- 2 x Crimp Beads (small silver tubes to secure the wire).
- Tools:
- Wire cutters.
- Flat-nose pliers (for crimping).
- Scissors.
Step-by-Step Tutorial: Building the Daisy Necklace
This pattern uses a clever looping technique to create 3D daisies directly on the wire. Follow these 6 steps carefully.
Step 1: Create the Flower Foundation
- Take your beading wire and thread your needle.
- String your first bead onto the wire: 1 Yellow center bead.
- Next, string on 1 White pearl petal and 1 Turquoise spacer bead.
- (See the first panel of the diagram).
Step 2: Add the Second Petal
- Loop the wire around and go back through the Yellow center bead.
- String on 1 White pearl petal and 1 Turquoise spacer bead again.
- Pull the wire tightly so the petal rests firmly against the yellow center.
- (See the second panel of the diagram).
Step 3: Complete the Daisy Flower
- Repeat the process from Step 2: Pass the wire through the Yellow center bead. Add 1 White pearl petal and 1 Turquoise spacer bead.
- Do this 3 times until you have a total of 5 White pearl petals surrounding the Yellow center bead.
- To close the loop and secure the daisy, pass the wire back through the Yellow center bead one last time and pull it tight.
- You now have a perfect, five-petaled daisy! (See the third panel).
- Pro-Tip: Make 6 to 7 of these daisy flowers, leaving a few inches of wire between each.
Step 4: Connect the Daisies
- Take a long piece of beading wire.
- String on the beads that will form the “chain” between your flowers: 1 Turquoise spacer bead, 1 Crystal bead, 1 Turquoise spacer bead.
- Attach one of your finished daisies to the wire by passing the wire through the center of the daisy and back out.
- Continue this pattern: Spacer, Crystal, Spacer, Daisy.
- Assemble them in a beautiful, U-shaped necklace arc. (See the fourth panel).
Step 5: Add the Clasp
- Once your necklace reaches the desired length, it’s time to finish the ends.
- Thread the wire through a Crimp bead.
- Thread the wire through a Jump ring.
- Pass the wire back through the Crimp bead.
- Use your flat-nose pliers to squeeze the Crimp bead flat, securing the jump ring in place.
- Do this on both sides of the necklace.
- Attach a Lobster clasp to one side via the jump ring. (See the fifth panel).
Step 6: The Finished Masterpiece
- Use your wire cutters to trim any excess wire close to the crimp beads.
- Your Beaded Daisy Pearl Necklace is now complete!
- Lay it flat and gently adjust the daisies so they sit perfectly.
- The finished look is stunning, cheerful, and perfectly boho. ✨
Pro-Tips for a Perfect Daisy Necklace
- Tension is Everything: When you are looping the wire back through the yellow bead to add each new petal (Step 2 & 3), pull the wire firmly. If the wire is loose, the daisy petals will flop around instead of standing upright in a 3D circle.
- Use Quality Beads: Uniformity is key. Use high-quality glass pearls and round beads. If the beads are slightly different sizes, your daisies may look lopsided.
- Plan Your Layout: Before you start stringing the daisies onto the main chain (Step 4), lay your finished daisies out on a flat surface and arrange them in a pleasing arc. This helps you visualize how the final necklace will drape.
- Customize Your Colors: This pattern is incredibly versatile. Swap the yellow center for a navy blue, the white pearls for pale pink, and the turquoise for silver for a completely different look!
Creative Ways to Style Your Daisy Necklace
This cheerful necklace is a summer staple. Here is how to wear it:
- Summer Sundress: Pair it with a bright yellow, white, or floral sundress for the ultimate sunny day look.
- Casual Tee: Add a pop of color to a simple white t-shirt and jeans. The necklace elevates any casual outfit.
- Layered Boho: Layer this necklace with a long, thin gold chain and some stacked beaded bracelets for a full bohemian vibe.
- Bridal Party Gift: Make a set of these for your bridesmaids! They make gorgeous, meaningful, handmade gifts.
Conclusion
The Beaded Daisy Pearl Necklace is a beautiful example of how a few simple beading techniques can create something truly special. With just a needle, some wire, and a handful of colorful beads, you can weave your own garden of flowers to wear around your neck.
Save this 6-step guide to your Pinterest board for your next jewelry-making session! Let me know in the comments: What color daisies are you planning to make for your necklace?
Happy Beading!