How to Make a Mini Beaded Daisy Chain: Easy Seed Bead Flower Tutorial
Learn how to make a gorgeous mini beaded daisy chain using tiny seed beads. This easy step-by-step tutorial is perfect for delicate bracelets, rings, and necklaces!
Introduction: Tiny Flowers, Big Style
There is something incredibly satisfying about creating beautiful, intricate jewelry from the smallest of materials. This Mini Beaded Daisy Chain is the perfect example of how a few tiny seed beads can weave together to create something absolutely adorable. 🪢✨
This tutorial uses a simple, continuous-loop technique to build delicate, three-dimensional daisy flowers on a clear, nearly invisible beading thread. The result is a stunning, airy floral chain that looks like a delicate garden floating around your wrist or neck.
With just two colors of seed beads—turquoise blue for the petals and bright yellow for the centers—you can create this stunning, minimalist jewelry piece. Let’s break down the 15-step guide and learn how to make this beautiful daisy chain! 🪢✨
What You Will Need
To make this delicate daisy chain, gather these simple supplies:
- Seed Beads: You will need two colors of tiny seed beads (size 11/0 or 8/0 work best):
- Turquoise Blue: For the flower petals.
- Bright Yellow: For the flower centers.
- Beading Thread: Clear, fine beading thread or a very thin nylon wire. The transparency makes the flowers look like they are floating!
- Beading Needle: A very thin, sharp needle (size 10 or 12) that can easily pass through the tiny holes of seed beads.
- Scissors: Sharp, small scissors for trimming thread.
- Clasp (Optional): If you are making a bracelet or necklace with a closure, you will need a lobster clasp, jump rings, and crimp beads.
Step-by-Step Tutorial: Creating the Mini Daisy Chain
This pattern uses a clever looping technique. You are essentially building one flower, then immediately building the next one right on top of it.
Phase 1: Building the First Daisy
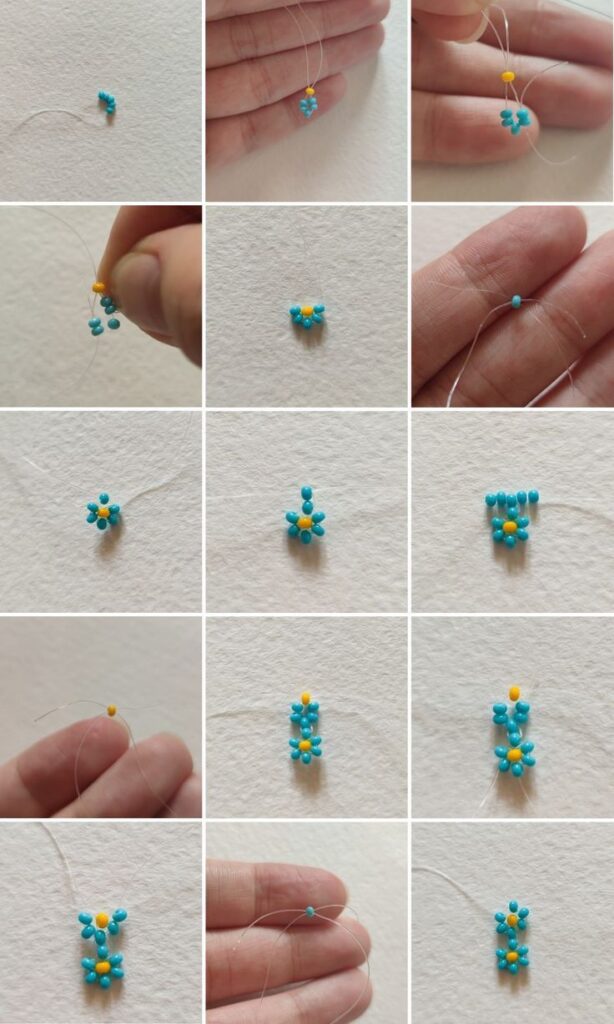
Step 1 & 2: The First Petal
- Thread your needle with a long piece of clear beading thread.
- String on 3 Blue seed beads. Slide them down toward the tail end of your thread. (Row 1, Panel 1).
- Add 1 Yellow center bead to the very end of the string. (Row 1, Panel 2).
Step 3: Forming the Daisy Loop
- Take your needle and loop it backwards through the first Blue bead you originally strung (the one closest to the tail).
- Pull the thread gently. The thread will form a tiny loop that holds the yellow bead in the center. (Row 1, Panel 3).
Step 4: Closing the First Daisy
- Continue threading your needle through the remaining Blue beads.
- Pull the thread taut. The loop will tighten, locking the yellow bead in the center and forming a perfect, tiny 3-petaled daisy. (Row 2, Panel 4 & 5).
Phase 2: Adding the Spacers
Step 5: The Spacer Bead
- Take your needle and add 1 Blue seed bead to the thread. (Row 2, Panel 6).
- Pass the needle down through the base of the daisy you just created.
- Pull tight. This single blue bead acts as a “spacer” between the flowers, ensuring they don’t jam together and the chain lays flat. (Row 3, Panel 7 & 8).
Phase 3: Building the Second Daisy
Step 6: The Second Petal
- Start the second daisy right above the spacer.
- String on 3 Blue seed beads.
- Add 1 Yellow center bead to the end of the string. (Row 4, Panel 10).
Step 7: Looping and Tightening
- Just like before, loop your needle backwards through the first Blue bead you strung for this new daisy.
- Pull the thread gently to enclose the yellow center.
- Continue threading the needle through the remaining Blue beads and pull the thread tight to lock the second daisy in place. (Row 4, Panel 11).
Step 8: Repeat the Pattern
- Your daisy chain is now growing! You have two beautiful flowers connected by a single spacer bead.
- To continue, simply repeat the pattern:
- Add 1 Blue spacer bead. (Row 5, Panel 13).
- Pass the needle down through the previous base.
- String 3 Blue petals + 1 Yellow center.
- Loop back through the first Blue petal and pull tight.
- Continue this pattern until your chain reaches the desired length for your bracelet, necklace, or ring. (Row 5, Panel 15).
Finishing:
- Once your chain is long enough, tie a secure knot with your thread and trim the excess.
- Add a lobster clasp and jump rings to the ends if you want a removable bracelet or necklace.
Pro-Tips for a Perfect Mini Daisy Chain
- Tension is Everything: If you pull the thread too tight when closing the daisy loop, the petals will curl up into a tiny ball. If you pull too loose, the yellow center will fall out. Aim for a firm, snug tension that holds the petals flat.
- Use a Bead Mat: Seed beads are tiny and roll around easily. Work on a soft beading mat or a clean, low-pile towel to prevent them from rolling off your table.
- Be Patient with the Needle: Seed beads have very small holes. If your needle is too thick, it won’t pass through. Always use a size 10 or 12 beading needle.
- Customize Your Colors: This pattern is incredibly versatile. Swap the turquoise petals for soft pink, lavender, or even pure white for a classic daisy look!
Creative Ways to Use Your Mini Daisy Chain
This delicate floral chain is perfect for a variety of jewelry and craft projects:
- Delicate Bracelet: A single daisy chain makes a gorgeous, minimalist bracelet. It looks beautiful stacked with other beaded bracelets.
- Adjustable Ring: Make a small chain, add an extender chain, and wear it as a cute, floating ring.
- Choker Necklace: Create a longer chain and finish it with a clasp for a stunning, boho-chic choker.
- Lanyard Charm: Attach a small clip to the end of a short daisy chain and clip it to your purse, backpack, or phone case for a cute, portable accessory.
Conclusion
The Mini Beaded Daisy Chain is a wonderful project for beaders who love delicate, intricate designs. With just a needle, some thread, and two colors of seed beads, you can weave a garden of tiny flowers into a stunning piece of jewelry.
The satisfaction of watching the daisies grow, one petal loop at a time, is incredibly rewarding.
Save this guide to your Pinterest board for your next beading session! Let me know in the comments: What color daisies are you planning to make with this technique?
Happy Beading!