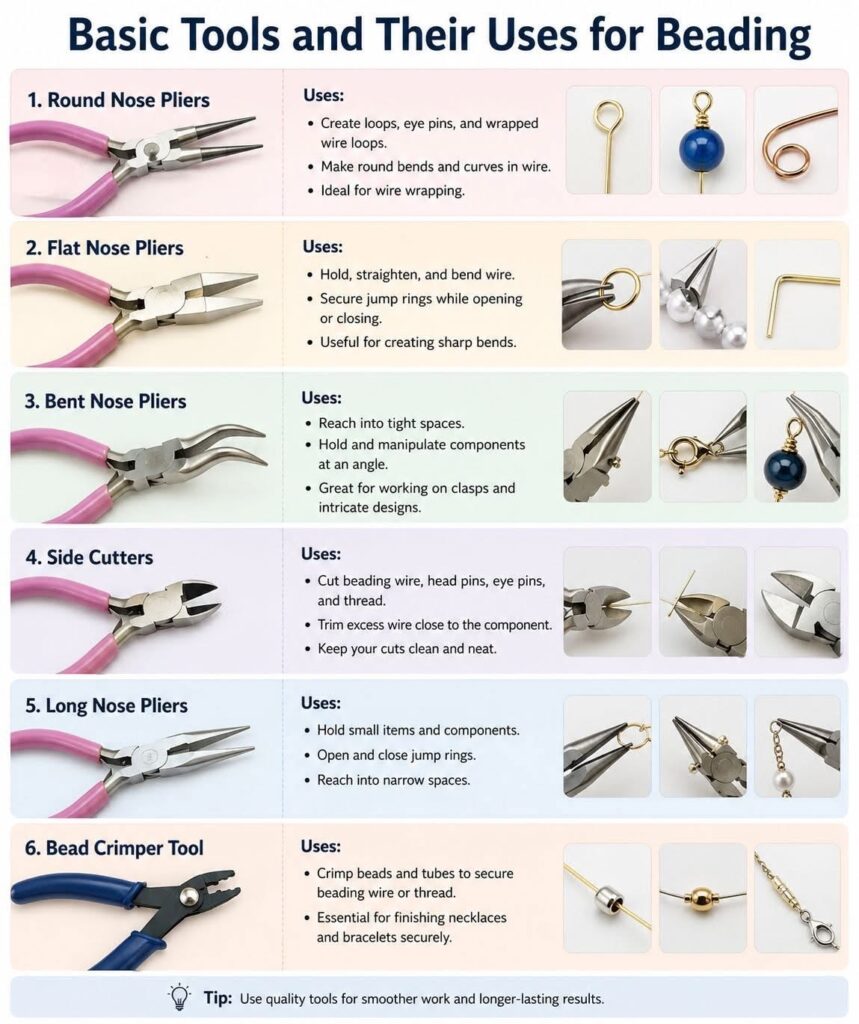
Basic Beading Tools: A Beginner’s Guide to Essential Jewelry Making Supplies
Basic Beading Tools: New to jewelry making? This beginner’s guide breaks down the 6 essential beading tools you need, including pliers, cutters, and crimpers, with practical tips for every project!
Introduction: Setting Up Your First Beading Tool Kit
Starting a new hobby can be intimidating, especially when you walk into a craft store and see aisles of unfamiliar tools. But here is the secret: you don’t need hundreds of tools to make beautiful jewelry. 🪢✨
In fact, almost every beading project—from simple stretch bracelets to intricate wire-wrapped pendants—can be completed with just 6 essential tools. The guide above perfectly breaks down exactly what these tools are, what they look like, and how to use them.
Whether you are a complete beginner just getting started, or a seasoned crafter looking to upgrade your basic tool kit, this guide will help you understand the purpose of every plier and cutter in your box. Let’s dive into the basic beading toolkit! 🪢✨
The 6 Essential Beading Tools You Need
Here is a comprehensive breakdown of the 6 core tools shown in the infographic, along with their specific uses in jewelry making.
1. Round Nose Pliers
What they are: Pliers with smooth, cone-shaped jaws that taper to a fine point.
Primary Uses:
- Creating Perfect Loops: Round nose pliers are the absolute best tool for making loops at the end of eye pins and head pins.
- Wire Wrapping: They allow you to make smooth, sweeping curves in wire.
- Wire Loops: Essential for creating the “wrapped wire loop” technique, which secures beads permanently.
Pro-Tip: The tapered shape allows you to make loops of varying sizes—use the wider part of the jaw for large loops, and the tip for tiny, delicate loops. (See the blue bead example in the infographic).
2. Flat Nose Pliers
What they are: Pliers with wide, flat jaws that grip along their entire length. They have no teeth, so they will not scratch your wire.
Primary Uses:
- Holding Components: Perfect for holding small jump rings, pins, or beads steady while you work.
- Straightening Wire: They are excellent for grasping and gently bending stiff wire back into a straight line.
- Opening Jump Rings: While your other hand holds the ring, use flat nose pliers to bend the jump ring open sideways (never pull it apart horizontally).
Pro-Tip: Be careful not to squeeze too hard on soft wire, as you can leave marks. Use flat nose pliers for gripping, not crushing. (See the pearl and ring example).
3. Bent Nose Pliers
What they are: Similar to flat nose pliers, but with jaws that angle at about 45 degrees.
Primary Uses:
- Reaching Tight Spaces: The angled jaws are designed to reach into cramped areas where straight pliers simply cannot fit.
- Working on Clasps: They are invaluable for opening and closing the tiny loops on clasps and small components.
- Intricate Designs: If you are making complex wire-wrapped rings or earrings, these pliers allow you to manipulate wire at awkward angles.
Pro-Tip: If you can only afford three tools, make this your third choice. It is a game-changer for comfort and precision!
4. Side Cutters (Wire Cutters)
What they are: Pliers with sharp, angled, cutting jaws designed specifically for cutting wire.
Primary Uses:
- Trimming Wire: Used to cut beading wire, head pins, and eye pins to the precise length you need.
- Clean Cuts: They are designed to make flush, clean cuts, preventing sharp, jagged edges that can snag clothing.
Pro-Tip: Never use your jewelry side cutters to cut thick steel wire or hard metals (like memory wire). Use heavy-duty wire cutters for those. Your jewelry side cutters are designed for soft, malleable metals (like silver, gold-filled, and copper wire).
5. Long Nose Pliers
What they are: Pliers with long, thin, tapered jaws that are flat on the inside.
Primary Uses:
- Holding Tiny Items: They are essential for grasping very small beads, pins, and findings.
- Opening and Closing Jump Rings: They work well in tandem with flat nose pliers to manipulate jump rings.
- Reaching Narrow Spaces: The long, slender nose allows you to reach into deep or narrow areas of an intricate design.
Pro-Tip: These are sometimes called “needle nose pliers.” They are a versatile workhorse that combines the power of flat nose pliers with the reach of bent nose pliers.
6. Bead Crimper Tool
What they are: A specialized tool with a unique, two-step jaw design used specifically for compressing metal crimp tubes.
Primary Uses:
- Securing Wire: The crimper tool is used to flatten and fold small metal crimp beads or tubes over beading wire, locking the wire in place.
- Finishing Necklaces: It is absolutely essential for finishing strung necklaces and bracelets, ensuring the clasp cannot slip off the wire.
Pro-Tip: A crimper tool does not cut. It only compresses. For the strongest, most professional finish, use the first notch of the crimper to flatten the tube, and the second notch to roll it into a neat, rounded shape. (See the silver tubes in the infographic).
Bonus Tip: Invest in Quality
As the infographic notes at the bottom: “Use quality tools for smoother work and longer-lasting results.”
- Why it matters: Cheap tools often have poorly aligned jaws, leaving sharp edges that will scratch your wire or snap off easily. Investing in a reputable brand (like Xuron, Beadalon, or Eurotool) ensures your tools will last for hundreds of projects.
Putting Your Tools to Work
Now that you know what each tool does, here is a mini checklist for your first few projects:
- For a simple wire loop: Use Round Nose Pliers to curl the wire, and Side Cutters to trim the excess.
- For a secure necklace: Use Crimper Tools to lock the wire onto the clasp, and Long Nose Pliers to open the jump rings.
- For a messy wire wrap: Use Flat Nose Pliers to straighten the wire and Bent Nose Pliers to tuck the ends neatly out of sight.
Conclusion
Investing in these 6 basic beading tools is the first step toward a lifetime of joyful jewelry making. You do not need a massive workshop—just a small pouch with these essentials is enough to create stunning, professional-quality pieces.
Save this guide to your Pinterest board for your next jewelry-making shopping trip! Let me know in the comments: Which tool do you find yourself using the most in your beading projects?
Happy Beading!