Every crochet bracelet — whether a simple chain, a beaded masterpiece, or a textured cuff — starts with the foundation chain. This first row of chain stitches (abbreviated as ch) determines the length, fit, and durability of your finished piece. Mastering the foundation chain is the very first skill every crocheter needs to learn.
In this guide, you will learn:
- The full meaning of each step in the crochet chain foundation process
- Step-by-step instructions from start to finish (with detailed explanations)
- How to work back into the chain to create a structured base
- Important tips for achieving professional results
- Materials needed for your first bracelet
Skill Level: Absolute Beginner
Time to Complete: 15–30 minutes
Project Type: Bracelet foundation
Why Master the Crochet Chain Foundation?
| Benefit | Explanation |
|---|---|
| Universal skill | Every crochet project starts with a foundation chain |
| Determines fit | The chain length directly affects bracelet size |
| Creates structure | A solid foundation prevents stretching and warping |
| Supports beads | Beaded bracelets need a stable base row |
| Fast to learn | You can master the foundation chain in 10 minutes |
Part 1: Abbreviations (Abbreviations)
Before you begin, here are the standard crochet abbreviations used in this guide:
| Abbreviation | Full Term | Description |
|---|---|---|
| ch | Chain | The most basic stitch; forms the foundation |
| sc | Single crochet | A short, dense stitch used for the foundation row |
| dc | Double crochet | A taller stitch (not used in this foundation row but mentioned for future rows) |
Part 2: Materials Needed (MATERIALS)
| Material | Specification | Notes |
|---|---|---|
| Yarn or cord | Firm cord (waxed cord or thin yarn) | Firm cord holds shape better than soft, stretchy yarn |
| Crochet hook | Suitable size for your yarn/cord | Check the yarn label for recommended hook size |
| Scissors | Sharp | For clean cuts |
| Beads (optional) | 4mm–6mm beads | Can be threaded onto the yarn before crocheting |
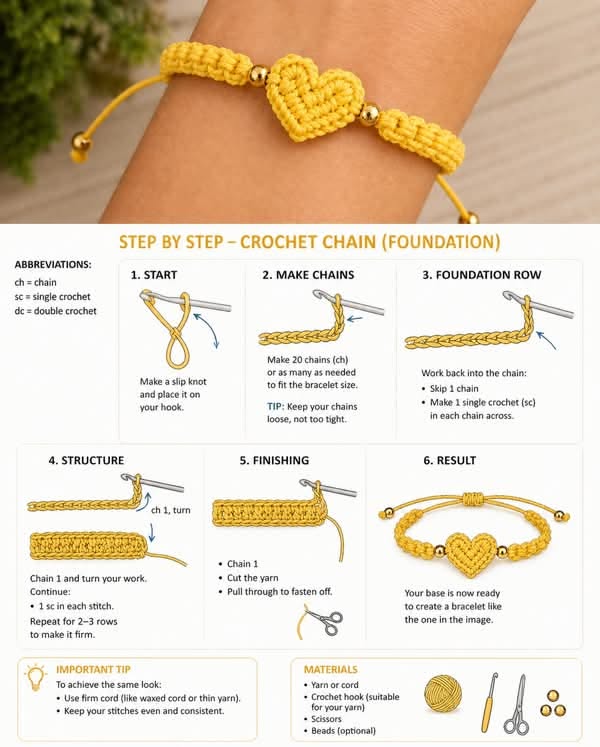
Important Tip from Your Image:
“Use firm cord (like waxed cord or thin yarn). Keep your stitches even and consistent.”
Soft, stretchy yarn will not hold the shape of a bracelet. Waxed cotton cord or thin, firm yarn is ideal for jewelry making.
Part 3: Step-by-Step Instructions
Your image breaks the process into 6 clear steps. Below is the expanded, full explanation of each step.
Step 1: Start (START)
| Action | Detail |
|---|---|
| Make a slipknot | Form a loop with your yarn, pull the working end through, and place it on your hook |
| Place the slipknot on your hook | Tighten gently — it should slide but not fall off |
How to make a slipknot (detailed):
| Sub-step | Action |
|---|---|
| 1 | Make a loop with your yarn, crossing the working end over the tail |
| 2 | Pull the working end through the loop from underneath |
| 3 | Place the resulting loop on your crochet hook |
| 4 | Pull both ends gently to tighten the knot around the hook |
Result: One loop on your hook, ready to begin chaining. The knot should slide easily along the hook but not be so loose that it falls off.
Step 2: Make Chains (MAKE CHAINS)
| Action | Detail |
|---|---|
| Make 20 chains (ch) — or as many as needed to fit your bracelet size | Each chain adds length |
| Tip: Keep your chains loose, not too tight | Tight chains make it difficult to insert your hook for the next row |
How to make a chain stitch (ch):
| Sub-step | Action |
|---|---|
| 1 | Yarn over (wrap the yarn over your hook from back to front) |
| 2 | Pull the yarn through the loop already on your hook |
| 3 | One chain is complete |
| 4 | Repeat steps 1–3 to make more chains |
How many chains for a bracelet?
| Wrist Size | Approximate Chains (with 2mm cord) |
|---|---|
| 14 cm (5.5 in) | 18–20 chains |
| 16 cm (6.3 in) | 20–22 chains |
| 18 cm (7 in) | 22–24 chains |
| 20 cm (7.9 in) | 24–26 chains |
Important: Chains will shorten slightly when you work back into them. Add 2–3 extra chains to your starting count to ensure the bracelet is long enough.
Result: A chain of 20 (or more) stitches, with one loop remaining on your hook. The chain should look like a series of interconnected V shapes.
Step 3: Foundation Row (FOUNDATION ROW)
| Action | Detail |
|---|---|
| Work back into the chain | Insert your hook into the chain stitches you just made |
| Skip 1 chain | Do not work into the first chain (it becomes the turning edge) |
| Make 1 single crochet (sc) in each chain across | Create a solid, structured base |
How to make a single crochet (sc) into a chain:
| Sub-step | Action |
|---|---|
| 1 | Insert your hook into the second chain from the hook (skipping the first chain) |
| 2 | Yarn over and pull up a loop — you now have 2 loops on your hook |
| 3 | Yarn over again |
| 4 | Pull through both loops on your hook |
| 5 | One single crochet is complete |
| 6 | Repeat in each chain across until you reach the end |
Result: A row of single crochet stitches sitting on top of your foundation chain. This creates a firm, stable base that will not stretch out of shape.
Step 4: Structure (STRUCTURE)
| Action | Detail |
|---|---|
| Chain 1 (ch 1) and turn your work | The ch 1 is a turning chain |
| Continue: Make 1 single crochet (sc) in each stitch across | Work into the top of each single crochet from the previous row |
| Repeat for 2–3 rows to make it firm | More rows = thicker, sturdier bracelet |
Why chain 1 before turning?
- Single crochet is 1 chain tall.
- Ch 1 brings your hook up to the correct height for the next row.
How to turn your work:
| Sub-step | Action |
|---|---|
| 1 | After completing the last stitch of the row, chain 1 |
| 2 | Rotate your work 180 degrees (like turning a page in a book) |
| 3 | Insert your hook into the first stitch of the new row (not the turning chain) |
| 4 | Continue making single crochet stitches across |
Result: A rectangular crochet band that is 2–3 rows thick. The edges should be straight, not wavy or curved.
Step 5: Finishing (FINISHING)
| Action | Detail |
|---|---|
| After your last row, chain 1 | Final turning chain |
| Cut the yarn | Leave a 10–15 cm (4–6 inch) tail |
| Pull through to fasten off | Pull the tail through the last loop on your hook |
How to fasten off (finish):
| Sub-step | Action |
|---|---|
| 1 | After your last stitch, chain 1 |
| 2 | Cut the yarn, leaving a 10–15 cm tail |
| 3 | Yarn over and pull the tail all the way through the loop on your hook |
| 4 | Pull tight to secure the knot |
Result: A finished crochet base with no loose ends that can unravel.
Step 6: Result (RESULT)
| Action | Detail |
|---|---|
| Your base is now ready to create a bracelet like the one in the image | You have a firm, rectangular crochet band |
| Add beads, buttons, or closures as desired | Personalize your bracelet |
What to do next:
| Idea | How To |
|---|---|
| Add beads | Thread beads onto the yarn before crocheting, then slide one into each single crochet |
| Add a button closure | Sew a button to one end and create a chain loop at the other |
| Add a sliding knot | Attach extra cord to both ends and tie a sliding (Peruvian) knot |
| Add a lobster clasp | Fold each end into a small loop, secure with stitches, and attach a clasp |
Result: A beautiful, handmade crochet bracelet!
Part 4: Full Understanding of Each Step
| Step | Purpose | Why It Matters |
|---|---|---|
| Make a slipknot | Creates the first loop on your hook | Without it, you cannot start |
| Make 20 chains | Forms the length of the bracelet | Determines the wrist size |
| Work back into the chain | Converts a loose chain into a solid row | Prevents stretching and distortion |
| Skip 1 chain | Creates a clean, straight edge | Gives the bracelet a professional finish |
| Ch 1 and turn | Prepares for the next row | Maintains consistent stitch height |
| Repeat 2–3 rows | Adds thickness and firmness | Makes the bracelet durable |
| Fasten off | Secures the end so work does not unravel | Essential for wearability |
Part 5: Important Tips from Your Image
| Tip | Why It Matters |
|---|---|
| Keep your chains loose, not too tight | Tight chains are difficult to insert your hook into for row 2 |
| Use firm cord (like waxed cord or thin yarn) | Soft yarn stretches and loses shape; firm cord holds the bracelet structure |
| Keep your stitches even and consistent | Uneven stitches make the bracelet look crooked or amateurish |
| To achieve the same look as the image | Follow all tips together for a professional result |
Part 6: Common Mistakes & Fixes
| Mistake | Cause | Fix |
|---|---|---|
| Chains are too tight | Pulled each chain too firmly | Relax your tension; chains should be loose enough to insert a hook easily |
| Bracelet is too short | Did not add extra chains for shrinkage | Add 2–3 extra chains to your foundation count |
| Edges are wavy | Worked into the turning chain by mistake | Always skip the first chain at the start of each row |
| Holes between stitches | Tension too loose | Pull each single crochet slightly tighter |
| Bracelet curls into a tube | Foundation chain too tight | Make the foundation chain looser; use a larger hook for the chain only |
| Yarn splits while crocheting | Hook is too sharp or yarn is twisted | Use a hook with a rounded tip; let yarn unwind naturally |
| Stitches are uneven | Inconsistent tension | Practice the same grip and pull force for each stitch |
Part 7: Design Variations
| Variation | Change | Effect |
|---|---|---|
| Single crochet only | Work 1 row of sc, then fasten off | Thin, delicate bracelet |
| Double crochet rows | Use dc instead of sc (with ch 3 turning chain) | Looser, more open fabric |
| Beaded version | Thread beads onto cord before starting; slide one into each sc | Sparkly, elegant bracelet |
| Two-color stripes | Change yarn color at the end of a row | Colorful, playful bracelet |
| Wider bracelet | Start with more chains (e.g., 30–40) | Cuff-style bracelet |
| Ribbed effect | Work in back loop only (BLO) | Creates horizontal ridges |
Part 8: Adding a Clasp or Closure (3 Options)
After completing your crochet base, you need a way to close the bracelet. Here are three options, from easiest to more advanced.
Option 1: Button and Loop (Easiest)
| Step | Action |
|---|---|
| 1 | Sew a small button to one end of the crochet band |
| 2 | Create a chain loop at the other end: chain 5–7, then slip stitch back into the band |
| 3 | The button fits through the loop to close the bracelet |
Best for: Casual bracelets, beginners.
Option 2: Sliding Knot (Kaydırmalı Düğüm / 秘鲁结)
| Step | Action |
|---|---|
| 1 | Attach 15 cm of cord to each end of the crochet band (using a lark’s head knot) |
| 2 | Tie a Peruvian knot (sliding knot) on each side |
| 3 | Trim and melt the ends (if using nylon cord) |
Best for: Adjustable fit, one-size-fits-most designs.
Option 3: Lobster Clasp
| Step | Action |
|---|---|
| 1 | Fold each end of the crochet band into a small loop |
| 2 | Secure the loop with a whip stitch (sew through the loop with a needle and thread) |
| 3 | Attach a lobster clasp to one loop and a jump ring to the other |
Best for: Professional-looking, secure closures.
Part 9: Beginner’s Practice Swatch
Before making a full bracelet, practice with a small swatch to build your confidence.
Practice Swatch Instructions
| Step | Action |
|---|---|
| Foundation | Chain 10 |
| Row 1 | Skip 1 chain, sc in each of the next 9 chains (9 sc total) |
| Row 2 | Ch 1, turn, sc in each of the 9 stitches |
| Row 3 | Repeat Row 2 |
| Fasten off | Cut yarn, pull through |
Check Your Swatch
| What to Look For | Pass/Fail |
|---|---|
| Edges are straight (not wavy or curved) | ☐ |
| Stitches are even (not too tight or too loose) | ☐ |
| Fabric lies flat (not curling into a tube) | ☐ |
| Each row has exactly 9 stitches | ☐ |
Once you can make a perfect swatch, you are ready to make a full bracelet.
Part 10: Project Ideas Using This Foundation
| Project | Foundation Chains | Rows | Finishing |
|---|---|---|---|
| Simple chain bracelet | 20–24 | 1–2 rows | Button + loop |
| Beaded bracelet | 20–24 | 1 row | Lobster clasp |
| Wide cuff | 30–40 | 3–4 rows | Toggle clasp |
| Anklet | 26–30 | 1–2 rows | Sliding knot |
| Keychain strap | 10–15 | 1 row | Key ring + bead |
SEO Blog Post Optimization
| Meta Tag | Suggested Content |
|---|---|
| Title | Step-by-Step Crochet Chain Foundation for Bracelets: Complete Beginner’s Guide |
| Meta Description | Learn to make a crochet chain foundation for bracelets with step-by-step instructions. Includes chain (ch), single crochet (sc), turning chains, and finishing. Perfect for beginners. |
| URL slug | /crochet-chain-foundation-bracelets-beginner |
| Keywords | crochet chain foundation, how to start a crochet bracelet, chain stitch, single crochet foundation, turning chain, fasten off crochet, beginner crochet bracelet |
| Alt text for image | Step-by-step crochet chain foundation diagram showing slipknot, making chains, working back into the chain with single crochet, turning chain, and finishing |
Final Pro Tip: Practice on Scrap Yarn First
Before using expensive cord or beads, practice the foundation chain and single crochet row on scrap yarn or inexpensive cotton yarn. Make a small 10-chain swatch following the practice instructions above.
Once you can make a neat, even rectangle, you are ready to make a full bracelet with your beautiful, artisanal purple cord.
Summary: You Can Now Make a Crochet Chain Foundation
| Step | Skill Learned | Status |
|---|---|---|
| 1 | Make a slipknot | ✅ |
| 2 | Chain (ch) to desired length | ✅ |
| 3 | Work single crochet (sc) back into the chain | ✅ |
| 4 | Skip the first chain for a straight edge | ✅ |
| 5 | Chain 1 and turn | ✅ |
| 6 | Work multiple rows | ✅ |
| 7 | Fasten off and finish | ✅ |
| Bonus | Add beads or closures | ✅ |
This foundation is the starting point for dozens of crochet bracelet patterns. Master it, and you can make bracelets for everyone you know. Congratulations on taking your first step into crochet!


