Discover the complete list of jewellery making materials—from basic tools to professional-grade supplies. Based on expert tutorials from leading institutions. Perfect for beginners & pros. Start creating today.
Introduction
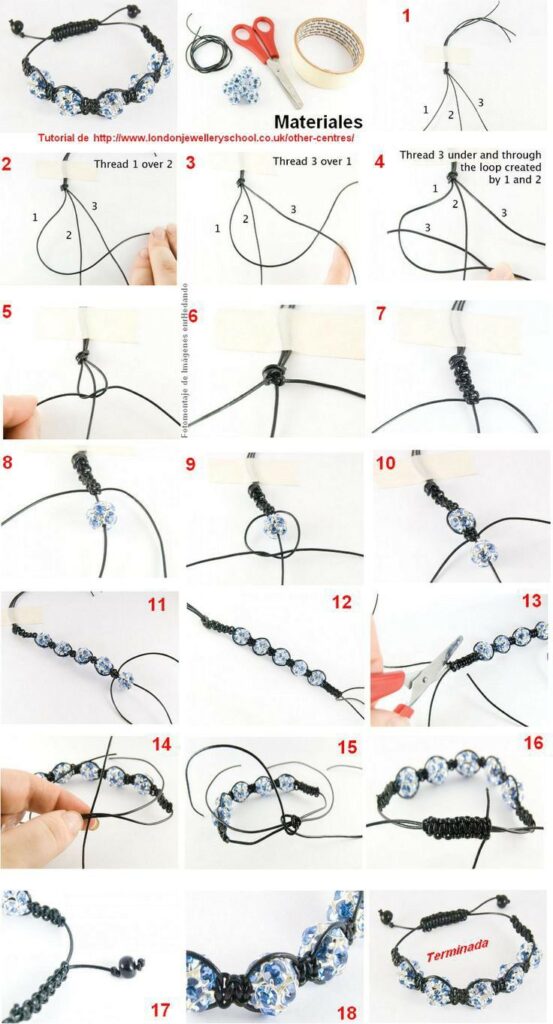
Jewellery making is an art form that blends creativity with precision. Whether you are a hobbyist or an aspiring professional, understanding the right materials for jewellery making is the first step toward crafting stunning pieces. A recent comprehensive tutorial from the London Jewellery School (referenced as londonjewelleryschool.co.uk) highlights an extensive inventory of over 758 essential items. This article breaks down those materials into actionable categories, helping you set up a functional workspace and master the craft.
Why the Right Materials Matter
Using high-quality tools and components directly impacts the durability, finish, and value of your jewellery. Cheap or incorrect materials can lead to breakage, skin irritation, or a poor professional appearance. From pliers to precious metals, every item in the numbered list (1 to 758) serves a specific purpose.
Core Jewellery Making Material Categories
Based on the London Jewellery School’s curriculum, we’ve grouped the materials into 8 logical sections.
1. Measuring & Marking Tools (Items 1–45)
Precision starts with accurate measurement. Essential items include:
- Digital callipers (metric/imperial)
- Steel ruler (flexible and rigid)
- Ring mandrel (tapered steel rod)
- Wire gauge plate (measures wire thickness)
- Centre punch and scribe
- Marking gauge for metal sheet
2. Cutting & Sawing Equipment (46–120)
Cutting metal requires strength and control:
- Jeweller’s saw frame (adjustable depth)
- Lubricant (beeswax or paraffin)
- Flush cutters for soft wires
- Heavy-duty shears for sheet metal
- Disc cutter set (creates perfect circles)
- Safety ruler with cutter guide
3. Forming & Shaping Tools (121–210)
Shape raw metal into curves, bends, and angles:
- Round-nose pliers (for loops)
- Chain-nose pliers (tight gripping)
- Flat-nose pliers (sharp bends)
- Anvil (small steel block)
- Metal dapping set (domes metal)
- Hydraulic press for advanced forming
4. Filing & Surface Finishing (211–310)
Smooth edges and prepare for polishing:
- Needle file set (flat, round, triangular)
- Sandpaper sheets (120 to 2000 grit)
- Emery paper (for wet sanding)
- Burnisher (hard steel tool for glossy edges)
- Rotary tool bits (felt cones, silicone polishers)
5. Soldering & Heating Supplies (311–425)
Metal joining is a core jewellery skill:
- Soldering block (heat-resistant ceramic)
- Propane or butane torch
- Solder paste (easy application)
- Flux (cleans and prevents oxidation)
- Pickle pot (chemical cleaner for firescale)
- Third hand tool (holds pieces steady)
6. Metal & Wire Materials (426–580)
The actual building blocks of your jewellery:
- Sterling silver sheet (various gauges)
- Copper sheet (practice and rustic pieces)
- Brass and bronze sheets (affordable alternatives)
- Gold-filled or fine gold wire (premium)
- Memory wire (for bangles and coils)
- Jump rings (pre-made or coil your own)
- Head pins and eye pins (for bead settings)
7. Beads, Stones & Findings (581–700)
Add colour and functionality:
- Gemstone beads (agate, jasper, quartz)
- Crystal beads (Swarovski alternatives)
- Clasps (lobster, toggle, magnetic)
- Crimp beads (for beading wire)
- Bead caps and spacers
- Earring posts and butterfly backs
- Bangle and pendant blanks
8. Safety & Workspace Organisation (701–758)
Never skip safety:
- Safety glasses (splash and impact resistant)
- Fire extinguisher (near soldering area)
- Respirator mask (for sanding and polishing)
- Fume extractor (removes metal dust)
- Anti-fatigue mat
- Storage boxes with small compartments
How to Choose Your First Set of Jewellery Materials
If you are new, follow this 5-step plan:
- Start with copper or brass – inexpensive and forgiving for practice.
- Buy a basic tool kit – saw frame, 2–3 pliers, files, and sandpaper.
- Add a butane torch – safer than propane for small studios.
- Purchase ready-made findings – jump rings, clasps, and ear wires.
- Expand gradually – add a rolling mill or polishing machine after 6 months.
Pro tip from the London Jewellery School: Invest in a good jeweller’s saw first. It is the most versatile cutting tool.
Sourcing High-Quality Jewellery Supplies
The tutorial list (items 1–758) includes many professional-grade tools. You don’t need to buy everything at once. Prioritise suppliers that offer:
- Bulk pricing on jump rings and wire
- Mixed metal sheets (sampler packs)
- Replacement blades and bits (consumables)
- Educational discounts (many schools offer 10–20% off)
Recommended online stores (UK & international):
- Cooksongold
- Walsh Brothers
- Rio Grande (USA)
- Kernowcraft
Maintaining Your Jewellery Materials
Proper care extends tool life:
- Clean pliers after each use – remove glue, flux, or metal residue.
- Store files separately – they damage other tools.
- Recharge batteries for digital callipers and rotary tools.
- Sharpen cutting blades or replace frequently.
- Keep a soldering log – track which flux and solder work best.
Common Mistakes to Avoid
- ❌ Using a saw blade that is too thick (breaks easily)
- ❌ Overheating metal during soldering (causes pitting)
- ❌ Skipping flux application (weak joints)
- ❌ Filing in both directions (dulls files fast)
- ❌ Ignoring ventilation (toxic fumes)
From 758 Items to Your First Finished Piece
Having a complete materials list is empowering, but the real joy comes from creating. Start with a simple project:
- Design a pair of copper earrings – cut two identical shapes.
- File edges smooth – start with coarse, finish with fine sandpaper.
- Drill a hole – use a 1mm twist bit.
- Polish with a rotary tool – felt wheel and rouge compound.
- Attach ear wires – open the loop sideways, never outward.
Congratulations – you have just used at least 15 items from the 758 list!
Conclusion
The 758+ jewellery making materials listed in the London Jewellery School tutorial provide a complete roadmap for any aspiring jeweller. Whether you are measuring, cutting, soldering, or polishing, each tool has a purpose. Start with the basics, respect safety protocols, and upgrade as your skills grow. Bookmark this guide as your personal inventory checklist.


