Learn the summary knot (まとめ結び) – a Japanese wrapping technique to finish kumihimo cords. Step-by-step guide with 4 wraps, loop pull, and obi plate attachment.
Introduction
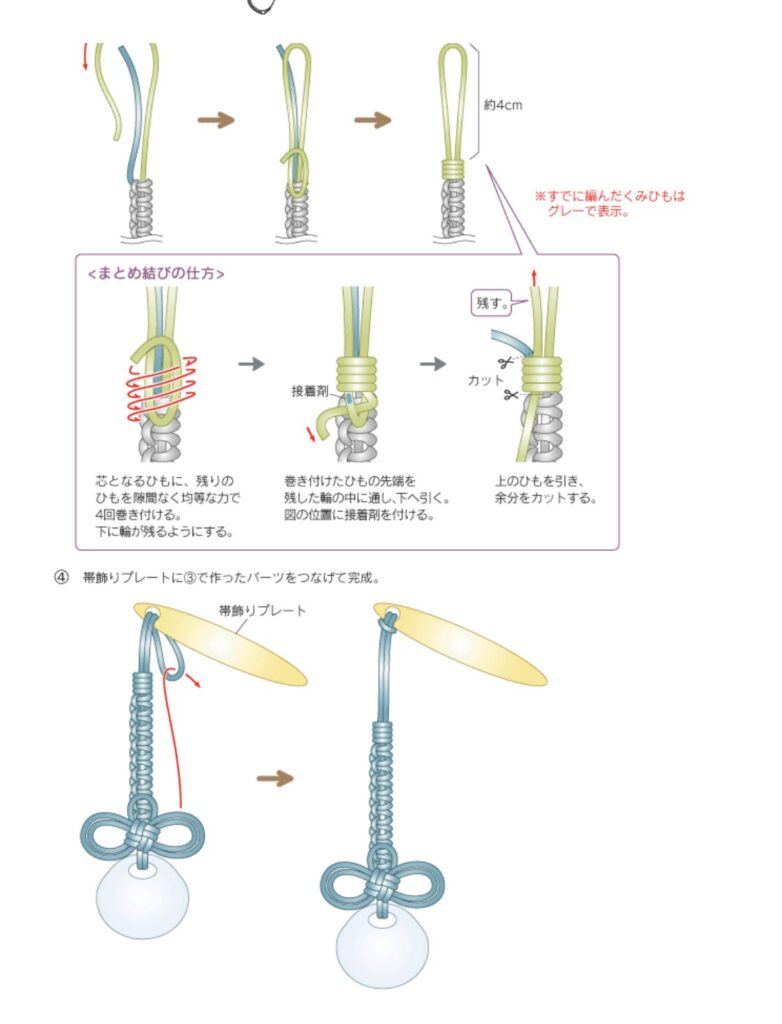
You have braided your kumihimo cord – but how do you finish it neatly without fraying or visible glue? The answer is the Summary Knot (まとめ結び – Matome Musubi) . This elegant Japanese knot wraps the remaining cords around a central core, creating a clean, professional termination. It is especially useful for obi decorative plates (帯飾リブレート) , where the knot becomes both a functional stopper and a design feature.
In this tutorial, you will learn:
- How to tie a summary knot using 4 even wraps
- How to create a bottom loop for attaching findings
- How to connect the finished piece to an obi decorative plate
Note: In the diagram, already-braided kumihimo is shown in grey.
Difficulty & Time
- Level: Beginner
- Time: 10–15 minutes per knot
- Technique: Wrapping knot with hidden tail
Materials & Tools
| Category | Item |
|---|---|
| Kumihimo cord | Already braided length (approx. 4cm finished length shown) |
| Core cord | A single strand or the central cord of your braid |
| Remaining cords | The loose tails from your braid |
| Adhesive | Clear craft glue or jewellery glue |
| Scissors | Sharp, small scissors |
| Obi decorative plate | 帯飾リブレート (metal or resin, with attachment loop or hole) |
| Tool | Tweezers (optional, for pulling cord through loop) |
What Is a Summary Knot (まとめ結び)?
The Summary Knot is a wrapping knot that binds all remaining cord tails around a central core. Unlike a simple overhand knot, it:
- Lays flat and even
- Creates a small loop at the bottom for attaching hardware
- Hides the cut ends inside the wraps
- Can be secured with a single drop of glue for permanence
It is commonly used in Japanese cord crafts, including kumihimo and mizuhiki.
Step-by-Step Instructions
Follow these steps carefully. The process uses 4 wraps applied with even tension and no gaps.
Step 1: Identify the Core & Remaining Cords
- Take your finished kumihimo braid.
- The core is the central cord (or one specific strand) that will remain straight.
- The remaining cords are all the other loose tails.
- Align them so the core is slightly longer than the others.
In the diagram, the already-braided section is shown in grey – your working cords extend from the grey area.
Step 2: Begin Wrapping – First Wrap
- Hold the core cord straight and taut.
- Take the remaining cords and wrap them tightly around the core.
- Make the first wrap directly against the braided section (no gap).
- Pull with even, firm pressure.
Step 3: Complete 4 Wraps
- Continue wrapping until you have made exactly 4 wraps.
- Each wrap should sit snugly against the previous one – no spaces.
- Keep the tension consistent. Loose wraps will unravel; too-tight wraps are hard to finish.
Key point: Wrap with the remaining cords, not the core. The core stays straight inside.
Step 4: Leave a Bottom Loop (下に輪が残るようにする)
- After the 4th wrap, do not pull the tail tight yet.
- Intentionally leave a small loop at the bottom (below the wraps).
- This loop will be used later to attach findings or connect to the obi plate.
Step 5: Pass the Tail Through the Loop
- Take the tip of the remaining cords (the wrapping cords).
- Pass it through the loop you left in Step 4.
- Push it all the way through so the tip emerges on the other side.
Step 6: Pull the Upper Cord to Tighten
- Now pull the upper cord (the core or the standing end above the wraps).
- As you pull, the loop will close and the wrapping tail will be drawn inside the knot.
- The tip should disappear completely under the wraps.
- The bottom loop will shrink to a small, neat eyelet.
Step 7: Apply Adhesive
- Apply a small drop of clear glue to the area marked in the diagram (usually the side of the wraps or where the tail entered).
- Do not over-glue – you do not want glue seeping onto visible parts of the braid.
- Let dry completely (5–10 minutes).
Step 8: Cut Excess
- Once the glue is dry, cut off any remaining excess cord very close to the knot.
- The cut end should be hidden inside or under the wraps.
How to Attach to an Obi Decorative Plate (帯飾リブレート)
After completing the summary knot, you will have:
- A neat wrapped knot (approx. 1–1.5 cm long)
- A small bottom loop (from Step 4)
Attachment method:
| Step | Action |
|---|---|
| 1 | Identify the connection point on your obi plate (usually a small ring, hole, or bar). |
| 2 | Open the bottom loop of your summary knot slightly (use tweezers or a pin). |
| 3 | Slip the obi plate’s ring or bar through the loop. |
| 4 | Tighten the loop by pulling gently on the cord above the knot. |
| 5 | Apply a tiny drop of glue to secure the loop (optional but recommended). |
| 6 | Let everything dry flat for 1 hour. |
Your finished piece should look like the diagram: grey braid → summary knot → loop → obi plate.
Pro Tips for a Perfect Summary Knot
- Even tension is everything – Uneven wraps create a bulging, ugly knot.
- Wet the cords slightly before wrapping – this helps them lie flat as they dry.
- Use a pin to hold the loop open while you pass the tail through.
- Test without glue first – practise on scrap cords until you can make 4 perfect wraps every time.
- Match cord colour – if your remaining cords are a different colour from the core, the knot may show stripes. Plan ahead.
Common Mistakes & Fixes
| Problem | Cause | Solution |
|---|---|---|
| Wraps have gaps | Uneven tension or not pushing wraps together | Use a fingernail to slide each wrap tight before the next |
| Tail won’t stay inside | Glue insufficient or knot too loose | After pulling upper cord, apply glue immediately before the tail slips out |
| Bottom loop too large | Left too much loop in Step 4 | Leave only a 3–5mm loop – it will shrink further when pulled |
| Knot is crooked | Core was not held straight | Keep the core taut and vertical throughout wrapping |
| Braid shows at knot edge | Wraps started too far from braided section | Start the first wrap flush against the grey braided area |
Variations of the Summary Knot
| Variation | Description |
|---|---|
| 2-wrap knot | For thin cords or very small finishes – less secure, use glue |
| 6-wrap knot | For thicker, heavier cords – more decorative and durable |
| Two-colour wrap | Alternate wraps with two different coloured tails for a striped knot |
| Tassel finish | Instead of cutting the tail, let it hang as a small tassel below the knot |
Frequently Asked Questions
Q: Can I use this knot on any kumihimo braid?
A: Yes – round, flat, or square braids all work well. The core must be clearly identifiable.
Q: What if my remaining cords are very thick?
A: Reduce the number of wraps to 2 or 3. For very thick cords, consider splitting the tails into two groups.
Q: Do I really need glue?
A: For jewellery that will be worn and moved, yes. Glue ensures the knot does not loosen over time. For decorative, static pieces, you may skip glue.
Q: What is an obi decorative plate (帯飾リブレート)?
A: It is a metal or resin plate used to decorate the obi (sash) of a kimono. Crafters also use them as bag charms, keychains, or jewellery pendants.
Q: How do I make the bottom loop larger?
A: In Step 4, leave a bigger loop. After pulling the upper cord, the loop will shrink by about 50% – plan accordingly.
Finished Look & Usage Ideas
Once completed, your summary knot will measure approximately 1 cm in length (4 wraps on a standard 2mm cord). The bottom loop provides an attachment point for:
- Obi decorative plates (as shown)
- Charms or pendants
- Earring hooks (for tassel earrings)
- Keychain rings
- Bag clips
The knot itself is both structural and decorative – it can be left visible as a design element or hidden inside a metal cap.
Conclusion
The Summary Knot (まとめ結び) is an essential skill for anyone working with kumihimo, mizuhiki, or any braided Japanese cord. By wrapping the remaining cords evenly around a core, leaving a bottom loop, and securing with glue, you create a professional, durable finish.
Key steps to remember:
- Wrap remaining cords around the core – 4 times, no gaps.
- Leave a small bottom loop.
- Pass the tail through the loop.
- Pull the upper cord to hide the tail.
- Apply glue and cut excess.
- Attach to an obi plate or other finding.
Ready to finish your next braided project? Practise the summary knot on scrap cord first, then apply it to your masterpiece. Share your finished work using:
#SummaryKnot #MatomeMusubi #KumihimoFinish #ObiPlate #JapaneseCordKnot


