Learn to make a suspended crochet organizer with pockets. Step-by-step guide with measurements – oval base, mesh row, side straps, and 3 wooden rods. Perfect for beginners.
Introduction
A suspended crochet organizer (organizador suspenso em crochê) is the perfect storage solution for small spaces. Hang it on a wall to store keys, mail, craft supplies, or even plants. This project uses size 6 yarn (barbante nº 6) or thick cotton thread, a 3.5–4 mm hook, and three 30 cm wooden rods.
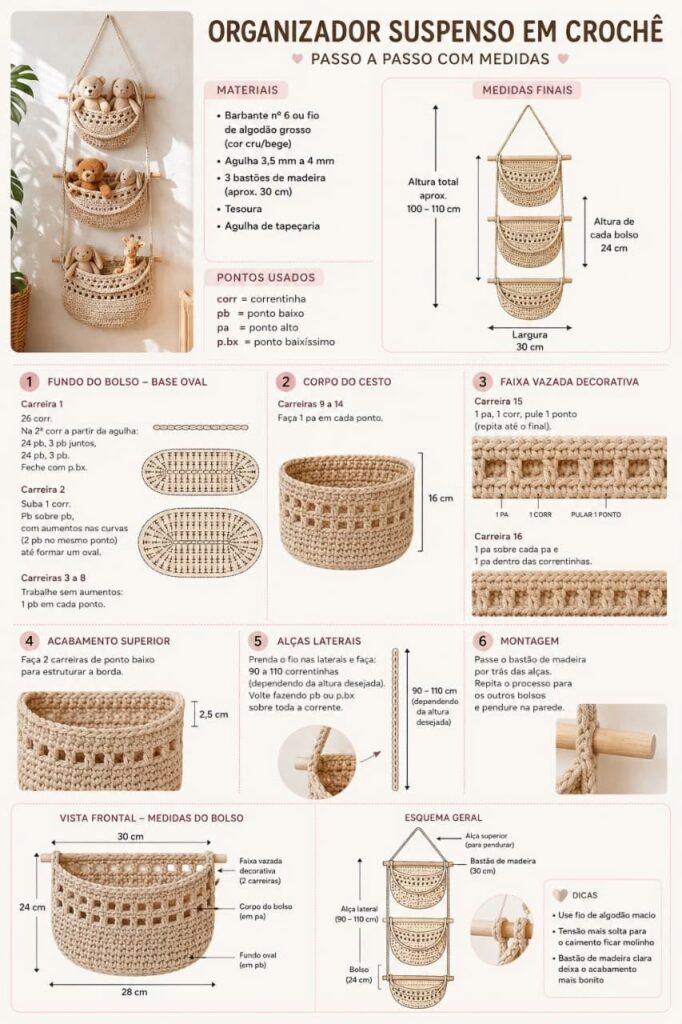
The finished organizer measures approximately 100–110 cm in total height, 30 cm wide, with each pocket 24 cm tall. You will learn:
- Oval base construction
- Single crochet (pb) and double crochet (pa) stitches
- Decorative mesh row (pa + chain spaces)
- Side straps and wooden rod assembly
Note: This tutorial creates one organizer with multiple pockets (one pocket per rod). Adjust the number of pockets by repeating the pocket section.
Difficulty & Time
- Level: Beginner to Intermediate (basic crochet knowledge required)
- Time: 6–8 hours (depending on number of pockets)
- Techniques: Chain (corr), single crochet (pb), double crochet (pa), slip stitch (p.bx)
Materials & Tools
| Category | Item |
|---|---|
| Yarn | Size 6 yarn (barbante nº 6) or thick cotton thread – natural/ecru colour (cru/bege) |
| Hook | 3.5 mm to 4 mm crochet hook (agulha 3,5 a 4 mm) |
| Wooden rods | 3 wooden sticks (bastões de madeira), approx. 30 cm long each |
| Tools | Scissors, tapestry needle (agulha de tapeçaria) |
| Optional | Measuring tape, stitch markers |
Crochet Stitch Guide (Portuguese Terms)
| Abbreviation | Portuguese | English |
|---|---|---|
| corr | correntinha | chain (ch) |
| pb | ponto baixo | single crochet (sc) |
| pa | ponto alto | double crochet (dc) |
| p.bx | ponto baixíssimo | slip stitch (sl st) |
Final Measurements
| Dimension | Size |
|---|---|
| Total height | 100–110 cm (approx.) |
| Width | 30 cm |
| Each pocket height | 24 cm |
| Wooden rod length | 30 cm |
| Side strap length | 90–110 cm |
Step-by-Step Instructions
Part 1: Pocket Base – Oval Foundation (Fundo do Bolso – Base Oval)
This creates the bottom of one pocket. Repeat for each pocket (you will make 3 pockets, one per wooden rod).
Row 1 (Carreira 1)
| Step | Action |
|---|---|
| 1 | Chain 26 (26 corr). |
| 2 | In the 2nd chain from the hook (na 2ª corr a partir da agulha): work 24 single crochet (pb) . |
| 3 | In the last chain: work 3 single crochet together (3 pb juntos) into the same stitch (to round the end). |
| 4 | Continue working along the other side of the foundation chain. |
| 5 | Close with a slip stitch (p.bx) . |
You should now have an oval shape.
Row 2 (Carreira 2)
| Step | Action |
|---|---|
| 1 | Chain 1 (suba 1 corr). |
| 2 | Work single crochet (pb) over each single crochet from the previous row. |
| 3 | On the curved ends: make increases (2 pb no mesmo ponto – 2 single crochet in the same stitch). |
| 4 | Continue around the entire oval. |
| 5 | Close with a slip stitch. |
Rows 3 to 8
| Step | Action |
|---|---|
| 1 | Work without increases (sem aumentos). |
| 2 | Make 1 single crochet in each stitch (1 pb em cada ponto). |
| 3 | Repeat for rows 3, 4, 5, 6, 7, and 8. |
| 4 | At the end of row 8, do not cut the yarn – you will continue to the body of the pocket. |
The oval base is now complete. It should measure approximately 30 cm wide.
Part 2: Pocket Body (Corpo do Cesto)
Now you will build upward from the oval base to create the pocket depth.
Rows 9 to 14
| Step | Action |
|---|---|
| 1 | Switch to double crochet (pa) . |
| 2 | Make 1 double crochet in each stitch (1 pa em cada ponto). |
| 3 | Repeat for rows 9, 10, 11, 12, 13, and 14 (6 rows total). |
| 4 | Do not cut yarn – the next section is the decorative mesh row. |
These 6 rows of double crochet create the main body of each pocket (approximately 24 cm tall when combined with the base and mesh row).
Part 3: Decorative Mesh Row (Faixa Vazada Decorativa)
This openwork row adds a beautiful lace effect and marks the top edge of each pocket.
Row 15 (Carreira 15)
| Step | Action |
|---|---|
| 1 | 1 double crochet (1 pa) . |
| 2 | Chain 1 (1 corr) . |
| 3 | Skip 1 stitch (pule 1 ponto). |
| 4 | Repeat steps 1–3 across the entire row. |
| 5 | End with a double crochet. |
Pattern: 1 pa, 1 corr, pular 1 ponto – repeat.
Row 16 (Carreira 16)
| Step | Action |
|---|---|
| 1 | 1 double crochet over each double crochet from row 15 (1 pa sobre cada pa). |
| 2 | 1 double crochet inside each chain space (1 pa dentro das correntinhas). |
| 3 | Continue across the entire row. |
This fills in the mesh row, creating a solid row with small decorative holes.
Part 4: Top Edge Finish (Acabamento Superior)
To give the pocket a clean, structured rim:
| Step | Action |
|---|---|
| 1 | Work 2 rows of single crochet (pb) all the way around the top edge. |
| 2 | This will create a 2.5 cm wide solid border. |
| 3 | Fasten off and weave in ends. |
Your first pocket is complete. Repeat Parts 1–4 to make 3 identical pockets (one for each wooden rod).
Part 5: Side Straps (Alças Laterais)
These straps will hold the wooden rods and allow you to hang the organizer.
For each side of the organizer (left and right):
| Step | Action |
|---|---|
| 1 | Attach the yarn to the side edge of the top pocket (or directly to the side of the assembled organizer). |
| 2 | Chain 90 to 110 chains (corr) – depending on your desired hanging height. |
| 3 | Turn and work single crochet (pb) or slip stitch (p.bx) back along the entire chain. |
| 4 | Fasten off and attach the other end of the strap to the opposite side of the same pocket. |
| 5 | Repeat for the other side of the organizer. |
The side straps should be identical in length so the organizer hangs straight. Use 90 cm for a shorter drop, 110 cm for a longer drop.
Part 6: Assembly (Montagem)
Now you will combine all pockets with the wooden rods.
| Step | Action |
|---|---|
| 1 | Take one wooden rod (30 cm). |
| 2 | Insert the rod behind the side straps at the first pocket’s top edge (passe o bastão de madeira por trás das alças). |
| 3 | The rod should sit horizontally, spanning the full 30 cm width. |
| 4 | Repeat for the second and third pockets – each pocket gets its own wooden rod. |
| 5 | Hang the organizer by the side straps on wall hooks or a dowel. |
The wooden rods keep each pocket open and prevent sagging. They also add a beautiful natural element to the finished piece.
General Diagram Overview (Esquema Geral)
From top to bottom, your finished organizer will have:
| Element | Description |
|---|---|
| Top hanging point | Side straps looped over a wall hook |
| Wooden rod (30 cm) | First rod – supports the top pocket |
| Side strap | 90–110 cm long, left and right |
| Pocket body | Double crochet section (pa) |
| Oval base | Single crochet foundation (pb) |
| Pocket height | 24 cm total per pocket |
| (Repeat for 3 pockets) |
Pro Tips for a Perfect Finish
- Yarn choice – Use soft cotton thread (algodão macio) for a flexible, draping finish.
- Loose tension – Work with a slightly looser tension (tensão mais solta) so the organizer hangs softly and doesn’t curl.
- Wooden rod colour – Light-coloured wood (madeira clara) creates a beautiful contrast with natural/ecru yarn.
- Block your work – Lightly steam or wet-block each pocket before assembly to ensure straight edges.
- Mark your rows – Use stitch markers to track rows 9–14 (double crochet section) so all pockets are identical.
Troubleshooting Common Problems
| Problem | Cause | Solution |
|---|---|---|
| Oval base curls | Tension too tight | Use a larger hook (4 mm instead of 3.5 mm) for the base |
| Pockets are different heights | Uneven row count | Count rows carefully – each pocket must have exactly 6 rows of double crochet |
| Side straps stretch over time | Single crochet only | Reinforce straps with slip stitch (p.bx) on the return pass |
| Organizer hangs crooked | Straps different lengths | Measure straps before cutting – both must be identical |
| Wooden rod falls out | Rod hole too loose | Add an extra row of single crochet around the strap loop to tighten |
Variations to Try
| Variation | How To |
|---|---|
| More pockets | Repeat Parts 1–4 for 4 or 5 pockets; add additional wooden rods |
| Coloured yarn | Use variegated or pastel cotton yarn instead of natural/ecru |
| Larger width | Start with 36 chains instead of 26; use longer wooden rods (40 cm) |
| Tassel details | Add tassels to the bottom of each pocket base |
| Wall-mounted | Instead of side straps, attach a single long back strap with loops for wall hooks |
Frequently Asked Questions
Q: What is barbante nº 6?
A: It is a size 6 yarn – thicker than standard worsted weight. In the US, look for “size 6 super bulky” or “heavy cotton rope yarn.” In the UK, look for “chunky cotton.”
Q: Can I use a different hook size?
A: Yes, but adjust your starting chain. A smaller hook (3 mm) will make a stiffer organizer. A larger hook (5 mm) will make it softer and more drapey.
Q: How much yarn do I need?
A: For three pockets, you will need approximately 400–500 metres of size 6 cotton yarn.
Q: What if I don’t have wooden rods?
A: Use wooden dowels from a craft store, bamboo skewers (for a mini version), or even thick plastic straws for a temporary solution.
Q: Can I wash this organizer?
A: Yes – hand wash in cool water with mild soap. Lay flat to dry. Do not machine dry (the wooden rods can be removed first).
Finished Look & Dimensions
When fully assembled, your suspended crochet organizer will have:
- Total height: 100–110 cm (including straps and all pockets)
- Width: 30 cm (matching the wooden rods)
- Each pocket: 24 cm tall × 30 cm wide × 5–6 cm deep
- Base: Oval, made entirely in single crochet
- Body: 6 rows of double crochet
- Top edge: 2 rows of single crochet (2.5 cm border)
- Side straps: 90–110 cm long, left and right
The natural/ecru colour (cru/bege) gives the organizer a rustic, Scandinavian, or boho aesthetic – perfect for any room.
Conclusion
Making a suspended crochet organizer (organizador suspenso em crochê) is a practical and beautiful project. By following this step-by-step guide, you have learned:
- How to crochet an oval base (rows 1–8)
- How to build the pocket body with double crochet (rows 9–14)
- How to add a decorative mesh row (row 15–16)
- How to finish with a single crochet border (2 rows)
- How to make side straps (90–110 cm chains)
- How to assemble with 3 wooden rods (30 cm each)
The result is a sturdy, elegant wall organizer that keeps your space tidy while showcasing your crochet skills.


