Learn to make and use a Kumihimo disk for Japanese braiding. Step-by-step tutorial to create beautiful braided cords for jewellery, keychains, and accessories.
Introduction
Kumihimo (組み紐) is the ancient Japanese art of braiding cords. The name literally means “gathered threads.” Traditionally, these braids were used as ties for samurai armour and kimono obi. Today, Kumihimo has evolved into a popular craft for making bracelets, necklaces, keychains, earrings, and bag charms.
At the heart of this craft is the Kumihimo disk – a round foam or wooden board with numbered slots that hold your threads in place while you braid. This tutorial will teach you:
- How to make your own Kumihimo disk
- How to set up threads on the disk
- The basic 8-strand braiding technique
- How to finish your braided cord
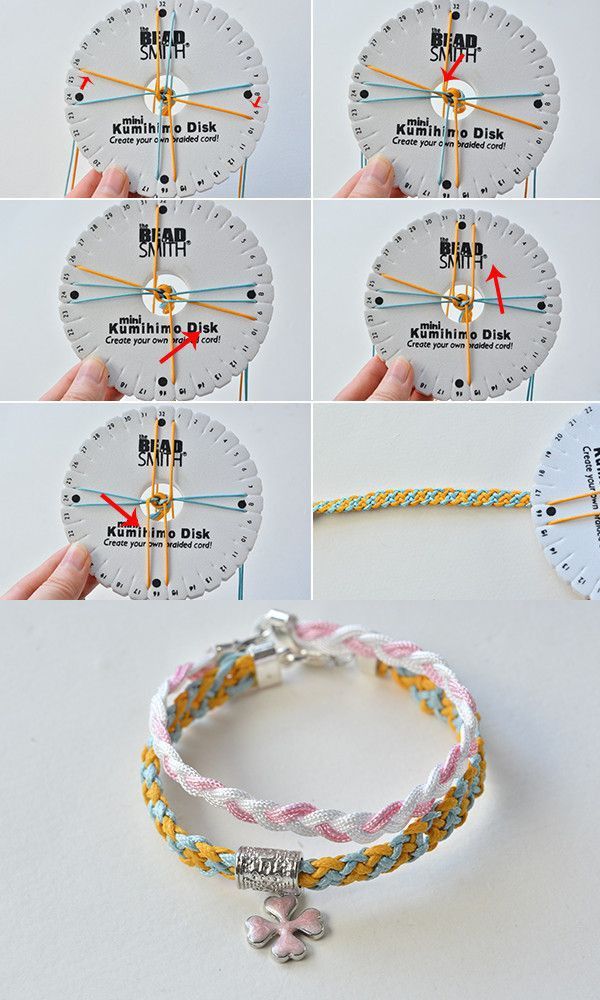
Note: The image shows multiple views of a Kumihimo disk with a braided cord emerging from the centre – the classic setup for round braids.
What Is a Kumihimo Disk?
A Kumihimo disk (also called a braiding disk or marudai for small projects) is a circular tool with:
- A centre hole where the braid exits
- Numbered slots (usually 32 or 48) around the perimeter
- Weighted bobbins or simple clips to hold thread tension
The disk allows you to create complex braids by moving threads from one slot to another in a specific sequence. The most common beginner braid uses 8 strands and produces a round, cord-like structure.
Two Options: Buy or Make Your Own Disk
Option 1: Buy a Ready-Made Disk
| Type | Material | Pros | Cons |
|---|---|---|---|
| Foam disk | Soft foam (EVA) | Lightweight, inexpensive, holds threads well | Less durable over time |
| Wooden disk | Laser-cut plywood | Sturdy, professional, heirloom quality | Heavier, more expensive |
| Plastic disk | Hard plastic | Easy to clean, durable | Can be slippery |
Price range: $5–$30 USD.
Option 2: Make Your Own Disk (DIY)
Materials needed:
- Thick foam board or corrugated cardboard (at least 15 cm / 6 inches square)
- Compass or round object (plate, bowl)
- Scissors or craft knife
- Ruler
- Marker or pen
- Hole punch (optional)
Step-by-step DIY instructions:
| Step | Action |
|---|---|
| 1 | Draw a circle (15–20 cm / 6–8 inches diameter) on foam board. |
| 2 | Cut out the circle carefully. |
| 3 | Cut a small centre hole (1–2 cm diameter). |
| 4 | Mark 32 equal slots around the edge. Use a protractor (360° ÷ 32 = 11.25° per slot). |
| 5 | Cut a small slit at each mark – about 1 cm deep into the disk. |
| 6 | Number the slots 1 to 32 around the disk. |
| 7 | (Optional) Mark the cardinal directions N, S, E, W for easy reference. |
Your homemade disk works just as well as a store-bought one. Many traditional braiders started with cardboard disks!
Materials for Braiding on a Kumihimo Disk
| Category | Item | Notes |
|---|---|---|
| Threads | Embroidery floss (6-strand), silk cord, satin cord, or special Kumihimo thread | 8 strands, each approx. 1 metre (40 inches) |
| Weights | Kumihimo bobbins, small binder clips, or metal washers | Keeps tension even |
| Tools | Scissors, ruler, tape (for ends) | |
| Finishing | Glue (fabric glue or superglue), end caps, crimp beads, lobster clasp | For jewellery |
Basic 8-Strand Kumihimo Braid (Round Braid)
This is the most common starting pattern. It creates a round, balanced cord.
Step 1: Prepare Your Threads
| Step | Action |
|---|---|
| 1 | Cut 8 strands of thread, each 1 metre (40 inches) long. |
| 2 | Choose colours – use 8 different colours, or 4 pairs, or 2 groups of 4. |
| 3 | Gather all strands together and tie an overhand knot at one end, leaving a 5 cm (2 inch) tail. |
| 4 | Apply a drop of glue to the knot to secure it. |
| 5 | Thread the tail up through the centre hole of the disk from underneath. |
| 6 | Pull until the knot sits snugly inside the centre hole (not slipping through). |
Step 2: Set Up Threads on the Disk
Arrange the 8 strands into the numbered slots as follows:
| Slot Position | Slot Number (Typical) | Notes |
|---|---|---|
| Top | 1 & 2 | Two adjacent slots at top |
| Right | 9 & 10 | Two adjacent slots at right |
| Bottom | 17 & 18 | Two adjacent slots at bottom |
| Left | 25 & 26 | Two adjacent slots at left |
Place one strand in each slot. The threads should be taught but not stretched.
Visual check: Your disk now has 2 strands at North, 2 at East, 2 at South, and 2 at West. The centre knot holds everything together underneath.
Step 3: Attach Weights
- Tie or clip a small weight (bobbin, binder clip, or metal washer) to the tail end of the threads hanging below the disk.
- The weight should be heavy enough to keep tension (about 20–50 grams).
- If the braid is too loose, add a heavier weight. If too tight, use a lighter weight.
Step 4: The Braiding Sequence (Round Braid)
This sequence moves threads from top to bottom, then right to left, then bottom to top, then left to right. Memorise this pattern:
Starting position: 2 strands at N, 2 at E, 2 at S, 2 at W.
| Move | Action |
|---|---|
| Move 1 | Take the right strand from the North pair (slot 2). Move it down to the empty right slot in the South pair. |
| Move 2 | Rotate the disk counter-clockwise 90 degrees. Now what was East is now North. |
| Move 3 | Take the right strand from the new North pair. Move it down to the empty right slot in the new South pair. |
| Move 4 | Rotate counter-clockwise 90 degrees again. Repeat. |
Simpler way to remember:
- Always work with the right-hand thread of the top pair.
- Move it to the right-hand empty slot of the bottom pair.
- Rotate disk 90 degrees counter-clockwise.
- Repeat forever.
After every 8 moves, you will have completed one full cycle. The braid will start emerging from the centre hole.
Step 5: Maintain Even Tension
- Every few moves, gently pull down on the finished braid from underneath.
- Keep the working threads tight but not stretched.
- If threads twist around each other, stop and untangle – never let the braid twist.
Step 6: Continue Until Desired Length
- Braid until you have used most of the thread, leaving about 15–20 cm (6–8 inches) of tails at the end.
- Remove the weight from the bottom.
Step 7: Finish the Braid
| Step | Action |
|---|---|
| 1 | Carefully remove all 8 strands from the disk slots. |
| 2 | Pull the braid gently to even out tension. |
| 3 | Tie a tight overhand knot at the end of the braid, as close to the braided section as possible. |
| 4 | Apply glue to the knot. |
| 5 | Cut off the excess tails, leaving about 1 cm (½ inch) beyond the knot. |
| 6 | (Optional) Slide an end cap or crimp cover over the knot for a clean finish. |
Adding Jewellery Findings
To turn your braided cord into a wearable item:
| Accessory | Steps |
|---|---|
| Bracelet | Attach a lobster clasp to one end using a jump ring. Add an extension chain to the other end. |
| Necklace | Attach a magnetic clasp or toggle clasp to both ends. |
| Keychain | Use a split ring through the top knot. Add a key ring. |
| Earrings | Cut two short braids (5–7 cm). Attach earring hooks to the top knots. |
Common Kumihimo Patterns
| Pattern Name | Strands | Movement | Result |
|---|---|---|---|
| Round braid | 8 | Top → Bottom, Rotate | Round, spiral cord |
| Flat braid | 8 | Top → Bottom, then reverse | Flat, ribbon-like cord |
| Hollow braid | 8 | No centre weight | Tube that can hold beads |
| Spiral (twist) | 8 | Always move same side | Twisted, barber-pole effect |
| 16-strand braid | 16 | More complex sequence | Thicker, textured cord |
Pro Tips for Beautiful Kumihimo Cords
- Colour placement – Adjacent threads blend visually. Place contrasting colours opposite each other for a striped effect.
- Thread choice – Embroidery floss (cotton) is forgiving. Satin cord (polyester) is slippery but shiny.
- Practice tension – Too loose = lumpy braid. Too tight = stiff, hard cord.
- Mark your disk – Use stickers or permanent marker to label top (T), right (R), bottom (B), left (L).
- Bobbins help – Weighted bobbins prevent tangles and keep tension even.
Troubleshooting Common Problems
| Problem | Cause | Solution |
|---|---|---|
| Braid is lumpy | Uneven tension | Practice the same rhythm – pull each move with identical force |
| Threads tangle | Not rotating disk consistently | Always rotate the same direction (counter-clockwise) |
| Colour pattern is random | Threads not placed correctly | Check initial setup – 2 strands per cardinal direction |
| Braid is flat, not round | Wrong move sequence | Ensure you move RIGHT thread of TOP pair to RIGHT empty slot of BOTTOM pair |
| Braid won’t come out of centre | Knot is too large | Tie a smaller knot or trim the tail shorter |
Project Ideas Using Kumihimo Cords
| Project | Length Needed | Difficulty |
|---|---|---|
| Single-strand bracelet | 18–20 cm | Beginner |
| Adjustable anklet | 25–30 cm | Beginner |
| Lanyard or badge holder | 40–50 cm | Intermediate |
| Dog collar | 30–45 cm | Intermediate |
| Belt or obi cord | 80–120 cm | Advanced |
| Multi-strand necklace | 3 × 45 cm (braid three) | Intermediate |
Frequently Asked Questions
Q: How long does it take to braid a 20 cm cord?
A: For a beginner, about 30–45 minutes. Experienced braiders can finish in 10–15 minutes.
Q: Can I use yarn instead of thread?
A: Yes, but use smooth, tightly twisted yarn (e.g., cotton crochet thread). Avoid fluffy or hairy yarns – they catch on the disk slots.
Q: My braid is twisting to one side – is that bad?
A: No – a slight natural twist is normal for round braids. If it twists too much, check that you are rotating the disk consistently.
Q: How do I clean a foam Kumihimo disk?
A: Wipe with a dry cloth. Do not use water – foam absorbs moisture and loses shape.
Q: What is the difference between a disk and a marudai?
A: A marudai is a large wooden stand used for professional braiding (long cords, kimono ties). A disk is a small, portable tool for hobby projects.
Finished Look & Dimensions
When you complete your first Kumihimo braid using an 8-strand setup on a disk:
- Diameter of braid: 3–5 mm (depending on thread thickness)
- Pattern: A spiralling, round cord with diagonal colour stripes
- Texture: Firm but flexible, slightly springy
- Ends: Neatly knotted and glued, ready for findings
The finished cord can be worn as a bracelet, necklace, or used as a decorative tie.
Conclusion
Creating your own Kumihimo disk – whether you buy one or make it from cardboard – opens the door to a beautiful, meditative craft. The basic 8-strand round braid is the perfect starting point. With just a few moves (top to bottom, rotate, repeat), you will produce a professional-looking braided cord in under an hour.
Key takeaways:
- A Kumihimo disk holds threads in numbered slots while you braid.
- The basic 8-strand round braid uses a simple 4-move sequence.
- Always move the right thread of the top pair to the right empty slot of the bottom pair, then rotate.
- Finish with glue and knots, then attach jewellery findings.


