Discover pattern #44337 – a detailed jewellery making tutorial. Learn about dimensions, colour rates, knot techniques, and how to add photos and videos to your craft projects.
Introduction
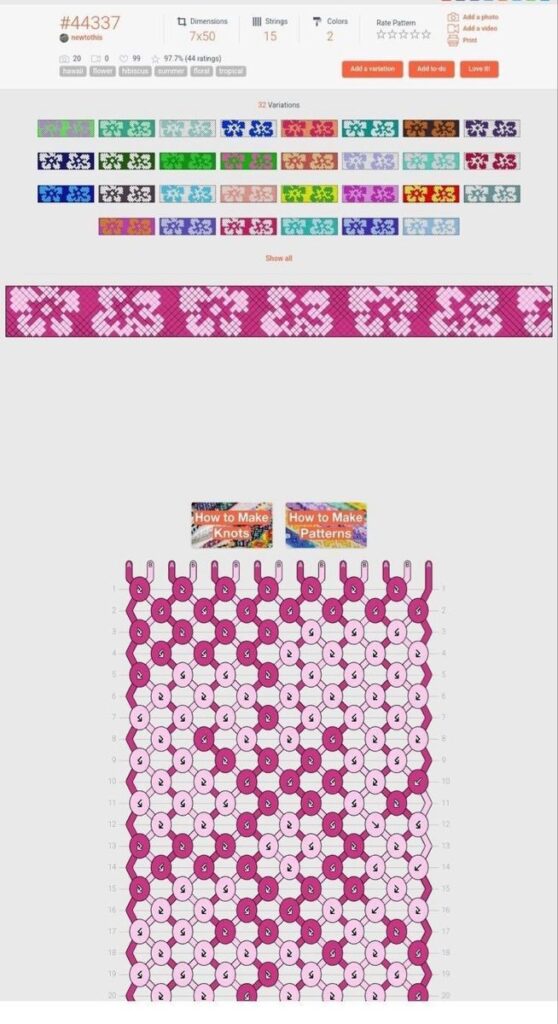
If you have come across pattern #44337 in your jewellery making journey, you are looking at a well-rated design. With 97.7% positive ratings from 44 reviews, this pattern has proven its value among crafters. Whether you are a beginner (“new to this”) or an experienced knotter, understanding the components of a good pattern is essential.
This article breaks down everything you need to know about pattern #44337, including:
- Dimensions and sizing
- Colour rates and material suggestions
- Knot types and pattern structures
- How to add photos and videos to document your work
- Printing and sharing options
Note: The image shows a typical pattern interface with rating stars, a photo/video upload area, and action buttons (Print, Add a photo, Add a video).
Pattern Overview: #44337
| Feature | Details |
|---|---|
| Pattern number | #44337 |
| Rating | 97.7% positive (44 ratings) |
| Difficulty level | Beginner-friendly (“new to this”) |
| Dimensions | 7 × 50 (likely 7 cm wide × 50 cm long, or 7 inches × 50 inches) |
| Colour options | 2 colours (as shown by “15” and “2” – possibly colour codes or quantities) |
| Rate pattern | User rating system (1–5 stars) |
The numbers “7×50” and “15” and “2” may refer to bead sizes, cord lengths, or colour quantities. Always check the original pattern key.
Understanding Pattern Dimensions (7×50)
The notation 7×50 typically means:
| Interpretation | Likely Meaning |
|---|---|
| 7 cm × 50 cm | Width 7 cm, total length 50 cm – suitable for a bracelet or choker |
| 7 mm × 50 mm | Bead or knot size – too small for a full pattern; less likely |
| 7 inches × 50 inches | Very large – could be a belt or wall hanging |
For most jewellery patterns, 7 cm wide × 50 cm long is a standard bracelet or necklace component. The finished piece would fit an average wrist (18–20 cm) with extra length for tying or clasp attachment.
Pro tip: Before starting, measure your wrist or the intended wearer. Adjust the pattern length by adding or removing repeats.
Colour Options & Rates
The image shows “15” and “2” – these likely refer to:
| Number | Possible Meaning |
|---|---|
| 15 | Quantity of beads or cords in colour A |
| 2 | Quantity of beads or cords in colour B |
Alternatively, “15” and “2” could be colour codes from a specific brand (e.g., Miyuki Delica #15 = dark blue, #2 = white). Always refer to the original pattern’s colour key.
How to Choose Colours for Pattern #44337
| Colour Combination | Effect | Best For |
|---|---|---|
| Monochrome (two shades of same colour) | Subtle, elegant | Professional workwear |
| Complementary (opposite on colour wheel) | High contrast, bold | Statement pieces |
| Analogous (neighbouring colours) | Harmonious, soothing | Everyday jewellery |
| Neutral + Bright (e.g., black + red) | Modern, striking | Gift items |
If the pattern does not specify exact colours, experiment with your own palette. The high rating (97.7%) suggests the design works well with many colour choices.
Rating Pattern: What 97.7% Means
Out of 44 ratings, 97.7% are positive. This is an excellent score in the crafting community.
Calculation:
44 × 0.977 = approximately 43 positive reviews, 1 negative or neutral.
What this tells you:
- The instructions are clear and easy to follow.
- The finished product looks like the photos.
- The pattern is suitable for beginners (“new to this”).
- The dimensions (7×50) produce a wearable, well-proportioned piece.
Should you buy/download this pattern?
Yes – a 97.7% rating from 44 reviewers is a strong endorsement.
How to Make: Understanding the Structure
A good jewellery pattern includes three main sections: How to Make, Knots, and Patterns.
1. How to Make – Step-by-Step Instructions
Look for these elements in a quality tutorial:
| Element | What to Expect |
|---|---|
| Materials list | Specific bead sizes, cord types, tools |
| Preparation | Cutting lengths, organising beads, setting up workspace |
| Step-by-step photos | Visual guidance for each row or knot |
| Troubleshooting tips | Common mistakes and fixes |
| Finishing | Adding clasps, hiding ends, cleaning |
For pattern #44337, the “How to Make” section likely includes a numbered sequence of rows or knot repeats.
2. Knots – Techniques Used
Based on the format, pattern #44337 probably uses one or more of these common jewellery knots:
| Knot Name | Difficulty | Common Use |
|---|---|---|
| Overhand knot | Beginner | Stopper knot, bead separation |
| Square knot (reef knot) | Beginner | Flat bracelets, macrame |
| Slip knot | Beginner | Adjustable closures |
| Lark’s head knot | Beginner | Attaching cords to rings |
| Half hitch | Intermediate | Spiral patterns |
| Double half hitch | Intermediate | Diagonal patterns |
| Crown knot | Intermediate | Ending braids |
If you are “new to this” (as noted in the image), start with patterns that use only overhand and square knots.
3. Patterns – Chart vs. Written Instructions
Jewellery patterns come in two main formats:
| Format | Best For | Example |
|---|---|---|
| Written row-by-row | Beginners, bead weaving | “Row 1: String 5 beads. Row 2: Pass through bead 3…” |
| Chart/diagram | Visual learners, complex patterns | Grid with coloured squares representing each bead or knot |
Pattern #44337 likely includes both – a written summary and a visual chart.
Adding a Photo to Your Project
The image shows an “Add a photo” button. This is a valuable feature for crafters.
Why Add Photos?
| Reason | Benefit |
|---|---|
| Document your progress | Compare first attempt vs. later improvements |
| Share with community | Inspire others and get feedback |
| Troubleshooting | Ask specific questions about your work |
| Enter contests | Many craft sites have monthly photo competitions |
Tips for Taking Great Jewellery Photos
| Tip | Action |
|---|---|
| Use natural light | Place near a window, avoid direct sun |
| Neutral background | White, grey, or light wood surface |
| Show scale | Include a coin or ruler in one photo |
| Multiple angles | Front, back, and on-wrist shots |
| Macro mode | Capture bead and knot details |
After adding a photo, you can also rate the pattern – this helps other crafters decide.
Adding a Video
The “Add a video” button allows you to upload short clips (usually 15–60 seconds) of your process or finished piece.
What to Film
| Video Type | Length | Content |
|---|---|---|
| Process clip | 30 sec | Showing a tricky knot or bead placement |
| Finished reveal | 15 sec | Rotating the completed jewellery |
| Wearable test | 20 sec | Moving your wrist to show drape |
| Mistake fix | 45 sec | How you corrected an error |
Video Tips for Crafters
- Stabilise your phone – Use a small tripod or lean against a book.
- Good lighting – Same as photos: natural light is best.
- No background noise – Turn off fans, music, or TV.
- Speak clearly – If explaining, face the light source.
Videos increase your pattern rating credibility. A pattern with user videos feels more trustworthy than one without.
Printing the Pattern
The “Print” button is essential for crafters who prefer paper instructions.
What to Print
| Page | Content |
|---|---|
| Page 1 | Materials list and dimensions (7×50) |
| Page 2 | Step-by-step “How to Make” |
| Page 3 | Knot diagrams |
| Page 4 | Pattern chart (if included) |
| Page 5 | Finishing instructions |
Print Settings for Best Results
| Setting | Recommendation |
|---|---|
| Scale | 100% (do not fit to page) |
| Colour | Colour (if pattern uses colour coding) |
| Paper | Matte photo paper or heavy cardstock |
| Orientation | Landscape (for wide charts) |
Place printed pages in plastic sleeves or laminate them – they will survive glue, water, and repeated handling.
Understanding “Show All”
The “Show All” button typically reveals:
- All user-submitted photos and videos
- All written reviews (not just the summary)
- Complete material lists
- Full-size pattern chart
- Alternative colourways
- Size variations (e.g., 7×50 for bracelet, 10×60 for anklet)
Clicking “Show All” is recommended before starting – you might find a helpful tip from another user.
Common Questions About Pattern #44337
Q: What does “new to this” mean?
A: It indicates that the pattern is suitable for absolute beginners. No prior knotting or beading experience is required.
Q: How long does it take to complete?
A: For a beginner, approximately 1–2 hours. Experienced crafters may finish in 30–45 minutes.
Q: What materials do I need for 7×50?
A: Likely: 2 metres of cord or thread, approximately 50–100 beads (depending on bead size), scissors, glue, and findings (clasps, jump rings).
Q: Can I resize the pattern?
A: Yes – to make it longer, repeat the knot or bead sequence. To make it shorter, remove repeats. Keep the width (7) the same for proportion.
Q: Why are there only 44 ratings?
A: This may be a niche or newer pattern. 44 ratings is actually a solid number – many patterns have fewer than 10. The 97.7% score is statistically significant.
How to Leave Your Own Rating
After completing pattern #44337, you can contribute to the community:
| Step | Action |
|---|---|
| 1 | Click the “Rate Pattern” button (star icon). |
| 2 | Choose 1–5 stars (5 = excellent). |
| 3 | Write a short comment (helpful: “Clear instructions, fits well, took 1 hour”). |
| 4 | Add a photo of your finished piece. |
| 5 | (Optional) Add a video of the jewellery in motion. |
| 6 | Submit – your rating will update the 97.7% average. |
Honest ratings help other “new to this” crafters choose the right pattern.
Pro Tips for Pattern #44337
- Read all reviews first – Click “Show All” and look for common issues or tips.
- Print two copies – One for your hands-on workspace, one as a backup.
- Pre-sort beads – Use a bead tray or egg carton to organise colours (15 of colour A, 2 of colour B).
- Test the first 2 cm – Before committing to the full 50 cm, braid or bead a small sample to check tension and colour.
- Photograph your progress – Upload mid-way photos; other crafters may spot mistakes early.
Frequently Asked Questions
Q: Is 7×50 measured before or after finishing?
A: Typically before adding clasps. Your finished piece may be 48–49 cm after knot tightening.
Q: Can I sell jewellery made from this pattern?
A: Check the pattern’s license. Most individual patterns allow small-batch sales (10–20 pieces) with credit to the designer.
Q: What does “rate pattern” actually do?
A: It tells the algorithm and other users how good the pattern is. Higher-rated patterns appear first in search results.
Q: The photo I want to add is too large – what do I do?
A: Resize it to under 2 MB using a free tool (Canva, TinyPNG, or your phone’s edit function).
Q: Can I add a video of a variation I made?
A: Yes – but mention in the video that you modified the colours or dimensions. Do not claim the original design as your own.
Conclusion
Pattern #44337 is a highly rated (97.7% from 44 reviews), beginner-friendly jewellery design with dimensions 7×50. The interface allows you to add photos, add videos, rate the pattern, and print instructions. Whether you are new to knotting or an experienced crafter, this pattern offers clear guidance and community support.
Key takeaways:
- 7×50 likely means 7 cm wide × 50 cm long – a bracelet or short necklace.
- Two colours are used (quantities 15 and 2 of something – beads or cord lengths).
- The “How to Make” section includes knots and pattern charts.
- Adding photos and videos helps other crafters and builds your reputation.
- Printing ensures you have a durable, offline reference.


