Learn how to make a beautiful, bohemian beaded bracelet with this simple step-by-step tutorial. Perfect for beginners using waxed cord and chip beads!
Are you looking for a fun, affordable, and stylish craft project for the weekend? If you love the bohemian aesthetic but hate spending a fortune on jewelry, you are going to love this easy beaded bracelet tutorial. Today, we are going to show you how to create a gorgeous “net” or “ladder” style macrame bracelet using simple knotting techniques and colorful stone chips.
Whether you want to make one for yourself or create a handmade gift for a friend, this tutorial is the perfect place to start. Let’s dive into the world of DIY jewelry making!
Supplies You Will Need
Before we start, gather your materials. You can find all of these at your local craft store or online:
- Cord: Black waxed cotton cord or nylon cord (approximately 2 to 3 yards). The waxed coating helps the knots hold their shape nicely.
- Beads: Stone chips or irregular beads. We are using vibrant red coral chips, but you can use turquoise, amethyst, or any colored stone chips you love.
- Scissors: Sharp scissors for cutting the cord.
- Lighter: (Optional) For melting the ends of the cord to prevent fraying.
Step-by-Step Instructions
Step 1: Creating the Clasp Loop
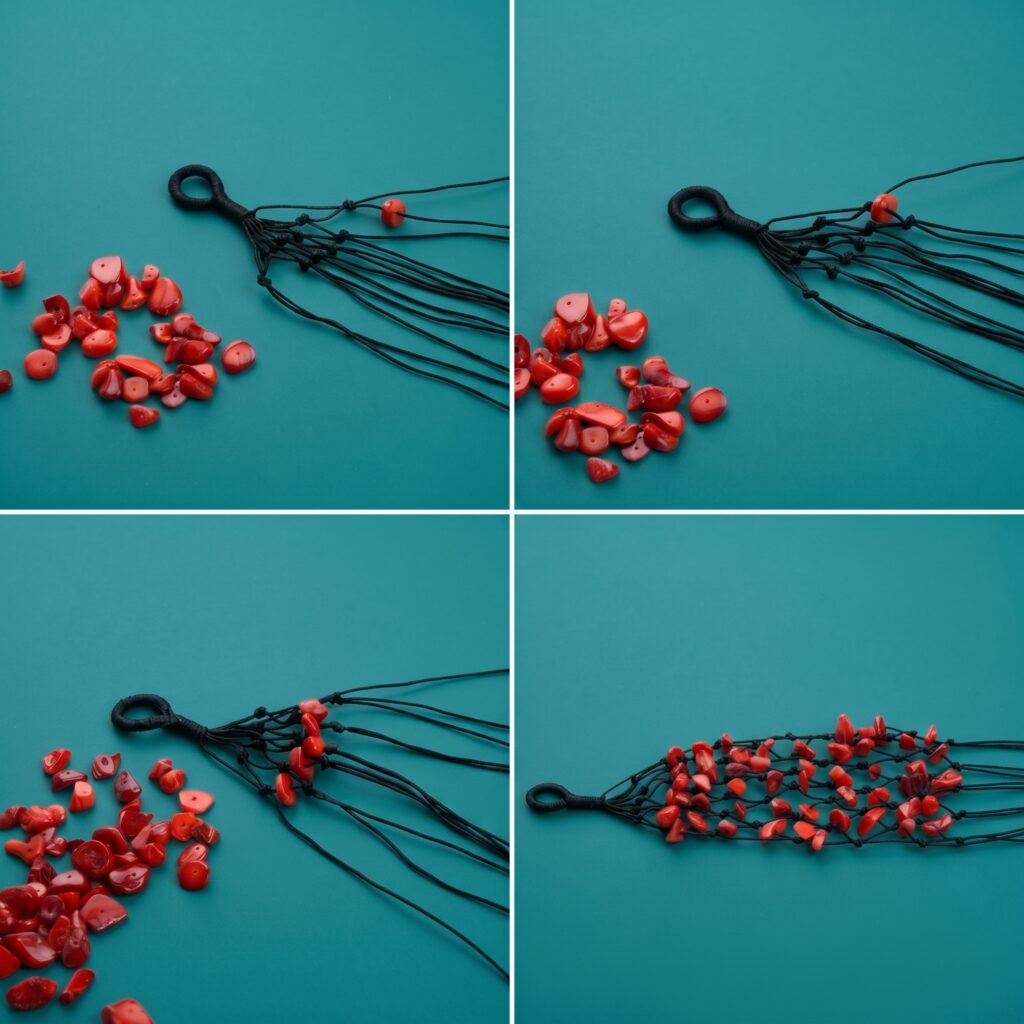
Begin by cutting six strands of your black cord, each roughly 12-15 inches long. Hold them together and, leaving a tail of about 1.5 inches, tie a simple overhand knot to create a large loop. This will act as the clasp for your bracelet. (See top-left image). The remaining ends of the cord should fan out from the knot.
Step 2: Start the Bead Netting
Now it is time to begin your netting pattern! Take your first cord on the far right side. Thread a single red stone chip onto it. Move the stone down near the base knot and tie a simple tight knot right below the bead to hold it in place. (See top-right image).
Step 3: Build the Ladder Pattern
Take the next cord over to the left. Thread your second bead onto this cord. Push it down toward the knot, but before you tie it off, make sure you are leaving a little bit of distance from the first bead to create an open, diamond-shaped netting effect. Tie a knot below the second bead.
Continue this process across all six cords, leaving the left-most cord empty to keep a diagonal shape. You are essentially creating a “brick-lay” or “ladder” pattern with the stones. (See bottom-left image).
Step 4: Finish the Weave
Repeat the knotting and threading process. Work your way up the cords, always tying a knot under each new bead. As you progress, you will notice the black cord forming a beautiful, open-mesh net that cradles the red stones perfectly. (See bottom-right image).
Keep adding rows of beads until your bracelet is long enough to wrap comfortably around your wrist. The final look is gorgeous, lightweight, and incredibly unique.
Step 5: The Final Finishing Touch
Once you have reached your desired length, gather all six ends together and tie one final, tight overhand knot to finish the webbing. Trim the excess cord with your scissors. If your cord is synthetic, you can use a lighter to quickly melt the tips so they don’t unravel (be careful not to burn the main knot!).
Pro-Tips for Beginners
- Tension is Key: Try to keep your knots consistent. Pull them tight, but don’t make the gaps between the beads too tight, or the bracelet won’t lay flat.
- Mix and Match: Feel free to mix different colors of stone chips, or even throw in a few metallic spacer beads for an added touch of glam.
- Make it a Set: Because these are so affordable to make, why not create a matching set of three or four in different colors?
Conclusion
Making your own jewelry is one of the most rewarding hobbies out there. Not only do you get exactly what you want in terms of style, but you also save money compared to buying boutique jewelry. This netted macrame bracelet is a statement piece that looks expensive but costs mere pennies to make.


