Learn how to make an elegant Shell Cluster Lace Border with this easy crochet tutorial. Perfect for blankets, garments, and accessories. Free diagram included!
Introduction
Have you ever finished a beautiful crochet project—like a soft baby blanket, a flowing summer top, or a cozy scarf—only to feel like it’s missing that final, polished touch? The answer to that problem is often a stunning lace border.
Today, we are taking a closer look at the Pakhi Kar Shell Cluster Lace Border. This delicate, fan-like stitch creates a lovely, wavy scalloped edge that adds texture and visual interest to any project. Whether you are a beginner looking to expand your skills or an experienced hooker searching for a new edging pattern, this shell cluster is versatile, fun to make, and incredibly elegant.
Let’s break down exactly how to create this beautiful lacework!
Understanding the Stitch Diagram
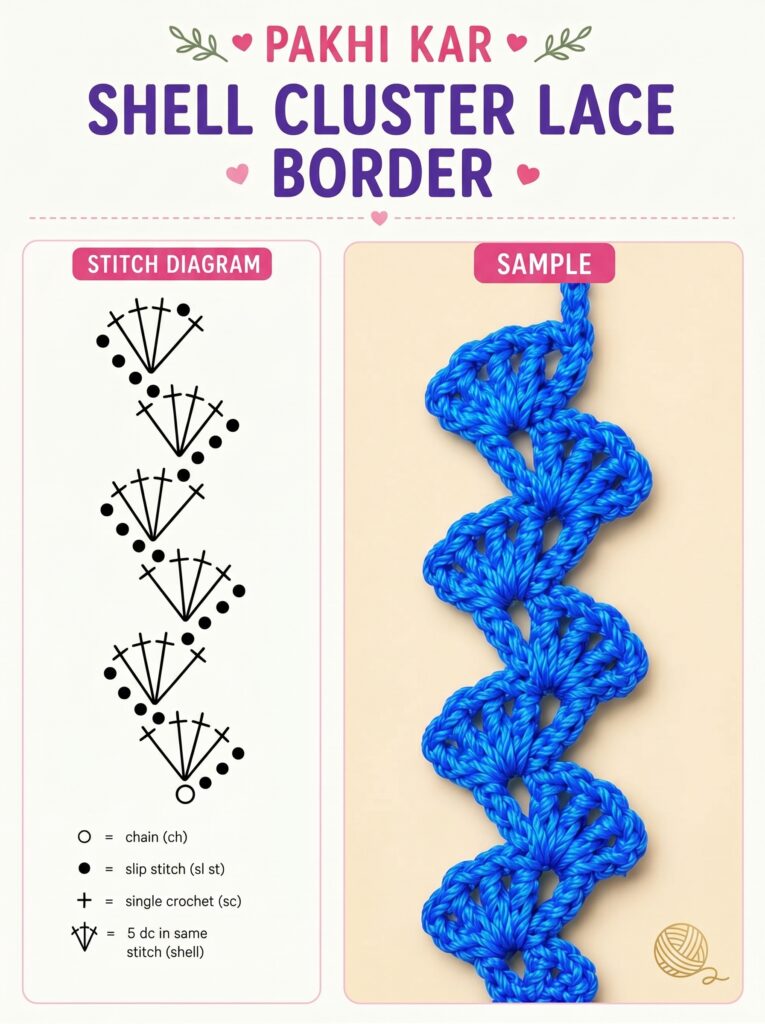
Before you pick up your hook, it helps to understand what you are creating. The image provides a clear stitch diagram, which is a universal language for crocheters.
At the heart of this pattern is the “Shell Cluster,” which consists of 5 double crochet stitches worked into the exact same stitch or space. When combined with chains and slip stitches, these clusters fan out to create the ruffled, wavy lace texture you see in the blue sample.
Note: This design creates a zigzagging border. It can be worked directly onto the edge of an existing project, or you can make it as a standalone decorative ribbon.
Stitch Abbreviations You Need to Know
Here is a quick legend of the symbols used in the diagram and what they mean in standard US crochet terms:
- O = Chain (ch): The foundation of your work.
- • = Slip Stitch (sl st): Used to move across the work without adding height, or to join rounds.
- + = Single Crochet (sc): A short, tight stitch used to anchor the shells.
- ♢ = Shell Cluster: 5 double crochets (dc) worked in the same stitch/space. This is the star of the show!
Step-by-Step Written Instructions
Follow these steps to create your own shell cluster lace.
Step 1: Create the Foundation
Chain a multiple of your desired length. Since this is an edge, you don’t need a massive chain; you can work these stitches directly into the side of your blanket. However, if you are making a test swatch:
- Make a slip knot, chain 4, and join with a slip stitch to the first chain to form a ring.
- Alternatively, you can simply single crochet into a foundation row to start.
Step 2: Building the First Shell
- Chain 1 (to turn your work, if working flat, or as a starting space).
- In your chosen space or stitch, work 5 Double Crochets (dc). This forms your first shell cluster.
Step 3: Anchoring the Cluster
To allow the lace to curve and spread properly, you need to anchor the shell down:
- Skip the next stitch/space on your foundation.
- Work 1 Single Crochet (sc) into the following stitch.
Step 4: The Zig-Zag Rhythm
Now, you will repeat this simple sequence to create the wavy lace:
- To go up: Chain 3. Then, work 5 Double Crochets (dc) into the previous single crochet you just made. (This is how the shells stack on top of each other).
- To anchor the top shell: Slip Stitch (sl st) into the base of the next available stitch on your main row.
- To go down: Single Crochet (sc) into the next stitch along your foundation row.
Continue alternating these “up” and “down” movements to create the wavy, zigzagging fan effect seen in the sample.
Pro-Tips for Perfect Lace Edging
- Tension is Everything: Shell lace is highly visual. If your tension is too tight, the fan won’t spread; if it’s too loose, the border will look sloppy. Practice on a small swatch first!
- Choose the Right Yarn: This pattern looks gorgeous in worsted weight cotton (like the vibrant blue in the sample), but it also looks incredibly delicate and airy in a lace-weight thread.
- Block Your Work: After you finish your border, gently wet-block the piece. This will help the shells open up and lay flat, showcasing the intricate fan details beautifully.
Ideas for Using This Border
This Shell Cluster Lace Border is insanely versatile. Try adding it to:
- The hem of a crochet summer dress or top.
- The edge of a lightweight shawl or poncho.
- The perimeter of a newborn baby blanket.
- As a decorative trim for crochet pillow covers.
Conclusion
The Shell Cluster Lace Border is a classic crochet technique that never goes out of style. Its rhythmic repetition makes it a relaxing stitch to work on, while the final result looks complex and professional.
We hope this guide inspires you to grab your hook and start crafting! Don’t forget to save this pattern to your Pinterest board for later, and let us know in the comments: What project are you planning to add this beautiful border to?
Happy Hooking! 🧶


