Learn the basics of string art! This guide breaks down simple geometric patterns, from starbursts to complex spirals, with easy-to-follow dot templates.
Introduction: The Art of Connecting Dots
Have you ever seen a piece of wall art made entirely of nails and thread and wondered, “How do they do that?” The answer lies in String Art, a craft that combines geometry, precision, and creativity.
String art is the process of winding colorful thread or string around a series of pins or nails arranged on a board. While it sounds simple, the mathematical magic happens when you follow specific dot-to-dot patterns. Depending on how you connect the points, you can create anything from a simple starburst to a breathtaking, sweeping spiral of color.
The image above is a beautiful cheat sheet for several classic string art geometric patterns. Whether you are using it on a physical board with nails or practicing digitally, understanding the “mapping” of these dots is the first step to creating professional-looking art.
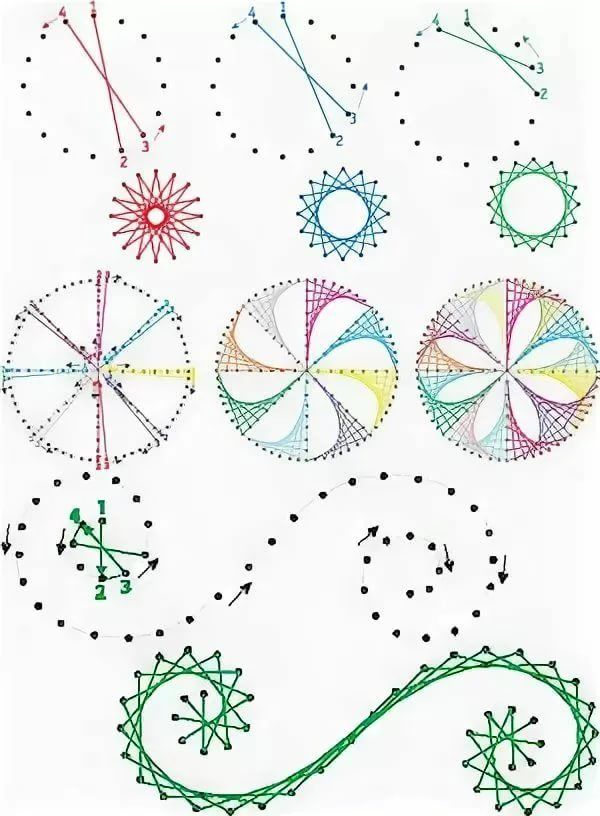
Today, we are breaking down these patterns and teaching you how to read them!
Essential Materials for String Art
Before you grab your hammer and nails, let’s make sure you have the right tools:
- A Sturdy Base: Wooden boards (pine or corkboard) work best. The wood needs to be soft enough to hammer nails into, but firm enough to hold them tightly.
- Nails or Pins: Small, thin wire nails with a flat head (like finishing nails) work wonderfully.
- Colored Thread or Embroidery Floss: The thicker the thread, the more visible your pattern will be. Cotton embroidery floss is a top choice because it comes in endless colors and has a slight sheen.
- A Hammer & Pliers: A small craft hammer for driving nails, and needle-nose pliers to hold the nails while you hammer to protect your fingers.
- Printable Templates: You can print dot patterns (like the ones in the image) onto paper, tape them to your wood, and hammer the nails through the paper. Once finished, you tear the paper away!
How to Read the Pattern Diagrams
Let’s look at the different types of geometric patterns shown in the image and understand how they work.
1. The Starburst & Radial Patterns (Top Row)
- The Setup: Look at the top left of the image. You see a circle of dots. The red lines show a pattern connecting dot 1 to dot 4, dot 2 to dot 3, and so on.
- The Result: The red star below it. By connecting dots that are not directly next to each other, the lines cross over in the center, creating a dense, radiant starburst.
- Variations:
- The Blue Pattern (Top Center): If you connect dots that are spaced slightly further apart (e.g., dot 1 to dot 4, skipping fewer dots in between), you get a tighter, pronged shape, like a snowflake.
- The Green Pattern (Top Right): If you connect dots that are quite far apart (e.g., dot 1 to dot 4 skipping many dots), the lines create a wide, open spiral or gear-like shape.
2. The Complex Petal & Flower Mandalas (Middle Row)
- The Setup: These diagrams (in the middle of the image) feature a series of colored guide lines radiating from the center outward.
- The Result: The three finished circles below them show the magic of layering. By connecting the dots along those specific angled guide lines in a repeating order, the intersecting threads create delicate, overlapping petal shapes.
- Pro-Tip: These patterns often use multiple colors. You might do 8 passes with pink thread, then 8 passes with blue thread, and 8 passes with yellow. Where the colors cross, they mix to create a stunning, multi-dimensional floral mandala. This is a fantastic way to create wall art for a living room!
3. The Interlocking Spiral & Curves (Bottom Row)
- The Setup: Look at the bottom left. The green diagram shows a very specific sequence. You see “numbered arrows” (1, 2, 3, 4) pointing in a curving direction along a line of dots. As you move along that sequence, you follow a curved path outward. The diagram to the right of it shows an S-curve with arrows along it.
- The Result: The large green complex figure at the bottom is a stunning interlocking spiral. It is not a simple circle; instead, the thread follows a 3D “figure-eight” or looping path. When you connect dots following a spiral guide, the lines gently curve and overlap, creating a wavy, ribbon-like flow.
- Usage: This spiral pattern is incredibly popular for making custom wall art for nurseries or modern living spaces.
Step-by-Step Instructions to Make Your Own
Now that you understand the patterns, here is how to bring them to life on a physical board:
Step 1: Prepare Your Template
- Print out your chosen dot pattern (the starburst, mandala, or spiral).
- Tape the paper template securely onto your wooden board.
Step 2: Hammer in the Nails
- Carefully hammer a nail into every single black dot on the template.
- Keep them straight! If your nails lean, the string will slip off. Use needle-nose pliers to hold the nail upright while you tap the hammer.
- Depth: Drive the nails in so they are firmly seated, but leave at least ¼ inch of the nail exposed to hold the string.
Step 3: Remove the Paper
- Once all the nails are in, gently tear away the paper template. You will be left with a wooden board with a perfect grid of nails.
Step 4: Follow the Threading Guide
- Tie a double knot of your colored thread onto one of the anchor nails.
- Now, follow the connecting lines in the diagram you chose (e.g., the 1-to-4 rule).
- Wrap the thread around the head of each nail, pulling it taut as you go, and move to the next nail in the sequence.
- Key Rule: Don’t overlap the string on top of itself on a single nail; try to keep the string wrapping under the nail head in a single layer.
Step 5: Finish and Display
- When you have completed the pattern, tie a secure knot around your last nail and clip the excess string.
- If you want extra security, you can put a tiny drop of clear craft glue on the knots to prevent them from unraveling.
- Hang your masterpiece on the wall!
Pro-Tips for Perfect String Art
- Start Simple: Do not begin with the complex S-curve spiral! Start with the top row starburst pattern. It uses fewer dots and gives you immediate satisfaction.
- Mind Your Tension: If you pull the thread too loosely, it will sag and ruin the geometric lines. If you pull it too tight, it can bend your nails. A steady, firm pull is perfect.
- Play with Layers: The middle row mandala patterns look incredible when you use three different colored strings. Tie off the first color, then tie on the second, and lay the new color over the top of the previous one.
- Safety First: Always use pliers to hold small nails. Fingers and hammers do not mix well!
Conclusion
String art is a wonderful bridge between math and art. By simply understanding how to connect points on a grid, you can create incredible geometric masterpieces. The patterns in this image—from the simple red starburst to the swooping green spiral—are a perfect starting point for beginners.
Save this guide to your Pinterest board for your next DIY project! Let us know in the comments: Which of these geometric patterns would you try first?
Happy Crafting! 🧵🔨✨


