Master the classic Monkey’s Fist knot with this easy 8-step tutorial. Includes paracord tips, how to tighten it perfectly, and creative uses for this nautical knot!
Introduction: The Ultimate Weighted Knot
In the world of knots, few are as iconic, practical, and aesthetically pleasing as the Monkey’s Fist. Historically, this knot was thrown between ships to secure docking lines—its heavy, round weight allowing sailors to accurately toss a rope across the water.
Today, the Monkey’s Fist has found a second life as a beloved craft staple. It is the go-to finish for rugged paracord bracelets, high-quality keychains, stylish curtain tie-backs, and even heavy-duty zipper pulls.
The best part? While this beautiful, spherical knot looks incredibly complex, the tutorial above breaks it down into a simple 8-step process. Using just your fingers, a length of rope, and a bit of patience, you can create this durable and attractive knot in minutes.
Let’s follow the steps and master the Monkey’s Fist!
Supplies You Will Need
Gathering your materials is quick and easy.
- Cord/Rope: 550 Paracord is the most popular choice for its durability, vibrant colors, and grip. You will need roughly 3 to 4 feet of cord for a small, average-sized knot.
- A Core (Optional but Recommended): While Step 7 offers an alternative, using a core ensures your knot stays perfectly round. A standard glass marble, a small rubber ball, or even a steel ball bearing works perfectly.
- A Lighter: If you are using nylon paracord, a lighter is essential to melt and seal the ends to prevent fraying.
Step-by-Step Instructions: How to Tie It
This tutorial uses your non-dominant hand as a “loom.” Follow these steps carefully.
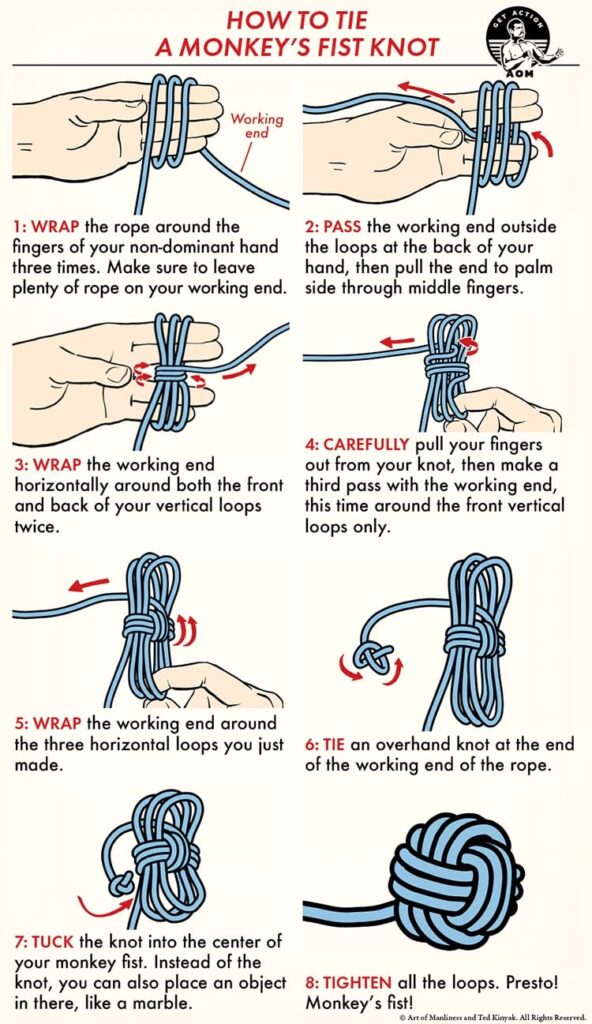
Step 1: Wrap Around Your Fingers (The Vertical Loops)
- Take the rope and hold the tail (short end) in the palm of your non-dominant hand.
- Identify the working end (the long piece you will manipulate).
- Wrap the working end around your index, middle, and ring fingers three times. Make sure the wraps stay tight, flat, and side-by-side. (See Step 1 Image).
Step 2: Pass Through to the Palm Side
- Take the working end and bring it around the outside of the loops you just made on the back of your hand.
- Pull the rope through the gap between your fingers, bringing it through to your palm side. (See Step 2 Image).
Step 3: Wrap Horizontally (The Second Pass)
- This step creates the “criss-cross” basket.
- Take the working end and wrap it horizontally around both the loops on the back of your hand AND the loops resting on your palm.
- Wrap it around these two sets of loops two times. (See Step 3 Image).
Step 4: Create the Third Pass
- Carefully slide your fingers out from inside the knot. Do not let the loops unravel!
- Hold the structure firmly.
- Make a third, horizontal pass by wrapping the working end around the front vertical loops only. Do this two times. (See Step 4 Image).
Step 5: Lock the Horizontal Loops
- Bring the working end around the three horizontal loops you just created.
- Wrap the working end around them to secure the structure. (See Step 5 Image).
Step 6: Tie an Overhand Knot at the End
- At the very end of your working rope, tie a simple Overhand Knot (a standard loop knot).
- This knot is crucial—it acts as an anchor for the next step. (See Step 6 Image).
Step 7: Tuck the Knot or Insert the Core
- Option A: Take the Overhand Knot you just tied and tuck it deep into the center hole of the Monkey’s Fist. Tighten the loops around it.
- Option B (Recommended): Place a marble, rubber ball, or steel bearing into the center hole of the knot instead of the Overhand Knot. This creates a perfectly weighted, perfectly spherical shape. (See Step 7 Image).
Step 8: Tighten and Adjust (The Finishing Touch)
- This is the most critical step. Do not pull on one single end tightly.
- Instead, gently adjust the loops on each side of the knot. Work your way around the sphere, pulling a little bit at a time.
- As you pull the slack out, the knot will shrink and tighten around the core, forming a flawless, dense, round ball. (See Step 8 Image).
- Trim the excess tail close to the knot and use a lighter to melt the tip slightly to seal it (if using nylon).
Pro-Tips for Beginners
- Watch Your Tension: When wrapping the rope around your fingers in Step 1, keep a moderate tension. If you wrap too tightly, you won’t be able to remove your fingers in Step 4. If you wrap too loosely, the final knot will look floppy.
- Practice Without a Core First: Practice the wrapping and weaving technique with just the Overhand Knot (Option A in Step 7) first. Once you memorize the 8 steps, graduate to using a marble.
- Use a Thicker Rope for Learning: Paracord is thin. If you are struggling to see your loops, practice first with thicker twisted cotton rope. The larger size makes the “Over/Under” movements much easier to track.
Creative Ways to Use Your Monkey’s Fist
Once you have tied your perfect knot, here is how you can use it in your everyday life:
- DIY Paracord Keychain: Thread the long tail through a heavy-duty metal keyring. The weight of the knot makes your keys incredibly easy to find at the bottom of your purse or backpack.
- Weighted Curtain Tie-Backs: Tie a large Monkey’s Fist with thick rope on both ends of a long cord. Use it to elegantly hold open heavy curtains in your living room.
- Dog Toy Tug-Rope: Tie two large Monkey’s Fists on either end of a rope. It makes a durable, safe, and fun tug toy for your furry friend.
- Button Toggles: Tie a small Monkey’s Fist (without a core) and sew it onto a jacket or a canvas bag to act as a rugged, handmade toggle button.
Conclusion
The Monkey’s Fist knot is a rite of passage for any knot enthusiast. Its satisfying round shape and sturdy construction make it one of the most useful decorative knots you can learn. With just these 8 simple steps, you can turn a plain piece of rope into a fascinating, functional piece of art.
Save this guide to your Pinterest board for your next weekend project! Let me know in the comments: What are you planning to make with your first Monkey’s Fist knot?
Happy Knotting! 🪢🌀


