How to Tie an Omamori Knot (Japanese Lucky Knot): 9-Step Guide
Learn how to tie the traditional Japanese Omamori knot, also known as the Agemaki lucky knot. This 9-step guide creates a beautiful, symmetrical knot perfect for good luck charms and jewelry.
Introduction: The Art of the Lucky Knot
Have you ever seen a beautiful, symmetrical knot adorning a Japanese lucky charm, a traditional wedding gift, or a sleek piece of packaging? That knot is known as the Omamori Knot (お守り結び) or the Agemaki knot.
In Japanese culture, Omamori refers to amulets or charms that offer protection and good luck. The knot tying them together is not just functional—it holds deep symbolic meaning. The interlocking loops represent eternity, harmony, and an unbreakable bond. It is a knot that signifies “good fortune” and “long-lasting relationships.”
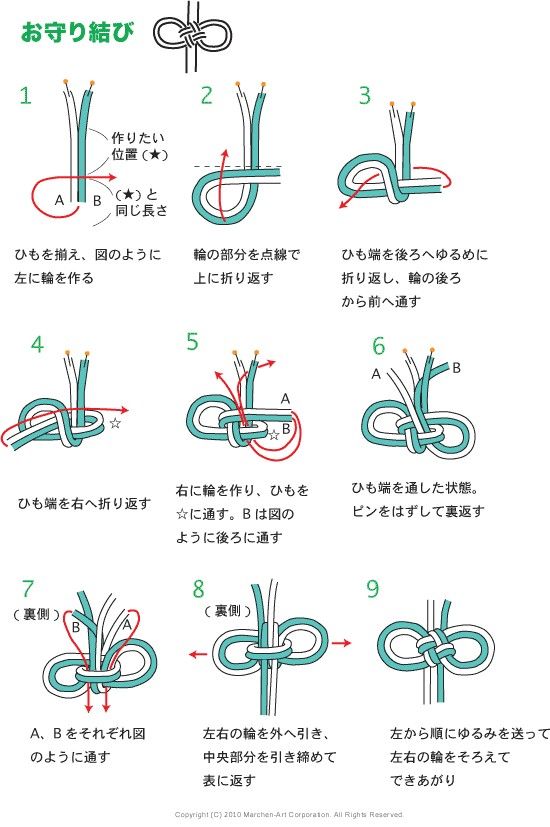
Unlike a square knot or a bow, the Omamori knot has a flat, intricate center with two perfect loops protruding from the sides. It looks complex, but as the 9-step diagram above shows, it is created through a beautifully logical sequence of folding, weaving, and pulling.
Today, we are going to break down this ancient knotting technique so you can add a touch of Japanese elegance to your own crafts!
What You Will Need
To tie this knot, you will need a few basic supplies. The tools shown in the diagram are essential for keeping everything aligned.
- Cord: A smooth, flat cord works best. In the diagram, they use a teal/white flat satin cord, which is flexible and easy to fold. You can also use paracord, silk cord, or heavy-duty embroidery floss. You will need about 2 to 3 feet of cord.
- A Flat Surface or Corkboard: The diagram suggests using pins to hold the knot in place. A corkboard or a foam board is highly recommended for beginners to prevent the loops from slipping.
- Push Pins (Optional): To hold the loops while you weave the center. (Note: The diagram shows pins in Steps 1-6).
Step-by-Step Tutorial: Tying the Omamori Knot
Follow these 9 steps carefully. The diagram uses red arrows to indicate direction, and letters A and B to mark the two distinct tails.
Step 1: Create the Left Loop
- Fold your cord in half, creating a loop at the top. Place a pin where you want the knot to sit (marked with a star ⭐).
- Take the left tail (marked A in the diagram) and create a loop on the left side. The length of this loop should be the same length as the distance from the star to the bottom of your tails. (See Step 1).
Step 2: Fold the Loop Upwards
- Take the loop you just created on the left side and fold it upwards, crossing it over the center of the vertical cords.
- Use a pin to hold this fold in place so it doesn’t move. (See Step 2).
Step 3: Tuck and Weave
- Take the left tail (A) and tuck it behind the loop you just folded up.
- Bring the tail forward and thread it through the center of the knot structure. (See Step 3).
- Pro-Tip: Pay close attention to the red arrow in this step—it shows you exactly where the cord needs to go to lock the left side.
Step 4: Create the Right Loop
- Take the right tail (marked B) and create a loop on the right side.
- Fold this loop to the right, mirroring your actions on the left side. Pin it in place. (See Step 4).
Step 5: The Center Weave
- Bring the right tail (B) back toward the center of the knot.
- Weave it under the right loop, pass it through the center, and secure it.
- The diagram shows a star (⭐) in the center. This is the “hole” where the knots intertwine. You want to pass your tails through this central hole. (See Step 5).
Step 6: Prepare to Tighten
- At this stage, your knot should look like Step 6. You have two outer loops, and your two tails (A and B) have been woven through the center.
- Remove the pins holding the loops in place. You are now ready to tighten the knot. (See Step 6).
Step 7: Flip to the Backside
- Gently flip the entire knot over. You will be working on the “backside” of the knot for the final tightening. (See Step 7).
Step 8: Pull the Tails
- On the backside, locate the tails (A and B).
- Gently pull the tails downward to tighten the center of the knot. As you pull, the two outer loops will shrink slightly and lock into place.
- Crucial Tip: Do not pull too hard! Pull gently until the center is snug. (See Step 8).
Step 9: Adjust and Finish (The Final Result)
- Flip the knot back to the front side.
- To get a perfect, symmetrical shape, you will need to adjust the loops. Do not just pull the tails. Instead, slide the slack out of the outer loops and inner loops simultaneously.
- Use your fingers to smooth out the center weave.
- Once you have achieved a tight, flat center and two perfect circular loops on the sides, your Omamori knot is complete! (See Step 9).
Pro-Tips for a Perfect Omamori Knot
- Smooth Cord = Better Knot: Flat satin cord (like the teal cord in the image) is the absolute best material for this knot. It lies flat and allows the geometric pattern to shine. Twisted rope will look bulkier and less defined.
- Pins Are Your Best Friend: If you are learning this for the first time, you must use push pins. The smooth material of the cord will slide out of shape immediately if you try to hold it all with your fingers. Pin every loop in Steps 1 through 5.
- Patience in Step 9: The final adjustment is where beginners usually get frustrated. Take a deep breath. Pull a tiny bit of slack from the left loop, then a tiny bit from the right loop, then pull the tails. Work slowly and symmetrically.
- Dressing the Knot: In knotting terminology, “dressing” means arranging the threads to look their best. Once your knot is tight, use a blunt needle or your fingernail to gently poke and smooth the center weave so the over-and-under pattern is perfectly visible.
Creative Uses for the Omamori Knot
Once you have mastered this beautiful knot, put it to use in these projects:
- Good Luck Charms: The traditional use! Tie this knot at the top of a small pouch filled with dried herbs or a tiny bell to make your own handmade lucky charm.
- Packaging Touches: Use a flat satin cord tied in an Omamori knot to wrap a handmade gift box. It instantly elevates the presentation to boutique status.
- Bracelet Finishes: Tie this knot as the centerpiece of a flat cord bracelet, using the long tails to wrap around your wrist.
- Bookmarks: This knot is stunning when used at the end of a long, flat bookmark cord.
Conclusion
The Omamori Knot is a beautiful bridge between Japanese tradition and modern crafting. It is a symbol of good fortune, but it also represents patience and precision. While Step 9 requires a steady hand, the satisfaction of seeing that perfect, symmetrical knot form is truly rewarding.
Save this guide to your Pinterest board for your next Japanese-inspired craft! Let me know in the comments: Have you tried tying an Omamori knot before?
Happy Knotting!