Learn how to make a stunning beaded flower and bow bracelet with this easy 4-step visual guide. Perfect for beginners using seed beads!
Introduction: The Sweetest Handmade Accessory
If you are looking for a beading project that is equal parts delicate, adorable, and surprisingly easy, you have found it. This Beaded Daisy & Bow Bracelet is the ultimate DIY jewelry piece. With its tiny white flowers and a charming gold bow, it instantly adds a romantic, boho-chic vibe to any outfit.
The best part? The diagrams provided break this project down into just four simple steps per section. If you can thread a needle and loop a wire, you can create this beautiful bracelet. It makes a fantastic handmade gift for friends, a cute addition to your own jewelry collection, or even a fun activity for a craft night.
Let’s grab our seed beads and wire, and learn exactly how to make this adorable accessory!
Materials You Will Need
Before you begin, gather these simple supplies. You probably have most of these in your craft stash already!
For the Daisy Flowers:
- Seed Beads: White (for petals) and Yellow (for the center).
- Spacer Beads: Tiny Green seed beads (or clear/mini gold beads).
For the Gold Bow:
- Seed Beads: Gold or Champagne color.
- Accent Bead: 1 small bead in a contrast color (like dark blue or white) to act as the center knot of the bow.
- Additional beads: A few small matching beads for the dangling tails.
Tools:
- Beading Wire or Nylon Thread: Sturdy and flexible.
- Beading Needle: Very thin to pass through the tiny holes of seed beads.
- Scissors or Wire Cutters.
- Lobster Clasp & Jump Rings (to finish the bracelet).
Part 1: Making the Daisy Chain (Left Diagram)
The daisy chain is the star of the bracelet. It uses a loop technique that weaves the petals and center together.
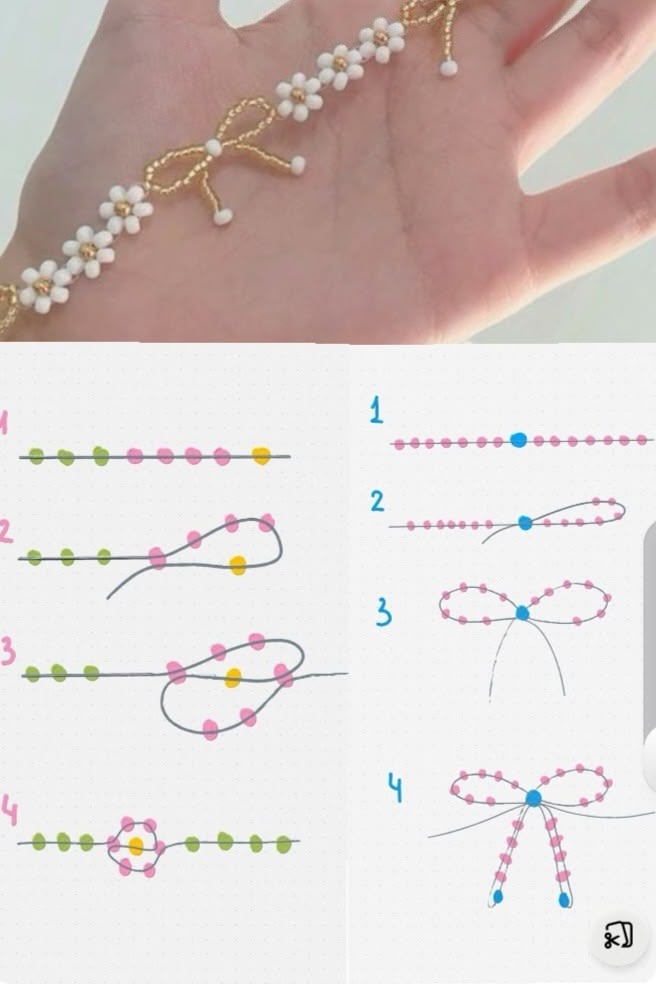
Step 1: String the Base (Image #1)
- Take your wire and string on 2 Green spacer beads.
- Next, string on 5 White petal beads.
- Finally, string on 1 Yellow center bead.
Step 2: Loop Back Through (Image #2)
- Take your needle and thread it backwards through the first White bead you put on (the one closest to the green spacers).
- Do not pull tight yet; keep the loop loose.
Step 3: Close the Daisy Loop (Image #3)
- Thread your needle through the 2nd, 3rd, 4th, and 5th White beads.
- Now, pull the wire tight. As you pull, watch the yellow bead move into the center of the white loop. The white beads will form a perfect circle, locking the yellow bead in place as the center of the daisy.
Step 4: Repeat the Pattern (Image #4)
- With your daisy securely locked, string on 2 more Green spacer beads.
- Repeat the process (5 White, 1 Yellow, loop back through the first white).
- Continue this pattern until you have a string of roughly 5 to 7 daisies, or until the chain is long enough to wrap around your wrist.
Part 2: Making the Beaded Bow (Right Diagram)
This gold bow acts as the perfect focal point, tying the daisies together.
Step 1: Create the Base (Image #1)
- String a length of Gold seed beads.
- Add your central contrast bead (the blue bead shown in the diagram).
- Continue stringing an equal number of gold beads on the other side.
Step 2: Form the Left Loop (Image #2)
- Take the excess wire and loop it back toward the center.
- Thread your needle through the central blue bead to lock the first loop in place.
Step 3: Form the Right Loop (Image #3)
- Take the wire and create a second loop on the right side.
- Thread your needle back through the central blue bead again to lock both loops securely. You now have a perfect beaded bow shape!
Step 4: Add the Dangling Tails (Image #4)
- Take the two remaining wire ends hanging from the central blue bead.
- String a small gold bead onto each end.
- Add one final tiny accent bead (a blue or white dot) at the very tip of each tail, and tie a secure knot beneath it to stop it from falling off.
- Trim the excess wire neatly.
Part 3: Assembling Your Bracelet
Now you have your daisy chain and your beautiful bow. Let’s put them together!
Step 1: Attach the Bow
- Place your beaded bow at the exact center of your daisy chain.
- Using your needle and a separate piece of beading wire, stitch the bow securely to the back of one of the middle daisies. Make sure it sits centered.
Step 2: Add the Clasp
- Take the two very ends of your daisy chain wire.
- Tie off the wire securely with a surgeon’s knot or double knot at the very end.
- Thread a small crimp bead over the knot and squeeze it flat with pliers (if using wire).
- Attach a jump ring and lobster clasp to one end.
- Attach a single jump ring to the other end to act as the catch.
Step 3: Finish and Wear
- Gently pinch the bow loops to shape them perfectly.
- Your bracelet is ready to wear!
Pro-Tips for Perfect Beading
- Tension is Key: When making the daisies, pulling too tight will bunch the petals; pulling too loose will let the yellow bead fall out. Practice on 2 flowers until you get the tension just right.
- Quality Beads: Because this is a delicate piece, investing in high-quality Japanese or Czech glass seed beads (like Toho or Miyuki) will make a huge difference in the finished shine and uniform size.
- Customize the Colors: Swap the white daisies for pale pink, or change the bow to silver for a completely different style.
Conclusion
Creating this Beaded Daisy & Bow Bracelet is a wonderfully relaxing and rewarding craft. It proves that with just a few tiny beads and a little patience, you can create boutique-quality jewelry for a fraction of the price.
Don’t forget to save this tutorial to your Pinterest board for later! And let us know in the comments: Which color combos are you going to try for your bracelet?
Happy Beading! 🌼🎀✨


