When making beaded jewelry on beading wire (also called tiger tail, cable, or тросик), the crimp bead is what holds everything together. However, metal crimp beads can have sharp edges that may eventually cut through the wire or irritate the skin. This is where protectors (also called rubber bumpers, bead guards, or silicone cushions) come in — they sit between the crimp and the beads, protecting both the wire and the wearer.
In this guide, you will learn:
- The full meaning of each step in the process
- How to position the crimp and protector correctly
- How to crimp with flat-nose pliers (without teeth)
- How to close the protector around the crimp
- How to finish both ends of a beaded necklace or bracelet
Key distinction from the previous guide: This method uses a protector (rubber/silicone bumper) in addition to the crimp. The protector sits between the crimp and the beads, acting as a cushion and a stopper.
Why Use a Protector (Bead Guard)?
| Benefit | Explanation |
|---|---|
| Protects beads | Prevents metal crimp from scratching or cracking beads |
| Protects wire | Soft material reduces friction and wear |
| Protects skin | No sharp metal edges near the clasp |
| Improves fit | The protector acts as a soft stopper, keeping beads snug |
| Professional finish | Hides the transition from crimp to beads |
What Is a Protector?
| Material | Usually rubber or soft silicone |
| Shape | Small tube or cup with a hole through the center |
| Placement | Sits next to the beads, between them and the crimp |
| Color | Often clear, white, or black (matches most designs) |
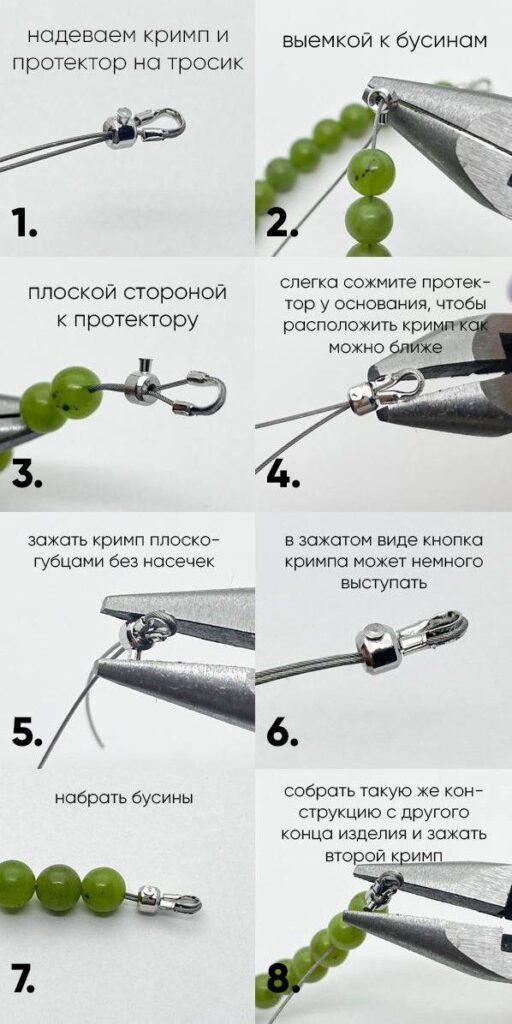
Part 1: Step-by-Step Instructions (From Your Image)
Step 1: Thread the Crimp and Protector onto the Wire
| Action | Detail |
|---|---|
| Slide a crimp bead onto the beading wire | Followed immediately by a protector (rubber bumper) |
| The protector should be positioned with its flat side toward the beads (плоской стороной к бусинам) | |
| The crimp should be positioned with its groove toward the protector (выемкой к протектору / к бусинам — your image says “выемкой к бусинам”) |
Result: On your wire (from the end toward the beads): wire end → crimp bead → protector (flat side facing beads) → design beads.
Note about the groove: Many crimp beads have a small groove or indentation on one side. This groove should face the protector/beads to allow the wire to sit correctly.
Step 2: Slightly Squeeze the Protector at the Base
| Action | Detail |
|---|---|
| Gently squeeze the protector at its base (the end nearest the beads) | This is a temporary squeeze to position the crimp as close as possible to the protector |
| Do not crush the protector | Just enough compression to slide the crimp close |
Result: The crimp and protector are now touching or nearly touching, with no gap between them.
Step 3: Fold the Wire Back Through the Crimp and Protector
| Action | Detail |
|---|---|
| Fold the wire end back | Pass it back through the crimp bead and the protector |
| This creates a double strand of wire inside both components | Much more secure than a single strand |
Result: The wire now makes a loop at the end, with both strands passing through the crimp and protector.
Step 4: Crimp the Crimp with Flat-Nose Pliers (Without Teeth)
| Action | Detail |
|---|---|
| Use flat-nose pliers without teeth (плоско-губцами без насечек) | Teeth on pliers can damage the crimp |
| Position the crimp bead between the plier jaws | Squeeze firmly to flatten the crimp |
Result: The crimp is now flattened and securely grips both strands of wire.
Important: Do not use the two-step crimper (grooved + round notch) described in the previous guide. This method uses simple flat-nose pliers to flatten the crimp, which may be less secure but is the method shown in your image.
Step 5: The Crimped Crimp — May Slightly Protrude
| Action | Detail |
|---|---|
| After crimping, the crimp may slightly protrude from the protector | This is normal (в зажатом виде кнопка кримпа может немного выступать) |
| It does not need to be completely hidden | The protector will cover the transition |
Result: The crimp is slightly visible or slightly sticks out from the protector.
Step 6: String Your Beads
| Action | Detail |
|---|---|
| Now string all your design beads | Onto the wire |
| The beads should sit against the flat side of the protector | The protector acts as a soft bumper |
Result: A fully strung bracelet or necklace, with one end finished.
Step 7: Assemble the Same Construction on the Other End
| Action | Detail |
|---|---|
| After all beads are strung | Repeat Steps 1–5 on the other end |
| Crimp bead, protector, fold wire back, crimp with flat-nose pliers | Same orientation |
Result: Both ends are finished with a crimp and protector.
Step 8: Trim Excess Wire (Implied, not labeled)
| Action | Detail |
|---|---|
| Use wire cutters (кусачками) | Cut the excess wire close to the crimp |
| Do not leave sharp protrusions | The wire end should not poke out |
Result: A clean, safe finish.
Part 2: Visual Summary of the Assembly Order
Correct Order (from end to beads)
| Position | Component | Note |
|---|---|---|
| 1 (end) | Wire end (folded back) | Creates a loop |
| 2 | Crimp bead | Groove facing protector/beads |
| 3 | Protector (rubber bumper) | Flat side facing beads |
| 4 | Design beads | The main jewelry |
The Folded Wire Path
    <── folded back ──<

    [Crimp] [Protector] ● ● ● ● ● ● ● (beads)

    >── wire from beads ──>
Both strands of wire pass through the crimp and the protector.
Part 3: Why Flat-Nose Pliers Without Teeth?
| Tool | Effect |
|---|---|
| Pliers with teeth | Leave marks, can crush or damage the crimp bead |
| Flat-nose pliers without teeth | Smooth jaws create an even, flat crimp without damage |
If you do not have flat-nose pliers without teeth, you can:
- Use the flat back of combination pliers (if smooth)
- Cover plier teeth with a layer of masking tape (temporary fix)
- Purchase smooth flat-nose jewelry pliers
Part 4: Complete Materials List
| Material | Purpose |
|---|---|
| Beading wire (cable / tiger tail / тросик) | Stringing material |
| Crimp beads | Small metal beads that secure the wire |
| Protectors (rubber bumpers / bead guards) | Soft cushions between crimp and beads |
| Flat-nose pliers without teeth | For crimping |
| Wire cutters | Trimming excess wire |
| Beads | Your design elements |
| Clasp (optional) | Can be attached to the loop created by the folded wire |
| Jump rings (optional) | To connect clasp to the wire loop |
Part 5: Common Mistakes & Fixes
| Mistake | Cause | Fix |
|---|---|---|
| Protector faces wrong direction | Flat side not toward beads | Flat side should touch the beads; rounded side touches the crimp |
| Crimp groove faces wrong way | Groove should face protector/beads | Crimp’s groove holds the wire better when facing the beads |
| Wire slips through crimp | Only one strand inside crimp | Always fold wire back for double strand |
| Protector crushed | Squeezed too hard in Step 2 | Only slight pressure to position; do not crush |
| Crimp has sharp edges | Used pliers with teeth | Use smooth flat-nose pliers |
| Crimp visible after finishing | Did not push protector close to beads | Squeeze protector base gently to close the gap |
| Protector slides out of place | No tension on wire | Pull wire snug before crimping |
Part 6: Crimp + Protector vs. Crimp + Calotte
| Feature | Crimp + Protector (This Guide) | Crimp + Calotte (Previous Guide) |
|---|---|---|
| Cover for crimp | Rubber/silicone protector | Metal clamshell (calotte) |
| Appearance | Soft, minimal, modern | Traditional, more decorative |
| Best for | Casual, contemporary jewelry | Formal, classic jewelry |
| Attachment for clasp | Loop of wire directly | Loop on calotte |
| Protects beads | Yes (soft bumper) | No (metal calotte touches beads) |
SEO Blog Post Optimization
| Meta Tag | Suggested Content |
|---|---|
| Title | How to Use Crimp Beads with Protectors (Bead Guards): Complete Step-by-Step Guide |
| Meta Description | Learn to use crimp beads with rubber protectors for beaded jewelry. Step-by-step instructions for positioning, crimping with flat-nose pliers, and finishing both ends. |
| URL slug | /crimp-beads-with-protectors |
| Keywords | crimp beads, protectors, bead guards, rubber bumpers, beading wire, finishing beaded jewelry, crimping with flat nose pliers |
| Alt text for image | Step-by-step guide for crimp beads and protectors: thread crimp and protector, position groove toward beads, flat side toward beads, fold wire back, crimp with flat pliers, string beads, repeat on other end |
Final Pro Tip: Use a Clasp with a Loop
The folded wire creates a small loop at the end of your bracelet (between the crimp and the wire fold). This loop can be used to attach a clasp directly — no jump ring needed:
- After folding the wire back, before crimping, pass the wire loop through the clasp’s ring
- Then bring the wire end back through the crimp and protector
- Crimp as usual
This creates an integrated connection that is very secure.
Summary: You Can Now Use Crimp Beads with Protectors
| Step | Action | Key Point |
|---|---|---|
| 1 | Thread crimp, then protector | Crimp groove toward beads; protector flat side toward beads |
| 2 | Slightly squeeze protector base | Position crimp as close as possible |
| 3 | Fold wire back through both | Double strand for security |
| 4 | Crimp with flat-nose pliers (no teeth) | Smooth jaws prevent damage |
| 5 | String beads | Protector acts as soft bumper |
| 6 | Repeat on other end | Same orientation |
| 7 | Trim excess wire | Clean finish |
This method creates a soft, modern finish that protects both your beads and the wearer. The rubber protector acts as a cushion, preventing the metal crimp from touching or damaging the beads.


