Kumihimo Flower: Learn to make stunning kumihimo earrings using 30cm braided cords in red, anemone & green. Step-by-step guide with felt backing & earring findings. Perfect for Japanese braiding beginners.
Introduction
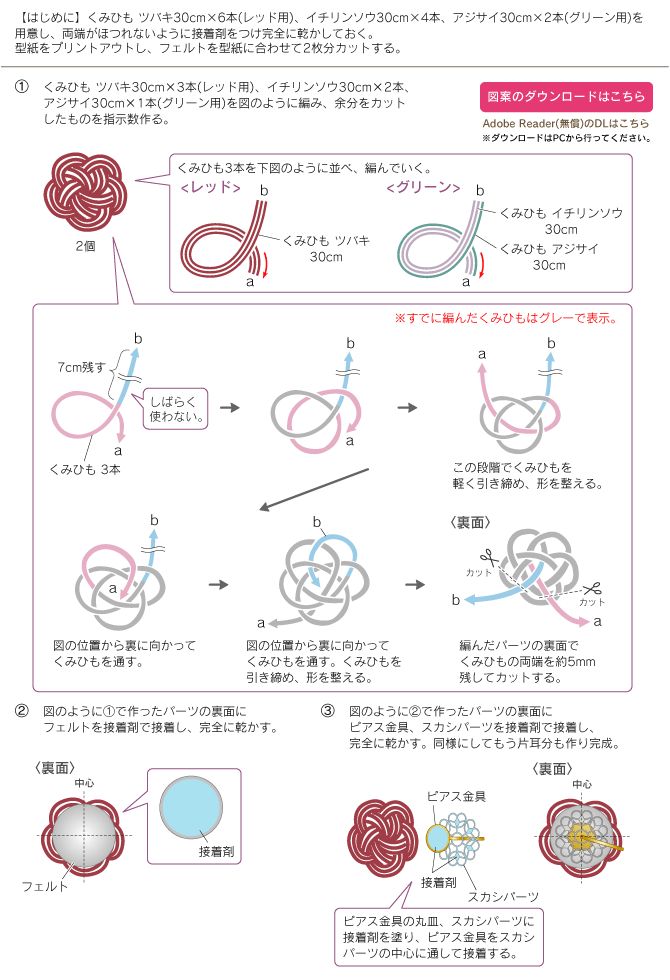
Kumihimo (組み紐) – the ancient Japanese art of braiding – creates beautifully structured cords perfect for jewellery. In this tutorial, you will make elegant layered kumihimo earrings using three colour groups:
- Suvaki (Red) – 6 cords total
- Ichirinsou (Anemone) – 4 cords total
- Ajisai (Hydrangea Green) – 2 cords total
Each cord is cut to 30cm, treated with adhesive to prevent fraying, then braided, backed with felt, and finished with professional earring findings.
Note: This design creates one pair of earrings. Repeat the process for the second earring.
Difficulty & Time
- Level: Beginner to Intermediate (basic kumihimo knowledge helpful)
- Time: 90 minutes per pair (includes drying time)
- Technique: Flat braid with layered assembly
Materials & Tools
| Category | Item |
|---|---|
| Kumihimo cords – Red | Suvaki (そばき) – 30cm × 6 strands |
| Kumihimo cords – Anemone | Ichirinsou (イチリンソウ) – 30cm × 4 strands |
| Kumihimo cords – Green | Ajisai (アジサイ) – 30cm × 2 strands |
| Adhesive | Fabric glue or clear craft bond (prevents fraying) |
| Felt | 2 small pieces (matching or neutral colour) |
| Earring findings | 2 earring pins (ビアス金具) + 2 round plates (丸皿) |
| Scissors | Sharp fabric scissors |
| Template | Printed pattern (型紙) – download from link |
| Tools | Awl or thick needle (to pass cords through felt) |
Preparation (Before Braiding)
- Apply adhesive to both ends of all 12 cords (6 red + 4 anemone + 2 green).
- Let dry completely – this prevents unraveling during braiding.
- Print the template (型紙) at 100% scale.
- Cut two felt pieces exactly matching the template shape.
⚠️ Download the pattern from the provided link using a PC (Adobe Reader required).
Step-by-Step Instructions
Step 1: Braid the First Cord Set
You will need for one earring (make 2 identical sets total):
- Suvaki (Red) – 30cm × 3 strands
- Ichirinsou (Anemone) – 30cm × 2 strands
- Ajisai (Green) – 30cm × 1 strand
How to braid:
- Arrange the 6 cords as shown in the diagram (3 red, 2 anemone, 1 green).
- Begin a flat kumihimo braid (basic round or flat plate method).
- Braid until you have approximately 7cm of braided length.
- Do not cut the remaining tails – leave them for now.
- Gently tighten the braid and shape it with your fingers.
- Repeat the exact same braid for the second earring.
Each earring uses 3 red + 2 anemone + 1 green = 6 cords total.
Step 2: Cut Excess & Prepare for Assembly
From each finished braid:
- Leave about 5mm of unbraided cord at both ends.
- Cut off any extra beyond that.
- The remaining short tails will be used to attach through the felt.
Step 3: Pass Cords Through Felt (Back Side)
- Take the felt piece (cut from template).
- From the front side of the braid, push the cord tails through to the back of the felt at the positions marked in the diagram.
- Pull gently to tighten.
- Adjust the braid so it sits centred on the felt.
- Shape and tighten again – this locks the braid in place.
Step 4: Glue Felt to Braid (Backing)
- Apply adhesive to the back surface of the braid and the front of the felt.
- Press firmly together.
- Let dry completely before moving to the next step.
This felt backing provides structure and hides the cord ends.
Step 5: Attach Earring Findings (ビアス金具 & 丸皿)
You will need:
- Earring pin (ビアス金具)
- Round metal plate (丸皿)
- Scalloped or decorative cap (スカンパーツ) – optional but recommended
How to attach (back side view):
- Apply adhesive to the round plate and the scalloped cap.
- Slide the earring pin through the centre hole of the scalloped cap.
- Push the pin through the felt and braid from back to front (or front to back, depending on design).
- Centre the findings on the earring.
- Press and hold for 30 seconds.
- Let dry completely (at least 1 hour).
Repeat for the second earring.
Diagram Reference (Key Points)
The original pattern shows:
- Cord arrangement: Red (bottom), Anemone (middle), Green (top) in a specific layered order.
- Braid tightening stage: After braiding but before cutting.
- Felt placement: Cords pass from front to back at marked positions.
- Finding attachment: Glue on the round plate and cap, pin through the centre.
If your downloaded pattern includes numbered positions, match each cord tail to its corresponding hole.
Pro Tips for Perfect Kumihimo Earrings
- Even tension – Pull each cord with the same force throughout the braid.
- Adhesive choice – Use flexible jewellery glue (not superglue, which becomes brittle).
- Drying time – Wait the full recommended time; rushing leads to loose findings.
- Matching pair – Count your braid moves. If you make 40 moves on the first earring, make exactly 40 on the second.
- Felt colour – Use black or dark grey felt – it hides shadows and looks professional.
Troubleshooting Common Problems
| Problem | Likely Cause | Solution |
|---|---|---|
| Fraying during braid | Adhesive not fully dry | Reapply glue and wait 2 hours |
| Braid twists | Uneven cord tension | Practice on scrap cords first |
| Findings fall off | Wrong glue type | Use epoxy or specialised metal-to-fabric glue |
| Earrings don’t match | Different braid length | Mark 7cm on a ruler and measure each |
Variations to Try
- All-red earrings – Use 6 red cords for a monochrome look.
- Pastel spring set – Replace red with pink, green with mint.
- Long drop style – Braid 12cm instead of 7cm for a dangling effect.
- Tassel finish – Instead of felt, let the tails hang as a fringe.
Frequently Asked Questions
Q: Can I use regular embroidery floss instead of kumihimo cords?
A: Yes, but wax it first and use more strands (8–10) for the same thickness.
Q: What does “Suvaki / Ichirinsou / Ajisai” mean?
A: These are Japanese colour/pattern names – Suvaki = red, Ichirinsou = anemone flower, Ajisai = hydrangea green.
Q: Where can I find the template if the link doesn’t work?
A: Search for “kumihimo earring teardrop template” or draw your own 3cm × 4cm leaf shape.
Q: How do I clean these earrings?
A: Wipe gently with a slightly damp cloth. Do not submerge in water (felt may warp).
Finished Look & Styling
Once complete, each earring measures approximately 4–5 cm in length (including finding). The three colours create a subtle gradient:
- Red (Suvaki) – bold, warm, festive
- Anemone (Ichirinsou) – soft, romantic, neutral
- Green (Ajisai) – fresh, calming, natural
Wear them with:
- A white blouse (colours pop)
- Dark green or navy dress (matches the ajisai)
- Casual kimono or bohemian outfit
Conclusion
Making kumihimo earrings with 30cm cords is a rewarding project that combines traditional Japanese braiding with modern jewellery design. By following these steps – preparing cords, braiding to 7cm, backing with felt, and attaching findings – you will create a professional, durable, and beautiful accessory.
Ready to start? Download the template, apply adhesive to your cords, and begin your first braid. Share your finished earrings using hashtags:
#KumihimoEarrings #KumihimoTutorial #JapaneseBeading #HandmadeEarrings


