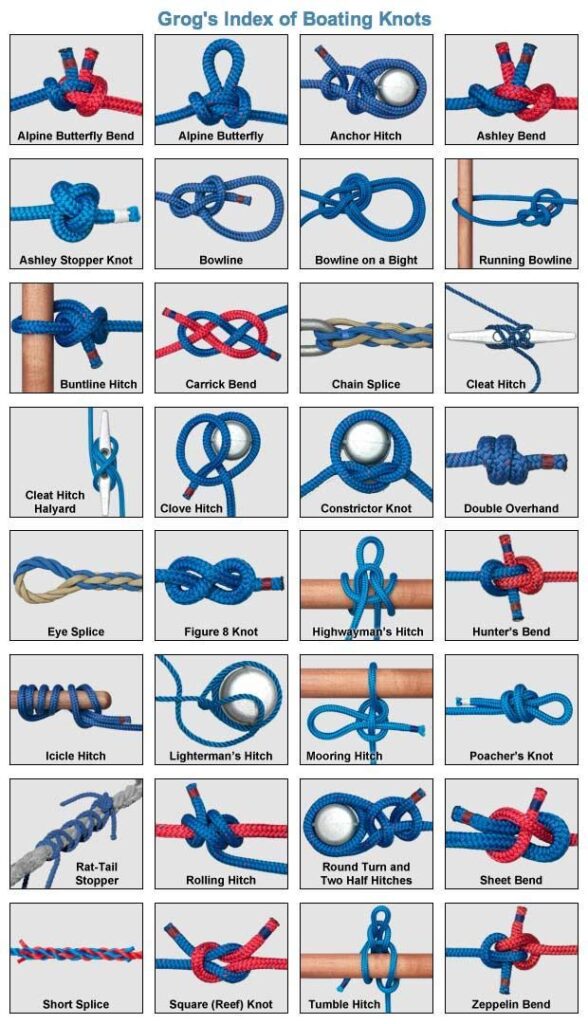
For centuries, sailors have relied on a handful of essential knots to secure boats, hoist sails, tie fenders, and perform emergency repairs. Grog’s Index of Boating Knots is one of the most trusted references for boaters, climbers, and outdoor enthusiasts. This guide covers over 30 knots — from the simple Clove Hitch to the complex Alpine Butterfly.
Grog’s Index of Boating Knots: Complete Guide to 30+ Essential Knots
In this guide, you will learn:
The full meaning of each knot
Primary use on a boat or in maritime settings
Difficulty level (Easy / Medium / Hard)
Security rating (High / Medium / Low)
Why Grog? Grog (the creator of AnimatedKnots.com) has revolutionized knot-tying education with clear, step-by-step animations. This index represents the gold standard for boating knots.
Part 1: Hitches (Knots That Tie Rope to an Object)
1. Anchor Hitch
Attribute
Detail
Use
Securing an anchor to a rope (anchor line or rode)
Difficulty
Medium
Security
Very High
Also known as
Fisherman’s Bend (though not actually a bend)
Why use it: The Anchor Hitch is specifically designed to withstand the constant pulling and releasing of an anchor. It will not slip or jam.
2. Buntline Hitch
Attribute
Detail
Use
Attaching a rope to a spar, ring, or another rope
Difficulty
Easy
Security
High
Best for
Attaching fenders to rails
Why use it: The Buntline Hitch is simple, secure, and does not slip under load.
3. Cleat Hitch
Attribute
Detail
Use
Securing a rope to a cleat (a metal or plastic horn-shaped fitting)
Difficulty
Easy
Security
High
Variations
Two versions appear in the index
How to tie (standard):
Wrap the rope around the base of the cleat
Make a figure-eight around the cleat horns
Finish with a half hitch under the last horn
4. Clove Hitch
Attribute
Detail
Use
Temporarily securing a rope to a post, rail, or piling
Difficulty
Very Easy
Security
Medium (not for critical loads)
Best for
Starting other knots, tying fenders temporarily
Why use it: The Clove Hitch is fast and easy to tie and untie, even under tension.
5. Constrictor Knot
Attribute
Detail
Use
Binding or cinching an object tightly
Difficulty
Medium
Security
Very High (jams tight)
Best for
Securing a rope to a post where you want no slip
Note: This knot is difficult to untie after being loaded.
6. Icicle Hitch
Attribute
Detail
Use
Tying to a post or pole where the pull is parallel to the post
Difficulty
Hard
Security
High
Best for
Tying to smooth, vertical surfaces (like a pile or spar)
Why use it: The Icicle Hitch grips tightly even when pulled parallel to the object.
7. Lightman’s Hitch
Attribute
Detail
Use
A secure, quick-release hitch
Difficulty
Medium
Security
High
Best for
Temporary mooring or quick-release applications
8. Mooring Hitch
Attribute
Detail
Use
Securing a boat to a dock or mooring buoy
Difficulty
Medium
Security
High
Best for
Docking where you need to adjust line length
9. Rolling Hitch
Attribute
Detail
Use
Tying a rope to another rope or a spar when the pull is parallel
Difficulty
Medium
Security
High
Best for
Adjusting tension on a line (e.g., a sail sheet)
10. Round Turn and Two Half Hitches
Attribute
Detail
Use
Securing a rope to a post, ring, or piling
Difficulty
Easy
Security
Very High
Best for
Docking lines, mooring lines
Why use it: The round turn reduces friction and wear, while the two half hitches lock the knot securely.
11. Tumble Hitch
Attribute
Detail
Use
A quick-release hitch that can be untied even under heavy load
Difficulty
Hard
Security
High (when tied correctly)
Best for
Emergency release applications
Part 2: Loops & Bends (Joining Ropes & Creating Loops)
Why use it: The Alpine Butterfly can be loaded in any direction (from any of the three points) without slipping or jamming.
14. Ashley Bend
Attribute
Detail
Use
Joining two ropes together
Difficulty
Hard
Security
Very High
Best for
Critical connections where safety is paramount
Note: Named after Clifford Ashley, author of “The Ashley Book of Knots.”
15. Carrick Bend
Attribute
Detail
Use
Joining two thick ropes (e.g., hawsers, mooring lines)
Difficulty
Medium–Hard
Security
Very High
Best for
Heavy lines that need a flat, jam-resistant bend
16. Double Overhand (Stopper Knot)
Attribute
Detail
Use
Creating a bulge or stopper at the end of a rope
Difficulty
Easy
Security
High
Best for
Preventing a rope from slipping through a block, cleat, or hole
17. Hunter’s Bend
Attribute
Detail
Use
Joining two ropes together
Difficulty
Medium
Security
Very High
Best for
General-purpose bend
18. Poacher’s Knot
Attribute
Detail
Use
Creating a loop that tightens under load (a type of noose)
Difficulty
Medium
Security
High
Best for
Poaching (historically), securing fishing lines
19. Rat-Tail Stopper
Attribute
Detail
Use
A tapered stopper knot for the end of a rope
Difficulty
Medium
Security
High
Best for
Whipping or finishing rope ends
20. Sheet Bend
Attribute
Detail
Use
Joining two ropes of different thicknesses
Difficulty
Very Easy
Security
Medium–High
Best for
Tying a rope to a sail’s clew (historically)
How to tie: A Sheet Bend is essentially a modified overhand knot where one rope is folded back.
21. Square (Reef) Knot
Attribute
Detail
Use
Joining two ropes of equal thickness (for light loads only)
Difficulty
Very Easy
Security
Low (can slip or capsize)
Best for
Tying bandages, reefing sails, bundling
Warning: The Square Knot is NOT secure for critical applications. It is often confused with a Granny Knot.
22. Zeppelin Bend
Attribute
Detail
Use
Joining two ropes together
Difficulty
Medium
Security
Very High
Best for
Critical applications, easy to untie after heavy loading
Why use it: The Zeppelin Bend is considered one of the most secure and easy-to-untie bends.
Part 3: Bowlines (Loop Knots)
23. Bowline
Attribute
Detail
Use
Creating a fixed loop at the end of a rope
Difficulty
Medium
Security
Very High
Best for
Rescue, hoisting, attaching sheets to sails
Memory aid: “The rabbit comes out of the hole, goes around the tree, and back down the hole.”
24. Bowline on a Bight
Attribute
Detail
Use
Creating a loop in the middle of a rope (not at the end)
Difficulty
Hard
Security
Very High
Best for
Rescue, creating two loops (for a bosun’s chair)
25. Running Bowline
Attribute
Detail
Use
Creating a noose or loop that tightens under load
Difficulty
Medium
Security
High
Best for
Tying to an object where the loop needs to constrict
Part 4: Splices (Rope Joining Without Knots)
26. Chain Splice
Attribute
Detail
Use
Splicing a rope to a chain
Difficulty
Hard
Security
Very High
Best for
Anchor rodes (rope-to-chain connection)
27. Eye Splice
Attribute
Detail
Use
Creating a permanent loop at the end of a rope by tucking strands
Difficulty
Hard
Security
Very High
Best for
Dock lines, mooring lines, halyards
28. Short Splice
Attribute
Detail
Use
Permanently joining two ropes by interweaving strands
Difficulty
Hard
Security
Very High
Best for
Joining two ropes where you do not need the splice to pass through a block
Part 5: Stopper & Figure Eight Knots
29. Ashley Stopper Knot
Attribute
Detail
Use
A large, secure stopper knot at the end of a rope
Difficulty
Medium
Security
Very High
Best for
When a Figure 8 is not large enough
30. Figure 8 Knot
Attribute
Detail
Use
A stopper knot at the end of a rope
Difficulty
Very Easy
Security
High
Best for
Climbing, general stopper use
Why use it: The Figure 8 is stronger and easier to untie after loading than a simple overhand knot.
31. Highwayman’s Hitch
Attribute
Detail
Use
A quick-release hitch that can be untied by pulling one end
Difficulty
Medium
Security
Low (not for critical loads)
Best for
Temporary tie-ups, emergency release
Historical note: Named after highway robbers who could untie their horses quickly and escape.
Part 6: Quick Reference Table
Knot
Category
Difficulty
Security
Primary Use
Anchor Hitch
Hitch
Medium
Very High
Anchoring
Buntline Hitch
Hitch
Easy
High
Fenders
Cleat Hitch
Hitch
Easy
High
Docking
Clove Hitch
Hitch
Easy
Medium
Temporary tying
Constrictor Knot
Hitch
Medium
Very High
Binding
Icicle Hitch
Hitch
Hard
High
Vertical posts
Lightman’s Hitch
Hitch
Medium
High
Quick release
Mooring Hitch
Hitch
Medium
High
Docking
Rolling Hitch
Hitch
Medium
High
Adjusting tension
Round Turn & 2 HH
Hitch
Easy
Very High
Docking
Tumble Hitch
Hitch
Hard
High
Emergency release
Alpine Butterfly
Loop/Bend
Medium
Very High
Mid-line loop
Ashley Bend
Bend
Hard
Very High
Joining ropes
Carrick Bend
Bend
Med–Hard
Very High
Heavy lines
Double Overhand
Stopper
Easy
High
End stopper
Hunter’s Bend
Bend
Medium
Very High
Joining ropes
Poacher’s Knot
Loop
Medium
High
Adjustable noose
Rat-Tail Stopper
Stopper
Medium
High
Finishing ends
Sheet Bend
Bend
Very Easy
Med–High
Different rope sizes
Square (Reef) Knot
Bend
Very Easy
Low
Bundling
Zeppelin Bend
Bend
Medium
Very High
Critical bends
Bowline
Loop
Medium
Very High
Fixed end loop
Bowline on a Bight
Loop
Hard
Very High
Mid-line double loop
Running Bowline
Loop
Medium
High
Adjustable noose
Chain Splice
Splice
Hard
Very High
Rope to chain
Eye Splice
Splice
Hard
Very High
Permanent end loop
Short Splice
Splice
Hard
Very High
Permanent joining
Ashley Stopper
Stopper
Medium
Very High
Large stopper
Figure 8 Knot
Stopper
Very Easy
High
General stopper
Highwayman’s Hitch
Hitch
Medium
Low
Quick release
SEO Blog Post Optimization
Meta Tag
Suggested Content
Title
Grog’s Index of Boating Knots: Complete Guide to 30+ Essential Knots
Meta Description
Complete guide to Grog’s Index of Boating Knots. Learn 30+ essential knots for sailing, docking, anchoring, and rescue. Includes hitches, bends, loops, splices, and stoppers.