The hammock clew (pronounced “klu”) is the gathered end of a hammock where multiple ropes (called nettles) come together and attach to a ring. During World War II, the US Navy issued canvas hammocks to sailors, each with a hand-woven clew made of braided rope. These clews were strong, durable, and designed to distribute weight evenly across the hammock.
WWII US Navy Hammock Clew
In this guide, you will learn:
The full meaning of each component of the hammock clew
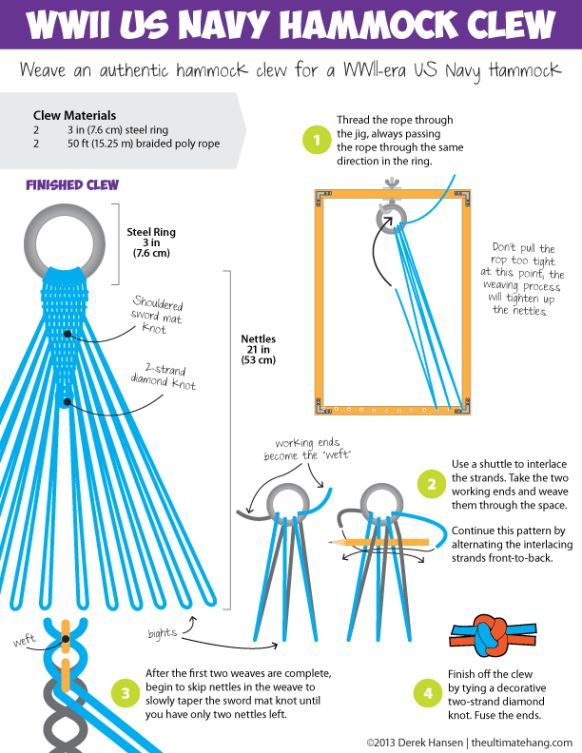
Materials needed (steel rings and braided poly rope)
How to set up a jig for weaving
How to create the shouldered sword mat knot
How to taper the nettles (the hanging ropes)
How to finish with a two-strand diamond knot
Historical Note: This is an authentic reproduction of a WWII-era US Navy hammock clew. The techniques are traditional and have been used by sailors for generations.
What Is a Hammock Clew?
Component
Description
Clew
The gathered end of a hammock where all ropes meet
Ring
A steel ring (3 inches / 7.6 cm) that attaches to the hammock hook
Nettles
The individual ropes that hang down from the clew and attach to the hammock fabric
Shouldered sword mat knot
The decorative, woven knot that sits below the ring
Two-strand diamond knot
The finishing knot at the bottom of the clew
Part 1: Materials (Clew Materials)
Material
Imperial
Metric
Notes
Steel ring
3 inches
7.6 cm
Two rings total
Braided poly rope
50 feet
15.25 m
Two ropes total
Total rope needed: 2 × 50 ft = 100 ft (30.5 m) of braided poly rope.
Why Braided Poly Rope?
Property
Benefit
Braided construction
Holds knots well, resists unraveling
Polypropylene
Does not absorb water, resists rot
Strength
Holds the weight of a sleeping sailor
Flexibility
Easy to weave and knot
Part 2: Finished Clew Specifications
Component
Measurement
Steel ring
3 inches (7.6 cm)
Shouldered sword mat knot
Decorative woven knot below ring
Nettles (hanging ropes)
21 inches (53 cm)
Working ends
Become the “weft” (woven cross strands)
Part 3: Step-by-Step Instructions
Step 1: Set Up Your Jig
Action
Detail
Create a jig (a board with pegs)
To hold the rope in place while weaving
Thread the rope through the jig
Always passing the rope through the same direction in the ring
Why a jig? A jig keeps consistent tension and spacing while you weave the complex knot. Without a jig, the nettles can become uneven.
Tip: Do not pull the rope too tight at this point. The weaving process will tighten up the nettles naturally.
Step 2: Thread the Rings
Action
Detail
Take one 50 ft rope
Thread it through the first steel ring
Pass the rope through the ring in the same direction each time
Consistency is key
Repeat with the second rope
Both ropes pass through the same ring
Result: Two ropes passing through a single steel ring, with long tails hanging down.
Step 3: Weave the Shouldered Sword Mat Knot
This is the decorative knot that sits just below the ring. It is called a “shouldered sword” knot because of its shape — wide at the top (shoulders) and tapering down (the blade).
Action
Detail
Use a shuttle (or your fingers) to interlace the strands
Take the two working ends and weave them through the space
Alternate the interlacing
Pass strands front-to-back, then back-to-front
The weaving pattern:
Pass
Action
First weave
Take working ends and weave through the space
Second weave
Alternate: front-to-back instead of back-to-front
Continue
Keep alternating with each pass
Result: A flat, woven mat that sits below the ring — the “shouldered sword mat knot.”
Step 4: Taper the Nettles
After the first two weaves are complete, you begin to taper the knot — making it narrower and narrower until only two nettles remain.
Step
Action
1
Complete the first two weaves (full width)
2
Begin to skip nettles in the weave
3
Skip one nettle on each side with each pass
4
Continue tapering until only two nettles remain
Visual of tapering:
Full width:   ||||||||||||  (12 nettles)
After taper 1:  ||||||||||   (10 nettles)
After taper 2:   ||||||||    (8 nettles)
After taper 3:    ||||||     (6 nettles)
After taper 4:     ||||      (4 nettles)
Final:            ||        (2 nettles)
Result: A tapered, sword-shaped woven knot — wider at the top (below the ring) and narrowing to two ropes at the bottom.
Step 5: Finish with a Two-Strand Diamond Knot
Action
Detail
Take the two remaining nettles
These are the working ends
Tie a two-strand diamond knot
A decorative, ball-like knot
Fuse the ends
Use a lighter to melt the rope tips (for poly rope)
How to tie a two-strand diamond knot:
Sub-step
Action
1
Cross the two strands to form a loop
2
Pass one end over, under, and through the loop
3
Pass the other end over, under, and through from the opposite side
4
Tighten carefully to form a diamond-shaped knot
Result: A decorative knot at the bottom of the clew that prevents the weave from unraveling.
Step 6: Attach the Second Ring (Optional)
Action
Detail
Pass the finished clew through the second steel ring
Or attach directly to the hammock fabric
The second ring can be used to connect to the hammock
Or attach to a hook or suspension system
Part 4: Understanding the Terminology
Term
Definition
Clew
The gathered end of a hammock (pronounced “klu”)
Nettles
The individual ropes that hang down from the clew
Shouldered sword mat knot
A woven, tapered knot named for its shape
Weft
The crosswise strands that weave through the nettles
Jig
A board with pegs used to hold ropes in place while weaving
Two-strand diamond knot
A decorative stopper knot
Part 5: Historical Context — WWII US Navy Hammocks
Fact
Detail
Issued to
All US Navy sailors during WWII
Material
Canvas hammock body, braided rope clew
Use
Sleeping berths on ships (stacked in rows)
Storage
Hammocks were lashed and stored in netting
Tradition
Sailors often personalized their clew knots
The clew was critical — if it failed, the sailor would fall. These knots were tied with great care and inspected regularly.
Part 6: Tips for Success
Tip
Why It Matters
Use a jig
Ensures even spacing and consistent tension
Don’t pull too tight early
The weaving process will tighten the nettles naturally
Keep the same direction through the ring
Prevents twisting and uneven wear
Fuse poly rope ends
Prevents fraying and unraveling
Practice the diamond knot first
It can be tricky to get symmetrical
Part 7: Common Mistakes & Fixes
Mistake
Cause
Fix
Nettles are uneven lengths
Inconsistent tension while weaving
Use a jig and check lengths frequently
Shouldered sword knot is lopsided
Skipped nettles unevenly
Count nettles on each side; skip symmetrically
Diamond knot is misshapen
Pulled one side tighter
Tighten both sides evenly and gradually
Ring moves out of position
Not secured in jig
Clamp or tie the ring to the jig
Rope frays at ends
Cut with dull scissors or not fused
Use sharp scissors; melt ends with a lighter
Part 8: Modern Uses for This Technique
Project
Adaptation
Camping hammock
Use modern synthetic rope; smaller ring
Decorative wall hanging
Use cotton rope; display the clew as art
Plant hanger
Smaller scale (1-inch ring, thinner rope)
Bag handle
Woven clew as a decorative handle attachment
Keychain
Miniature version with small cord
SEO Blog Post Optimization
Meta Tag
Suggested Content
Title
WWII US Navy Hammock Clew: Complete Weaving Guide
Meta Description
Learn to weave an authentic WWII-era US Navy hammock clew with steel rings and braided rope. Step-by-step instructions for the shouldered sword mat knot and two-strand diamond knot.
URL slug
/wwii-navy-hammock-clew
Keywords
hammock clew, WWII Navy hammock, shouldered sword mat knot, two-strand diamond knot, netting hammock, braided poly rope hammock
Alt text for image
WWII US Navy hammock clew diagram showing 3-inch steel ring, shouldered sword mat knot, 21-inch nettles, two-strand diamond knot, and weaving pattern
Final Pro Tip: Make a Miniature Version First
Before cutting 100 feet of rope, practice the technique on a small scale:
Material
Miniature Version
Ring
1-inch key ring
Rope
3 mm cotton cord, 2 × 10 ft
Use
Keychain or zipper pull
Once you master the weaving pattern on a small scale, scale up to the full 50 ft ropes for an authentic hammock clew.
Summary: You Can Now Weave a WWII Navy Hammock Clew
Step
Skill Learned
Status
1
Set up a jig and thread ropes through the ring
✅
2
Weave the shouldered sword mat knot
✅
3
Alternate the interlacing (front-to-back, back-to-front)
✅
4
Skip nettles to taper the knot
✅
5
Reduce to two nettles
✅
6
Tie a two-strand diamond knot
✅
7
Fuse the ends
✅
This historical technique is a rewarding project for anyone interested in maritime history, traditional knotting, or hammock making. The finished clew is both functional and beautiful — a true piece of naval craftsmanship.