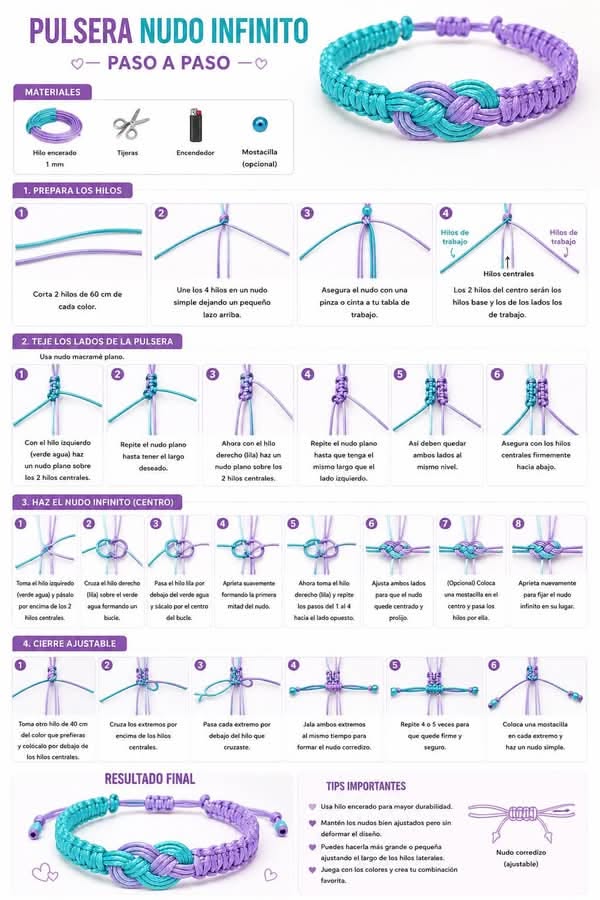
The Infinity Knot (Nudo Infinito) is a beautiful macrame design that symbolizes endless love, eternal friendship, and infinite possibilities. This bracelet combines the flat macrame knot (nudo macramé plano) for the side bands, a central infinity knot as the focal point, and an adjustable sliding closure (nudo corredizo) for a perfect fit.
In this guide, you will learn:
- The full meaning of each step in the process
- Materials needed for the bracelet
- How to prepare your cords (60 cm each, 2 colors)
- How to tie the flat macrame knot for the side bands
- How to create the infinity knot at the center
- How to finish with an adjustable sliding closure
- Important tips for a professional result
Design Name: Infinity Knot Bracelet (Pulsera Nudo Infinito)
Skill Level: Intermediate
Time to Complete: 30–45 minutes
Why Make an Infinity Knot Bracelet?
| Benefit | Explanation |
|---|---|
| Meaningful symbol | The infinity symbol (∞) represents eternal love or friendship |
| Adjustable fit | The sliding closure fits any wrist size |
| Two-color design | Use contrasting colors for a striking effect |
| Professional finish | Waxed cord ensures durability and clean knots |
| Great gift | Make matching bracelets for friends or couples |
Part 1: Materials (Materiales)
| Material (Spanish) | Material (English) | Specification |
|---|---|---|
| Hilo encerado | Waxed cord | 1 mm thickness |
| Tijeras | Scissors | Sharp |
| Encendedor | Lighter | For sealing cord ends |
| Mostacilla (opcional) | Seed bead (optional) | For center accent |
| Pinza o cinta | Clip or tape | To secure work to a board |
Cord Lengths and Colors
| Cord | Color | Length | Quantity |
|---|---|---|---|
| Left working cord | Light blue / aqua (verde agua) | 60 cm | 1 |
| Right working cord | Lilac / purple (lila) | 60 cm | 1 |
| Center cords (base) | Any color (hidden) | 60 cm | 2 |
| Sliding cord (cierre) | Your choice | 40 cm | 1 |
Total: 4 cords of 60 cm (2 for working, 2 for center base) + 1 cord of 40 cm for the sliding closure.
Part 2: Step-by-Step Instructions
Step 1: Prepare the Cords (Prepara los Hilos)
| Action | Detail |
|---|---|
| Cut 2 cords of 60 cm from each color | You will have 4 cords total (2 colors × 2 cords each?) — Actually: two 60 cm cords for the center, and two 60 cm cords for the working sides. |
| Join the 4 cords in a simple knot | Leave a small loop at the top (pequeño lazo arriba) |
| Secure the knot to your work surface | Use a clip, pin, or tape |
Result: A small loop at the top (this will be the attachment point for the sliding closure).
Cord arrangement:
- Left side: Light blue/aqua working cord (verde agua)
- Right side: Lilac/purple working cord (lila)
- Center (2 cords): Base cords (hilos centrales)
The two center cords will be the “core” — they do not move. The side cords are the working cords (hilos de trabajo).
Step 2: Tie the Side Bands (Teje los Lados de la Pulsera)
You will use the flat macrame knot (nudo macramé plano) — also known as the square knot or cobra knot.
Left Side (Green/Aqua)
| Step | Action |
|---|---|
| 1 | Take the left cord (verde agua) and make a flat knot over the 2 center cords |
| 2 | Repeat the flat knot until you reach the desired length |
| 3 | Pull the center cords firmly downward to keep tension |
Right Side (Lilac/Purple)
| Step | Action |
|---|---|
| 1 | Take the right cord (lila) and make a flat knot over the 2 center cords |
| 2 | Repeat the flat knot until it is the same length as the left side |
| 3 | Both sides should be at the same level (al mismo nivel) |
How to tie a flat knot (nudo macramé plano):
| Sub-step | Action |
|---|---|
| 1 | Place the left cord over the center cords |
| 2 | Place the right cord over the left cord, then under the center cords |
| 3 | Bring the right cord up through the loop on the left |
| 4 | Pull tight (this is half of the knot) |
| 5 | Repeat on the opposite side: right cord over, left cord under and through |
| 6 | Pull tight (one complete flat knot) |
Result: Two bands of flat knots — one on the left side, one on the right side — of equal length.
Step 3: Make the Infinity Knot (Haz el Nudo Infinito) — Center
This is the focal point of the bracelet — the infinity symbol created by interlocking loops.
| Step | Action |
|---|---|
| 1 | Take the left cord (verde agua) and pass it over the 2 center cords |
| 2 | Cross the right cord (lila) over the left cord, forming a loop |
| 3 | Pass the right cord through the center of the loop |
| 4 | Gently tighten to form the first half of the knot |
| 5 | Now take the right cord (lila) and repeat steps 1–4 toward the opposite side |
| 6 | Adjust both sides so the knot is centered and neat (centrado y prolijo) |
Optional bead accent:
- Place a seed bead (mostacilla) in the center
- Pass the cords through the bead
- Tighten again to fix the infinity knot in place
Result: A beautiful infinity symbol (∞) at the center of the bracelet.
Step 4: Adjustable Sliding Closure (Cierre Ajustable) — Nudo Corredizo
The sliding knot (nudo corredizo) allows the bracelet to fit any wrist size.
| Step | Action |
|---|---|
| 1 | Take another cord of 40 cm (any color you prefer) and place it under the center cords |
| 2 | Cross the ends over the center cords |
| 3 | Pass each end under the cord you crossed |
| 4 | Pull both ends at the same time to form the sliding knot |
| 5 | Repeat 4–5 times to make it firm and secure |
| 6 | Place a seed bead on each end and tie a simple knot |
How to tie a sliding knot (nudo corredizo / Peruvian knot):
| Sub-step | Action |
|---|---|
| 1 | Fold the 40 cm cord in half under the center cords |
| 2 | Bring both ends up and over the center cords |
| 3 | Cross the ends over each other |
| 4 | Pass each end through the loop created |
| 5 | Pull both ends simultaneously to tighten |
Result: An adjustable closure that slides along the center cords.
Step 5: Finish the Ends
| Action | Detail |
|---|---|
| Trim excess cord | Leave approximately 1–2 cm beyond the final knot |
| Seal the ends | Use a lighter to carefully melt the tips (for nylon/waxed cord) |
| Add optional beads | Thread a seed bead onto each end and tie a simple knot |
Result: A clean, professional finish with no fraying.
Part 3: Final Result (Resultado Final)
Your finished bracelet should have:
- A small loop at the top (for the sliding knot to pass through)
- Two flat knot bands on the left and right
- A central infinity knot (nudo infinito)
- An adjustable sliding closure (nudo corredizo)
- Optional bead accents at the center and/or ends
Part 4: Important Tips (Tips Importantes)
| Tip (Spanish) | Translation | Why It Matters |
|---|---|---|
| Usa hilo encerado para mayor durabilidad | Use waxed cord for greater durability | Waxed cord holds knots tightly and lasts longer |
| Mantén los nudos bien ajustados pero sin deformar el diseño | Keep knots tight but without deforming the design | Balance between security and aesthetics |
| Puedes hacerlo más grande o pequeña ajustando el largo de los hilos laterales | You can make it larger or smaller by adjusting the length of the side cords | Customize the bracelet size |
| Juega con los colores y crea tu combinación favorita | Play with colors and create your favorite combination | Personalize your bracelet |
Part 5: Sizing Guide
| Wrist Size | Length of Side Bands (each side) | Total Bracelet Length |
|---|---|---|
| 14 cm (5.5 in) | 5–6 cm | Approx. 15–16 cm |
| 16 cm (6.3 in) | 6–7 cm | Approx. 17–18 cm |
| 18 cm (7 in) | 7–8 cm | Approx. 19–20 cm |
The infinity knot itself adds approximately 1–2 cm to the total length. The sliding closure adds adjustability.
Part 6: Design Variations
| Variation | Change | Effect |
|---|---|---|
| Single color | Use the same color for both working cords | Subtle, elegant monochrome |
| Three colors | Use a different color for the center cords | Pops of color in the background |
| Beaded center | Add a larger focal bead (6–8 mm) | More prominent infinity knot |
| Multiple infinity knots | Add 2–3 infinity knots along the bracelet | More complex design |
| Anklet version | Use longer cords (80 cm each) | Wear on the ankle |
Part 7: Common Mistakes & Fixes
| Mistake | Cause | Fix |
|---|---|---|
| Infinity knot is lopsided | Pulled one side tighter than the other | Adjust both sides evenly before final tightening |
| Side bands are different lengths | Did not count knots | Count the number of flat knots on each side |
| Sliding knot doesn’t slide | Wrapped too tightly around the core | Keep wraps loose until final adjustment |
| Ends fray | Did not seal with lighter | Melt tips carefully (do not burn) |
| Bead falls off | Knot not tight enough after bead | Tie a simple knot directly after the bead |
SEO Blog Post Optimization
| Meta Tag | Suggested Content |
|---|---|
| Title | Infinity Knot Bracelet (Pulsera Nudo Infinito): Step-by-Step Macrame Tutorial |
| Meta Description | Learn to make an Infinity Knot Bracelet (Pulsera Nudo Infinito) with waxed cord. Step-by-step instructions for flat knots, infinity knot center, and adjustable sliding closure. |
| URL slug | /infinity-knot-bracelet-tutorial |
| Keywords | infinity knot bracelet, nudo infinito, pulsera macrame, nudo corredizo, nudo macrame plano, adjustable macrame bracelet |
| Alt text for image | Infinity Knot Bracelet step-by-step tutorial showing 60 cm cords, flat knots on left and right sides, central infinity knot, optional bead, and adjustable sliding closure |
Final Pro Tip: Practice the Infinity Knot First
The infinity knot (nudo infinito) is the most challenging part of this bracelet. Before starting your final bracelet, practice the knot on a scrap piece of cord:
- Take two small pieces of cord (15 cm each)
- Practice the over-under-over-under sequence described in Step 3
- Repeat 5–6 times until the knot looks symmetrical and neat
Once you master the infinity knot, the rest of the bracelet is straightforward.
Summary: You Can Now Make an Infinity Knot Bracelet
| Step | Skill Learned | Status |
|---|---|---|
| 1 | Prepare 4 cords of 60 cm with a top loop | ✅ |
| 2 | Tie flat knots (nudo macramé plano) on left and right sides | ✅ |
| 3 | Create the infinity knot (nudo infinito) at the center | ✅ |
| 4 | Add an optional bead to the center | ✅ |
| 5 | Make an adjustable sliding closure (nudo corredizo) | ✅ |
| 6 | Add beads to ends and seal with a lighter | ✅ |
This beautiful, meaningful bracelet makes a wonderful gift for a friend, partner, or family member. The infinity symbol (∞) represents eternal connection — a perfect sentiment for a handmade present.


