YK-212 Mizuhiki Earrings: Learn to make YK-212 Mizuhiki earrings using the Station Connection knot (駅連結び). Step-by-step guide with 30cm cords. Perfect for Japanese cord jewellery beginners.
Introduction
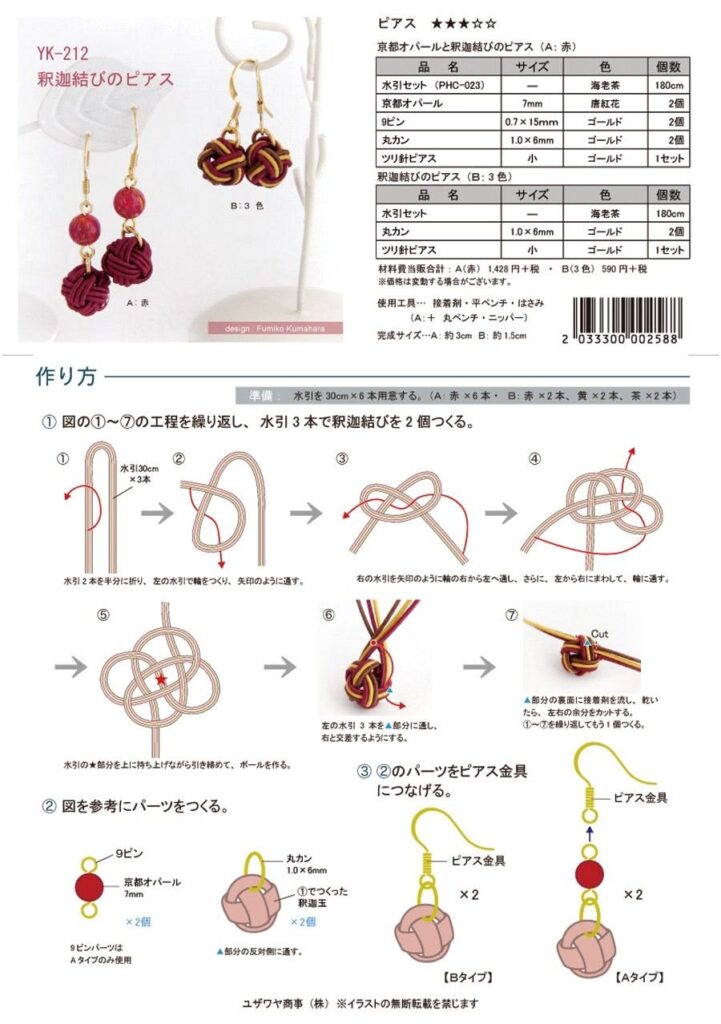
Mizuhiki (水引) is the traditional Japanese art of decorative knotting using stiff, glossy paper cords. The YK-212 earrings feature a beautiful geometric pattern called Station Connection Knot (駅連結び – Eki Ren Musubi) . This design symbolises connection, travel, and continuity – making it a meaningful handmade gift.
In this tutorial, you will use three 30cm mizuhiki cords to create one finished knot unit. You will repeat the process to make two identical units – one for each earring.
Note: The original pattern shows repeating steps ① through ⑦. You will repeat the same sequence of knots multiple times using fresh sets of 3 cords until you have two completed earring components.
Difficulty & Time
- Level: Beginner (after 2–3 practice attempts)
- Time: 30 minutes per knot unit (60 minutes for the pair)
- Technique: Station Connection Knot (駅連結び) – a structured, repetitive bind
Materials & Tools
| Category | Item |
|---|---|
| Mizuhiki cords | 30cm length × 3 strands (per knot unit) |
| Total for pair | 30cm × 6 strands (3 per earring) |
| Adhesive | Clear craft glue or mizuhiki sealing glue |
| Earring findings | 2 earring hooks (gold or silver preferred) |
| Jump rings | 2 small rings (4mm diameter) |
| Tools | Scissors, flat nose pliers, tweezers |
| Optional | Bead cap or decorative charm between knot and hook |
Understanding the Station Connection Knot (駅連結び)
The Station Connection knot is formed by interlacing three cords in a repeated sequence. Unlike a single decorative knot, this technique connects multiple “stations” (tight knot segments) along the same three cords.
Visual structure:
- Each complete cycle of steps ①–⑦ creates one tight, square-like knot segment.
- By repeating the sequence, you build a chain of connected knots.
- The final length is adjustable – more repeats = longer earrings.
Preparation
Before you begin:
- Cut three mizuhiki cords to exactly 30cm each.
- Apply a tiny drop of glue to both ends of each cord to prevent fraying.
- Let the glue dry completely (5–10 minutes).
- Arrange cords side by side, aligned at the tips.
Pro tip: Use contrasting or gradient colours for visual interest – e.g., gold + red + white.
Step-by-Step Instructions (Repeat ① to ⑦)
You will repeat these seven steps in a loop. Each full cycle consumes a small length of cord and produces one linked “station.” Keep going until you have approximately 1–2cm of remaining tails (to attach findings).
Step 1 – Initial Cross
- Hold the three cords parallel.
- Cross the left cord over the middle cord.
- The right cord stays straight for now.
Step 2 – First Loop
- Bring the right cord over the crossed left-middle pair.
- Pass it under the left cord.
- Pull gently to form a loose loop.
Step 3 – Tighten Left Side
- Pull the left cord away from the centre.
- The loop from Step 2 will tighten into a half-hitch.
Step 4 – Reverse Cross
- Cross the right cord over the middle cord.
- The left cord remains passive.
Step 5 – Second Loop
- Bring the left cord over the right-middle pair.
- Pass it under the right cord.
- Pull gently – a second loop forms.
Step 6 – Tighten Both Sides
- Pull both outer cords (left and right) evenly.
- The centre will form a neat, square knot.
Step 7 – Final Tighten & Align
- Pull all three cords simultaneously.
- The knot should sit flat and firm.
- Adjust so the knot is centred on the cords.
This completes ONE station connection knot.
Repeat steps ① through ⑦ again on the remaining cord length.
How Many Repeats for YK-212 Earrings?
The original pattern does not specify an exact number of repeats. Instead, you continue until:
- You have used approximately 2/3 of the cord length (about 20cm braided into knots).
- The remaining tails are 5–7cm long (for attaching findings).
- For a standard earring drop (3–4 cm of knots), you will need 8–12 repeats of the 7-step sequence.
Test your length:
After 5 repeats, hold the knot chain next to your ear. Add more repeats if you want a longer dangle.
Finishing the Knot Unit
Once you have completed enough repeats:
- Apply a small drop of glue to the final knot to lock it.
- Cut the remaining tails to 1cm each (if not using for tassel).
- Optionally, melt or glue the cut ends to prevent unravelling.
- Set aside – this is one earring component.
Repeat the entire process with a fresh set of three 30cm cords to make the second earring.
Attaching Earring Findings
| Step | Action |
|---|---|
| 1 | Open a jump ring using pliers (twist sideways – do not pull apart). |
| 2 | Slide the jump ring through the top loop of your knot chain. |
| 3 | Close the jump ring securely. |
| 4 | Open the earring hook (also sideways). |
| 5 | Attach the jump ring to the hook. |
| 6 | Close the hook completely. |
Optional: Add a small bead cap or charm between the knot chain and the jump ring for extra elegance.
Pro Tips for Perfect Mizuhiki Knots
- Work on a dark surface – mizuhiki cords are often shiny; dark backgrounds reduce eye strain.
- Moisten fingers slightly – helps grip the slippery paper cords.
- Use tweezers for the final tightening of small knots.
- Consistent tension – pull each repeat with the same force so all stations look identical.
- Practice cord – use cheaper cords or coloured string to practise the 7-step sequence before using premium mizuhiki.
Common Mistakes & Fixes
| Problem | Cause | Solution |
|---|---|---|
| Knots are loose | Not tightening enough after each step | Pull each outer cord firmly before moving to next step |
| Cords twist | Uneven tension or incorrect crossing order | Undo the last knot and redo slowly |
| Earrings don’t match | Different number of repeats | Count your repeats – write down the number for first earring |
| Cord frays | Glue not applied before starting | Always seal ends before knotting |
| Knot chain curves | Pulling harder on one side | Alternate which cord you pull first |
Colour Ideas for YK-212 Earrings
The Station Connection knot looks striking in many colour combinations:
| Palette | Cords (3 strands per earring) |
|---|---|
| Classic | Red + White + Red |
| Elegant | Gold + Silver + Pearl White |
| Seasonal | Green + Red + Gold (Christmas) |
| Spring | Pink + Light Green + Cream |
| Modern | Black + Charcoal + Metallic Silver |
Frequently Asked Questions
Q: What does “Station Connection” (駅連結び) mean?
A: It refers to a knotting style where each knot acts like a “station” on a train line – connected in sequence. It symbolises journeys, meetings, and continuity.
Q: Can I use longer cords?
A: Yes. For longer earrings, start with 40cm or 50cm cords. The knot sequence remains the same.
Q: How do I clean mizuhiki earrings?
A: Wipe gently with a soft, dry cloth. Avoid water – mizuhiki paper cords may soften or lose shape.
Q: Where can I buy mizuhiki cords?
A: Japanese craft stores, online marketplaces (Etsy, Amazon Japan), or specialised mizuhiki suppliers.
Q: Is this knot the same as a square knot?
A: No. The Station Connection knot uses three cords and a specific 7-step sequence. A square knot uses two cords.
Finished Look & Styling
Once completed, each YK-212 earring features a straight chain of identical, tightly bound knots. Depending on your number of repeats, the drop length ranges from:
- Short: 2–3 cm (6–8 repeats) – subtle, elegant
- Medium: 3–4 cm (8–12 repeats) – balanced, everyday wear
- Long: 4–5 cm (12–15 repeats) – dramatic, festive
Wear them with:
- A simple black dress (cords pop)
- A kimono or Japanese-inspired outfit
- Casual jeans and a white blouse (adds an artisan touch)
Conclusion
The YK-212 Mizuhiki earrings using the Station Connection knot (駅連結び) are a beautiful introduction to Japanese cord jewellery. By repeating the simple 7-step sequence with three 30cm cords, you create a structured, meaningful, and highly wearable accessory.
Key takeaways:
- Prepare three 30cm cords per earring.
- Repeat steps ①–⑦ until desired length.
- Finish with glue, cut tails, attach findings.
- Make a second identical unit.
Ready to knot? Gather your mizuhiki cords, seal the ends, and begin your first Station Connection. Share your finished earrings using:
#MizuhikiEarrings #YK212 #StationConnectionKnot #EkiRenMusubi #JapaneseCordJewellery


