Learn to make a Zipper Braid bracelet and keychain using flat craft lace. Step-by-step guide with 2 colours, overhand knot finish, and lanyard hook. Perfect for beginners.
Introduction
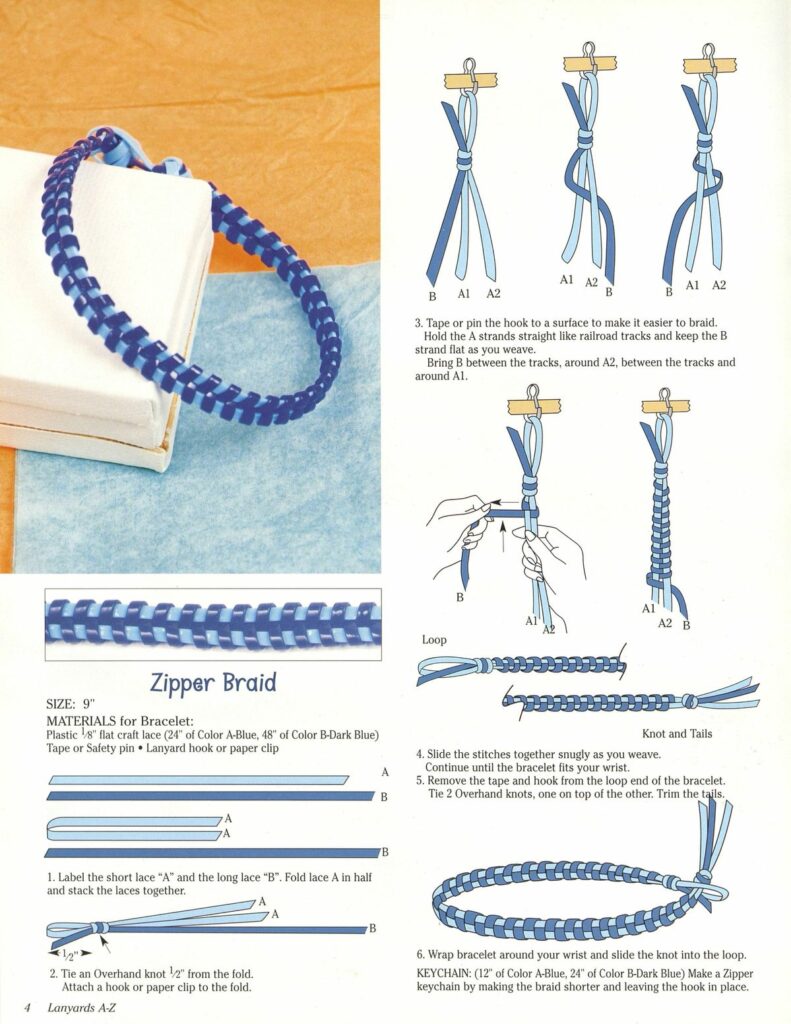
The Zipper Braid (also known as the “zipper stitch” or “Portuguese sinnet”) is a beautiful, textured braid that resembles the teeth of a zipper. It is created using two colours of flat craft lace – one short strand and one long strand. The result is a firm, flat, and decorative band perfect for bracelets, keychains, lanyards, and bag handles.
In this tutorial, you will learn:
- How to set up two colours of craft lace (1/8 inch flat plastic lace)
- The simple over-under weaving technique that creates the zipper pattern
- How to finish with overhand knots and a loop closure
- How to make both a 9-inch bracelet and a keychain version
This project requires no special tools – just tape, scissors, and a lanyard hook or paper clip.
Difficulty & Time
| Aspect | Details |
|---|---|
| Level | Beginner (no prior braiding experience needed) |
| Time | 15–20 minutes for a bracelet; 10 minutes for a keychain |
| Technique | Zipper braid (alternating weaves between two parallel strands) |
What Is a Zipper Braid?
| Feature | Description |
|---|---|
| Structure | Two parallel strands (railroad tracks) with a third strand woven between them |
| Appearance | A central zigzag line with loops on both sides – looks like a zipper |
| Best for | Bracelets, keychains, lanyards, belt loops, bag straps |
| Material | Flat plastic craft lace (also called gimp, boondoggle, or scoubidou) |
The braid is worked flat and remains flexible yet sturdy. It does not stretch or curl, making it ideal for items that will be handled frequently.
Materials & Tools
For a 9-Inch Bracelet (Size: 9″)
| Category | Item | Notes |
|---|---|---|
| Craft lace – Colour A | 24 inches (Blue) | Shorter lace – becomes the “railroad tracks” |
| Craft lace – Colour B | 48 inches (Dark Blue) | Longer lace – does the weaving |
| Hardware | Lanyard hook or paper clip | Attaches to the folded end |
| Tools | Tape or safety pin | To hold the hook to a surface |
| Tools | Scissors | To trim tails |
For a Keychain (Shorter Version)
| Category | Item | Notes |
|---|---|---|
| Craft lace – Colour A | 12 inches (Blue) | Shorter lace |
| Craft lace – Colour B | 24 inches (Dark Blue) | Longer lace |
| Hardware | Lanyard hook | Remains attached as the keychain connector |
Plastic craft lace (1/8″ flat) is available at craft stores, online, or in lanyard-making kits.
Step-by-Step Instructions for the Bracelet
Step 1: Prepare the Laces (Label & Fold)
| Action | Details |
|---|---|
| 1 | Label the shorter lace (24″) as Colour A (Blue). |
| 2 | Label the longer lace (48″) as Colour B (Dark Blue). |
| 3 | Fold Colour A in half to find its centre point. |
| 4 | Stack the laces together – Colour A (folded) on top of Colour B (straight). |
The fold of Colour A will become the loop end of your bracelet.
Step 2: Tie an Overhand Knot at the Fold
| Action | Details |
|---|---|
| 1 | Measure 1/2 inch (1.25 cm) from the folded end of Colour A. |
| 2 | Tie an overhand knot using all strands (both ends of Colour A + Colour B). |
| 3 | Pull the knot tight so it sits exactly 1/2 inch from the fold. |
This knot prevents the braid from unraveling and creates a neat transition from the loop.
Step 3: Attach a Hook to the Fold
| Action | Details |
|---|---|
| 1 | Open a lanyard hook or paper clip. |
| 2 | Slip it through the folded loop (the end without the knot). |
| 3 | Close the hook. |
This hook will be taped to a surface to hold your work steady while braiding.
Step 4: Tape or Pin the Hook to a Surface
| Action | Details |
|---|---|
| 1 | Use tape or a safety pin to attach the hook to a table edge, clipboard, or your knee. |
| 2 | The braid should hang downward with the knot at the top. |
| 3 | Ensure the strands are straight and untangled. |
Securing the work keeps tension consistent and makes braiding much easier.
Step 5: Understand the Strand Positions
| Strand | Name | Description |
|---|---|---|
| A1 | Left track | Left half of Colour A (folded) |
| A2 | Right track | Right half of Colour A (folded) |
| B | Weaver | Colour B – the long strand that moves back and forth |
The A strands should be held straight and parallel – like railroad tracks. The B strand should be kept flat as you weave.
Step 6: The Zipper Braid Weave (First Half)
| Action | Details |
|---|---|
| 1 | Take the B strand and bring it between the two A strands (between the tracks). |
| 2 | Pass B around the outside of A2 (the right track). |
| 3 | Bring B back between the A strands (between the tracks again). |
| 4 | Pass B around the outside of A1 (the left track). |
This completes ONE full zipper stitch. The B strand should now be back where it started.
Visual pattern: Between tracks → around right track → between tracks → around left track → repeat.
Step 7: Slide the Stitches Together
| Action | Details |
|---|---|
| 1 | After completing each stitch, slide it down toward the knot at the top. |
| 2 | Push the new stitch snugly against the previous one. |
| 3 | Keep the tension even – not too loose (gappy) and not too tight (stiff). |
Slide the stitches together snugly as you weave – this is the key to a neat zipper pattern.
Step 8: Continue Until the Bracelet Fits Your Wrist
| Action | Details |
|---|---|
| 1 | Repeat the weave (between tracks → around right → between tracks → around left) continuously. |
| 2 | Every 10–15 stitches, check the length against your wrist. |
| 3 | The finished braid should be 9 inches (23 cm) from the knot to the end of the braid (excluding the loop). |
| 4 | Stop when the braid reaches your desired length. |
For most wrists, 9 inches is perfect. For a tighter fit, aim for 8.5 inches.
Step 9: Remove the Hook and Tape
| Action | Details |
|---|---|
| 1 | Carefully remove the tape from the surface. |
| 2 | Remove the lanyard hook from the folded loop. |
| 3 | The loop end remains intact – this will be the closure loop. |
Step 10: Tie Two Overhand Knots (One on Top of the Other)
| Action | Details |
|---|---|
| 1 | Gather all strands (A1, A2, and the B tail). |
| 2 | Tie a standard overhand knot as close to the last stitch as possible. |
| 3 | Pull tight. |
| 4 | Tie a second overhand knot directly on top of the first. |
| 5 | Pull very tight. |
Two knots stacked together (one on top of the other) create a secure stopper that will not pull through the loop.
Step 11: Trim the Tails
| Action | Details |
|---|---|
| 1 | Cut the remaining tails to approximately 1/4 inch (6 mm) beyond the double knot. |
| 2 | If using plastic lace, you can carefully melt the ends with a lighter to prevent fraying (adult supervision required). |
Step 12: Wear Your Bracelet
| Action | Details |
|---|---|
| 1 | Wrap the bracelet around your wrist. |
| 2 | Insert the double-knotted end through the folded loop at the top. |
| 3 | Pull gently to tighten. |
| 4 | The bracelet should fit snugly but comfortably. |
Wrap bracelet around your wrist and slide the knot into the loop – no clasp needed!
Keychain Version (Shorter)
The same technique works for a keychain. Follow the same steps with shorter laces and keep the hook attached.
| Aspect | Keychain Details |
|---|---|
| Colour A (shorter) | 12 inches (Blue) |
| Colour B (longer) | 24 inches (Dark Blue) |
| Braid length | 3–4 inches (or as desired) |
| Hook | Leave the lanyard hook attached to the folded loop |
| Finish | Tie double overhand knots, trim tails |
| Use | Attach to keys, backpack, or bag |
Make a Zipper keychain by making the braid shorter and leaving the hook in place.
Colour Combination Ideas
| Colour A (Tracks) | Colour B (Weaver) | Effect |
|---|---|---|
| Blue | Dark Blue (as shown) | Monochromatic, subtle |
| White | Red | Bold, sporty |
| Black | Neon Green | High contrast, edgy |
| Yellow | Purple | Complementary, playful |
| Pink | White | Feminine, sweet |
| Brown | Turquoise | Earthy, bohemian |
Experiment with glow-in-the-dark or metallic craft lace for special effects.
Pro Tips for a Perfect Zipper Braid
| Tip | Why It Matters |
|---|---|
| Keep A strands straight | They are the “railroad tracks” – if they twist, the zipper pattern becomes uneven. |
| Keep B strand flat | Flat plastic lace has a front and back – twisting B changes the appearance. |
| Slide stitches snugly | Gaps between stitches make the braid look loose and messy. |
| Use consistent tension | Pull each weave with the same force. |
| Tape the hook securely | If the hook moves, your tension will be inconsistent. |
| Practice on scrap lace first | The weave is simple, but muscle memory takes 5–10 stitches. |
Troubleshooting Common Problems
| Problem | Cause | Solution |
|---|---|---|
| Braid looks twisted, not flat | The B strand is twisted | Keep B flat – do not let it roll over. |
| Gaps between stitches | Not sliding stitches together | Push each new stitch firmly against the previous one. |
| Braid is too stiff | Tension too tight | Loosen your grip slightly. |
| Braid is too loose/floppy | Tension too loose | Pull each weave tighter before sliding. |
| Loop end is too small | Folded too close to the knot | Next time, leave 1 inch instead of 1/2 inch. |
| B ends before bracelet is long enough | Cut B too short | For a 9″ bracelet, 48″ of B is correct. For longer, use 60″. |
Variations to Try
| Variation | How To |
|---|---|
| Three-colour zipper | Use two different colours for A1 and A2 (left and right tracks), plus a third colour for B. |
| Thick zipper | Use 1/4″ flat craft lace instead of 1/8″ – use longer cords (36″ A, 72″ B). |
| Necklace | Use longer cords (36″ A, 80″ B) and add a larger lanyard hook or clasp. |
| Headband | Use soft satin cord instead of plastic lace – follow same weave. |
| Belt loop holder | Make a short 2–3″ zipper braid and attach to jeans belt loop for keys. |
Frequently Asked Questions
Q: What is flat craft lace?
A: It is a flat, plastic cord used for lanyards, keychains, and boondoggle projects. It comes in 1/8″ and 1/4″ widths and many colours. Also called “gimp” or “scoubidou.”
Q: Can I use round cord instead of flat?
A: Yes, but the “zipper” effect is less pronounced. Round cord creates a more rounded, spiral-like braid.
Q: Why do I need to tie two overhand knots?
A: One knot alone may pull through the loop. Two knots stacked create a wider stopper that cannot slip back through.
Q: How do I make the bracelet longer than 9 inches?
A: Use longer starting cords. For a 10″ bracelet, use 26″ for A and 52″ for B. For a 12″ bracelet (anklet), use 30″ for A and 60″ for B.
Q: Can I wash the bracelet?
A: Plastic craft lace is waterproof. Wash with soap and water, rinse, and air dry. Avoid high heat (do not leave in a hot car – it may warp).
Q: Is this the same as a “Portuguese sinnet”?
A: Yes – the zipper braid is also known as the Portuguese sinnet or square sinnet. It is a classic macrame stitch.
Finished Look & Dimensions
When completed correctly, your Zipper Braid Bracelet will have:
| Feature | Measurement / Description |
|---|---|
| Total length (including loop) | Approximately 10–10.5 inches |
| Braided length (excluding loop) | 9 inches |
| Width | Approximately 1/2 inch (12–14 mm) |
| Loop diameter | About 1/2 inch (folded end) |
| Closure type | Loop + double overhand knot |
| Pattern | Zigzag zipper teeth along the centre, solid colour on edges |
The braid is flat, flexible, and lies comfortably against the skin. The plastic lace is durable, waterproof, and easy to clean.
Conclusion
The Zipper Braid is one of the most satisfying beginner-friendly braids. Using just two colours of flat craft lace, a lanyard hook, and tape, you can create a professional-looking bracelet or keychain in under 20 minutes.
Key steps to remember:
- Label short lace as A (tracks) and long lace as B (weaver).
- Fold A, tie an overhand knot 1/2″ from the fold.
- Attach a hook to the folded loop and tape it to a surface.
- Hold A strands straight like railroad tracks.
- Weave B: between tracks → around right → between tracks → around left.
- Slide stitches snugly together as you go.
- Continue to 9 inches (bracelet) or shorter (keychain).
- Remove hook, tie double overhand knots, trim tails.
- Wear by inserting the knot into the loop.
Ready to start? Gather 1/8″ flat craft lace in two colours, a lanyard hook, tape, and scissors. Begin with the 9-inch bracelet, then try the keychain version. Share your creation using:
#ZipperBraid #CraftLaceBracelet #GimpBraid #BoondoggleTutorial #LanyardBracelet