Looking for a quick, satisfying, and utterly adorable crochet project? Whether you’re a seasoned hooker looking for a stash-buster or a complete beginner wanting to try something new, this Crochet Puff Flower Bracelet is the perfect pattern for you.
This project combines delicate, textured “puff” flowers with a simple adjustable macrame-style cord. The result? A charming, bohemian piece of jewelry that looks expensive and boutique-bought, but actually takes very little time to make. Best of all, because it features a sliding knot closure, it fits virtually any wrist size—making it the ultimate handmade gift!
In this guide, we’ll walk you through every step, from crocheting the puff flowers to assembling the bracelet and tying the perfect adjustable closure. Let’s get started!
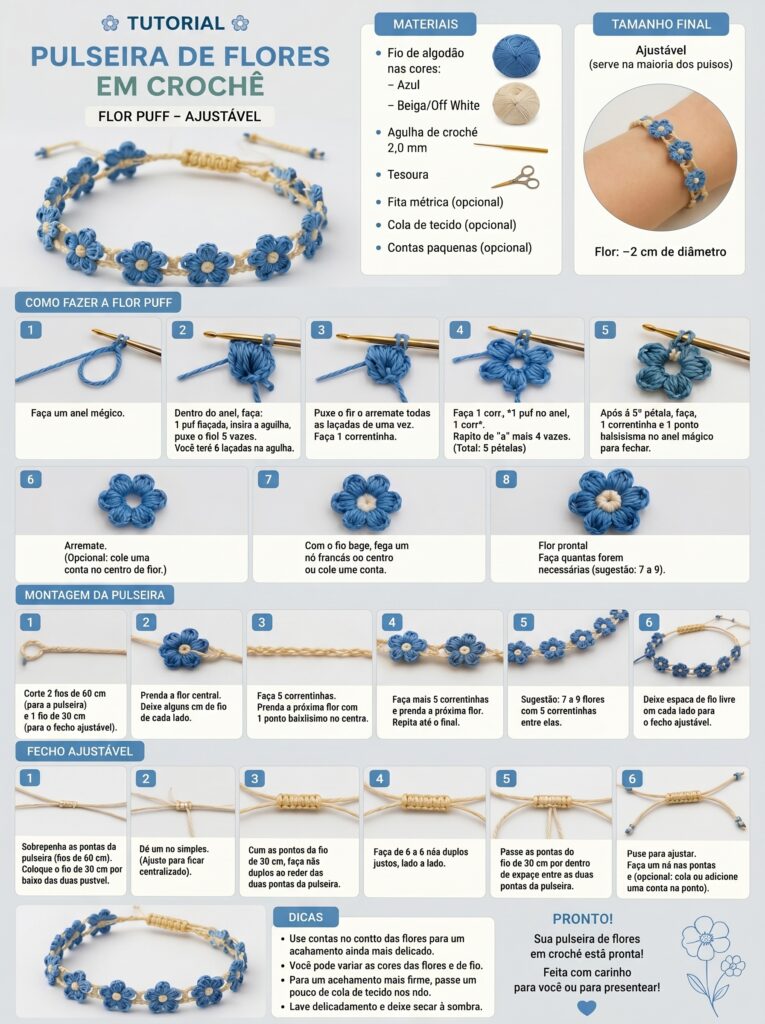
Materials You Will Need
To complete this project, you’ll need just a few basic supplies. Gather these up before you begin:
- Yarn: Cotton yarn in two colors (Blue for the flowers, Beige/Off-White for the cord).
- Crochet Hook: 2.0mm (This is a small hook, which gives the flowers a nice, tight definition).
- Scissors: For cutting your yarn.
- Measuring Tape: (Optional, but helpful for sizing).
- Fabric Glue: (Optional, for securing ends).
- Small Beads: (Optional, for decorating the center of the flowers).
Beginner Tip: Cotton yarn is highly recommended for this project because it’s durable and holds its shape better than acrylic, resulting in crisp, perfect flower petals.
Part 1: How to Crochet the Puff Flowers (Step-by-Step)
The “puff” stitch is essentially a cluster of half-double crochets worked into the same space. It creates a beautiful, three-dimensional bump.
Step 1: The Magic Ring
Start by making a magic ring. This is the best way to crochet in the round without leaving a hole in the center of your flower. (If you don’t know how to do a magic ring, you can also chain 4 and slip stitch to form a small circle).
Step 2: The Puffs (First Round)
Inside your magic ring:
- Yarn over, insert your hook into the ring, yarn over, and pull up a loop. (Do not pull through; leave the loops on your hook).
- Repeat this action 4 more times (so you have 5 loops on your hook).
- Yarn over once more and pull through all 6 loops on your hook.
- Chain 1 to secure the puff.
Step 3: Build the Petals
Repeat that puff sequence 5 times inside the ring. After your 5th puff, chain 1, and then slip stitch into the very first puff you made to close the round.
Step 4: The Petal Outline (Second Round)
Now, to make the petals look perfectly rounded, we will crochet around them.
- Chain 1.
- Work 1 Single Crochet (sc), then 1 Half Double Crochet (hdc), then 1 Single Crochet (sc) into the space between the first and second puff.
- Repeat this sequence (sc, hdc, sc) in the space between every puff.
- Slip stitch to close the round and fasten off.
Step 5: The Center (Optional)
You now have a cute little blue flower! For a polished look, you can add a small bead or a little French knot in the center using the off-white yarn. Make as many flowers as you want for your bracelet (the image suggests 7 to 9 flowers for a standard adult wrist).
Part 2: Assembling the Bracelet
Now that your lovely little flowers are ready, it’s time to string them together.
Step 1: Cut the Cord
Cut two pieces of your Beige/Off-White yarn or cord.
- Cut one piece 60cm (24 inches) long. This is your main base cord.
- Cut a second piece 30cm (12 inches) long. This is for the sliding closure.
Step 2: Add Your Flowers
Take your 60cm cord and fold it in half. Find the center point.
- Place your first puff flower at the center.
- Thread the cord through the petal gaps (or use a tapestry needle to weave the cord through the bottom of the flower).
- Slide the flower to the exact center.
Step 3: Continue Stringing
Add your second flower next to the first. You’ll want to leave about 5cm (2 inches) of the cord empty between the flowers to allow the bracelet to curve comfortably around your wrist.
- Continue adding flowers—working outward from the center—until you have added all your blooms.
- Tip: Always tie a small knot behind each flower to keep it from sliding back and forth!
Step 4: Add the Tails
Leave about 5cm of cord empty on the far left and far right ends. These will be the “tails” used for the sliding knot.
Part 3: Tying the Adjustable Slide Knot
This is the secret to making your bracelet one-size-fits-all. Don’t be intimidated; it’s easier than it looks!
- Overlap the Tails: Take the two loose ends of your 60cm cord and overlap them, pointing in opposite directions.
- Wrap the Short Cord: Take your 30cm piece of cord. Place it underneath the overlapped area (centering it).
- Tie the Loops: Take the left end of the 30cm cord and wrap it around the two base cords to the right. Take the right end and wrap it around to the left. This is where you create the sliding mechanism.
- Make the Knots: Follow the diagram closely to create a classic “Macrame Square Knot” or sliding knot. (Tip: The image shows wrapping the ends, creating a loop, and pulling them tight).
- Adjust and Trim: Slide the knot up and down to test it. Once you’re happy with the fit, trim the excess ends of the 30cm cord and, if desired, add a tiny drop of fabric glue to secure the knots permanently.
Pro-Tips & Styling Ideas
- Make a Set: These flowers are so fast to make! Why not create a matching necklace or a set of 3 bracelets in different colors?
- Color Variations: Swap out the blue for soft lavender, bright sunflower yellow, or a deep burgundy for a completely different vibe.
- Stiffen your Flowers: If your flowers are curling, you can dab a little bit of fabric stiffener or diluted school glue onto the back of them and let them dry flat overnight.
Conclusion
And there you have it—your very own, handmade, adjustable crochet flower bracelet! This project is the perfect blend of vintage charm and modern boho style. It makes a fantastic quick gift for Mother’s Day, a birthday, or even a fun activity for a craft night with friends.


