Create a beautiful, nature-inspired amigurumi bracelet with this free crochet pattern. Includes step-by-step instructions for flowers, leaves, and an adjustable finish!
Introduction: Wear Your Love for Crochet
There is something incredibly special about wearing handmade jewelry. It adds a personal touch, tells a story, and is a fantastic conversation starter. Today, we are thrilled to share this beautiful Amigurumi Floral Bracelet pattern.
Unlike standard flat crochet, this project uses amigurumi techniques (working in the round) to create 3D, stuffed flowers and leaves that sit beautifully on your wrist. The addition of delicate gold beads gives it an elegant, boho-chic finish that looks like it came straight from a high-end artisan boutique.
Best of all, this is a “Crochet Pattern for All Levels.” Whether you are just getting comfortable with a hook or looking for a quick weekend project, you are going to love making this. Let’s dive into the details!
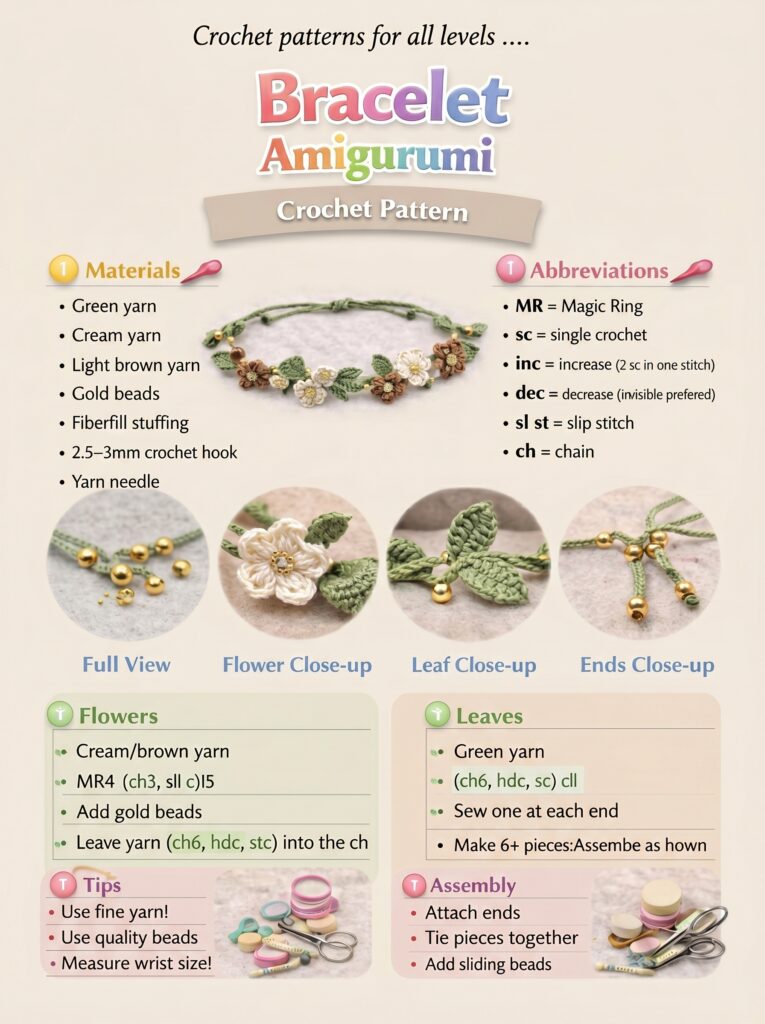
Materials You Will Need
To get started, you will need to gather these supplies. Using fine yarn and a small hook is key to keeping your flowers delicate rather than bulky.
- Yarn: Fine cotton or mercerized yarn in Green, Cream, and Light Brown.
- Crochet Hook: 2.5mm to 3.0mm hook (smaller hooks give the amigurumi pieces a tight, professional finish).
- Gold Beads: Small size (6/0 or 8/0) to use as accents and clasps.
- Fiberfill Stuffing: Just a tiny bit to give your flowers a puffy look.
- Yarn Needle: For sewing pieces together and weaving in ends.
- Scissors.
Pro-Tip: Use fine yarn and a smaller hook than the yarn label recommends. This prevents the stuffing from showing through the stitches.
Stitch Abbreviations (US Terms)
Here is a quick reference guide to the abbreviations used in this pattern:
- MR: Magic Ring
- sc: Single Crochet
- inc: Increase (2 single crochets in the same stitch)
- dec: Decrease (invisible decrease preferred)
- sl st: Slip Stitch
- ch: Chain
- hdc: Half Double Crochet
- dc: Double Crochet
Part 1: How to Make the Amigurumi Flowers
These little blooms are made in the round, which gives them a 3D, dimensional look.
Step 1: The Center Base
- Using your Cream or Light Brown yarn, make a Magic Ring (MR).
- Round 1: Work 6 sc into the MR. (Do not join; work in a spiral).
- Round 2: inc in each stitch around. (You will have 12 stitches).
- Round 3: sc, inc around. (You will have 18 stitches).
- Round 4: sc, sc, inc around. (You will have 24 stitches).
- Note: Lightly stuff this center piece with a tiny pinch of fiberfill before you close it up.
Step 2: Adding the Petals
Now we will create the ruffled petals using the cream or brown yarn.
- Attach your yarn to any stitch on the outside edge.
- Chain 3.
- Into the exact same stitch you are attached to, work: 1 sl st, 1 hdc, 1 dc, 1 hdc, 1 sl st. (This creates a tiny petal loop).
- Slip stitch to the next stitch on the base.
- Repeat this petal loop sequence around the entire circumference of the flower.
Step 3: The Finishing Touch
- To make the bracelet fully intertwined with nature, use the Green yarn to create a small leaf right at the base of the flower.
- Attach green yarn to the bottom of the flower.
- Chain 6.
- Work the following into the chain (starting from the 2nd chain from the hook): sc, hdc, dc, hdc, sc, sl st. This creates a pointed leaf.
- Fasten off and hide your ends.
Part 2: Making the Leaf Accents
In addition to the leaves at the base of the flowers, you want to make some standalone leaf chains to space out the bracelet.
- Leaf Pattern: Chain 6. Starting from the 2nd chain from the hook, work: sc, hdc, dc, hdc, sc. Slip stitch to the end to finish.
- Assembly: Create 6 or more of these standalone leaf pieces. You can sew them onto the cord, or use them as end caps for the bracelet ties (as seen in the sample photo).
Part 3: Assembly and Adding the Beads
This is where your bracelet truly comes to life!
Step 1: Create the Base Cord
- Take a long piece of Green yarn (approximately 12-15 inches, depending on your wrist size).
- Thread 2 to 3 gold beads onto the cord. Leave them near the end of the cord to act as decorative stoppers.
Step 2: Attach the Flowers
- Arrange your flowers along the center of the green cord.
- Use your yarn needle to sew the flowers securely in place. Leave a little bit of breathing room between them so the bracelet curves naturally.
Step 3: Connect the Ends
- For a fully adjustable bracelet, do not tie the ends in a permanent knot.
- Instead, take two ends and tie them together.
- Thread 2 or 3 gold beads onto the tied ends, and secure them with a knot at the very tip. The weight of the beads will allow you to slide the ends to tighten or loosen the bracelet to fit your wrist perfectly.
Tips for Success
- Use Quality Beads: Since this is jewelry, use high-quality glass or metal seed beads. Cheap plastic beads can scratch and fade over time.
- Measure Twice, Crochet Once: Before you sew everything together, lay your pieces on your wrist to measure the exact layout. This ensures a perfect fit.
- Hide Your Ends: Take your time weaving in the yarn tails. Because the pieces are small, visible knots can ruin the professional look of the bracelet.
Conclusion
This Amigurumi Floral Bracelet is a wonderful project that combines the cozy texture of crochet with the elegance of beaded jewelry. It makes a fantastic handmade gift for Mother’s Day, birthdays, or just a treat for yourself!
We hope you enjoy creating this lovely piece. Save this pattern to your Pinterest board so you can find it later, and share a photo of your finished bracelet in the comments—we would love to see your color choices!
Happy Hooking! 💐


