Learn how to make a gorgeous, adjustable crochet flower bracelet with this easy beginner tutorial. Uses cotton thread, tiny flowers, and a sliding knot closure. Free pattern included!
Introduction: Simple, Elegant, Handmade
Is there anything better than wearing a piece of jewelry you made with your own two hands? Today, we are diving into a project that is the definition of simple, elegant, and handmade: The Crochet Flower Bracelet.
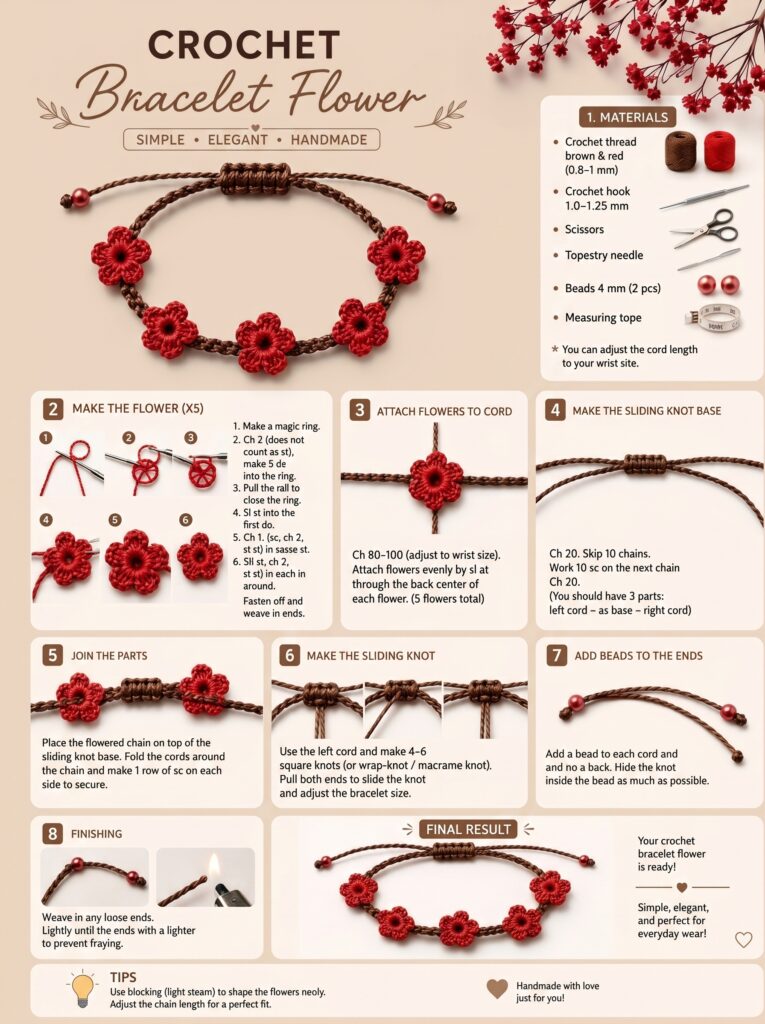
This delicate design features tiny, rich red crochet flowers strung along a sturdy brown cord, finished with an adjustable macrame sliding knot and polished off with matching red beads. It has a beautifully rustic, bohemian feel that pairs perfectly with everything from casual jeans to a flowy summer dress.
The best news? This pattern is incredibly beginner-friendly. Using just basic stitches, a tiny hook, and a little patience, you can create a boutique-quality piece of jewelry in an afternoon. Let’s get our hooks ready and make something beautiful!
Materials You Will Need
Because this is a delicate bracelet, we are stepping away from standard yarn and using fine thread. Here is what you need to gather:
- Crochet Thread: Brown and Red (Size 10 or 8). Using a 0.8–1.25mm hook with fine thread is what gives these tiny flowers their crisp definition.
- Crochet Hook: 1.0 – 1.25 mm (Small hooks are essential for this micro-crochet project).
- Scissors: Sharp, small scissors for clean cuts.
- Tapestry Needle: For weaving in those tiny ends.
- Beads: 4 mm round beads (2 pieces) to match your flower color.
- Measuring Tape: To ensure the bracelet fits your wrist perfectly.
Stitch Abbreviations (US Terms)
We are keeping it super basic for this pattern. Here are the few stitches you will use:
- MR = Magic Ring (or chain 4 and slip stitch to form a loop).
- ch = Chain
- sc = Single Crochet
- sl st = Slip Stitch
- dc = Double Crochet
Part 1: How to Make the Tiny Flowers (Make 5)
The star of this bracelet is the little red flower. We will make 5 of these total.
Step 1: The Magic Ring
- Create a Magic Ring (MR).
- Alternatively, if you are a beginner: Chain 4, and join with a slip stitch to the first chain to form a ring.
Step 2: First Round (The Center)
- Chain 2. (This counts as your first stitch).
- Work 5 Double Crochets (dc) into the center of the ring.
- Pull the tail tightly to close the center hole completely.
- Slip stitch into the top of the chain 2 to join the round.
Step 3: Second Round (The Petals)
Now we will create the 5 delicate petals.
- Chain 1.
- Into the next stitch, work: 1 sc, 1 dc, 1 sc. (This is one petal).
- Slip stitch into the following stitch.
- Repeat this sequence (sc, dc, sc and sl st) all the way around the flower until you have 5 petals.
- Fasten off your thread and weave in the ends.
Pro Tip: Make sure to leave a long tail on your flowers when you cut the thread. You can use this tail later to sew the flowers onto the cord!
Part 2: Creating the Bracelet Base
Now we need to make the cord that holds these beautiful blooms.
Step 1: Chain Your Length
- Using your Brown thread, chain anywhere from 80 to 100 chains.
- Important: Use your measuring tape here! Drape your chain around your wrist. This is the center base of the bracelet, so you want it to sit comfortably flat against your wrist.
Step 2: The Center Anchors
- To give the cord stability, skip the first 10 chains from the hook.
- Work 10 Single Crochets (sc) into the next 10 chains.
- Chain 20.
- You should now have 3 distinct parts to your base: A left cord, a central solid sc section, and a right cord.
Step 3: Attach Your Flowers
- Take your 5 completed red flowers and space them evenly along the central part of the bracelet.
- Using your tapestry needle, sew the flowers onto the base using small, hidden stitches. Make sure they sit securely in the center so they don’t flip upside down when worn.
Part 3: Assembling the Adjustable Sliding Knot
This is the magic trick that allows your bracelet to fit anyone perfectly.
Step 1: Overlap the Cord
- Take the two outer ends of your brown cord (the “left cord” and “right cord” from earlier) and overlap them on top of each other.
Step 2: Wrap and Knot
- Using a separate piece of brown thread (approx 6 inches long), place it under the overlapped cords.
- Tie 4 to 6 macrame-style Square Knots (or wrap-knots) over the center of the overlap.
- (If you don’t know how to tie a square knot: Take the left string, cross it over the middle cords and under the right string. Take the right string, go under the middle cords and pull through the left loop. Tighten. Repeat in reverse).
Step 3: Pull to Adjust
- Once your knots are tied, pull both ends of the bracelet outward. The knot should slide easily up and down the cords. This is your adjustable closure!
Part 4: Finishing Touches
Step 1: Add the Beads
- Thread one 4mm red bead onto the very tip of each of the two loose cord ends.
- Tie a secure overhand knot right at the tip of the cord to stop the beads from falling off.
- Pro-Tip: Push the knot firmly inside the bead hole to hide it completely for a polished look.
Step 2: Finishing and Blocking
- Weave in any remaining loose ends using your needle.
- Lightly trim the tips of the cord with scissors.
- Blocking: Lay the bracelet flat. Using a stream of steam from an iron (don’t touch the iron to the thread, just hover it over), give the bracelet a gentle steam. This will relax the stitches, make the flowers pop, and straighten the cord for a beautifully professional finish.
Conclusion: Ready to Wear!
And just like that, you have created a gorgeous, simple, and elegant crochet flower bracelet. It is lightweight, breathable, and perfectly adjustable to fit any wrist size.
This project is a fantastic stash-buster for leftover embroidery or crochet thread, and it makes a wonderfully thoughtful handmade gift for friends and family.
Don’t forget to save this tutorial to your Pinterest board, and let us know in the comments what colors you plan to use for your flowers!
Happy Crocheting! 🧶❤️


