Elevate your projects with these 6 unique crochet wave borders using only double crochet and chain stitches. Free stitch diagrams included for every variation!
Introduction: The Magic of Simple Stitches
Have you ever finished a beautiful crochet blanket, scarf, or garment, only to feel like the edges are missing a little something? A great border acts like a picture frame—it completes the piece, adds texture, and gives it a polished, professional look.
Today, we are exploring the incredible versatility of two of the most fundamental stitches in crochet: the Double Crochet (Ponto Alto) and the Chain (Correntinha).
While these stitches are often the foundation of beginner projects, the image above proves just how creative you can get with them. By varying the placement, clusters, and spacing of these stitches, you can create an incredible variety of wavy, zig-zag, and scalloped borders.
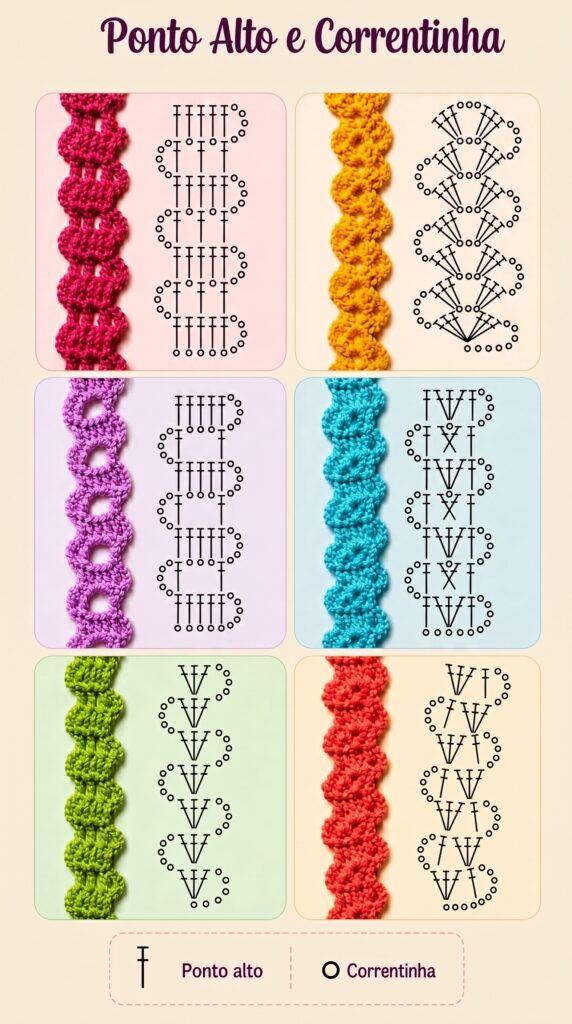
Best of all? These patterns are diagram-based, making them incredibly easy to follow for visual learners! Let’s break down these 6 beautiful variations.
Understanding the Stitch Diagrams
Before we dive into the individual patterns, let’s review the symbols used in the diagrams. The legend at the bottom of the image is short and sweet:
- O (Correntinha) = Chain (ch): The foundation and spacing stitch.
- T with a crossbar (Ponto Alto) = Double Crochet (dc): The primary stitch used to build height and texture.
Pro-Tip: In all of these patterns, the “wave” or “zig-zag” effect is achieved by working stitches into chain spaces rather than individual stitches, allowing the work to stretch, fan out, and curve naturally.
Pattern 1: The Classic Wavy Ladder (Top Left & Middle Left)
Color Samples: Pink and Magenta.
This is arguably the most classic iteration of this stitch combination. It creates an elegant, open “ladder” or wave effect.
How to read it:
- You start with a chain base.
- You work a group of tall Double Crochets (dc) into a chain space.
- Then, you work a few Chain stitches (ch) to create an arch.
- You connect the arch back to the base with a Single Crochet (sc) or Slip Stitch (sl st) in the next space.
- The repetition of these “tall clusters” and “chain arches” creates the sweeping, horizontal waves seen in the pink and magenta samples.
Best used for: Lightweight summer shawls, baby blankets, and airy edgings.
Pattern 2: The Fan & Shell Cluster (Top Right & Middle Right)
Color Samples: Mustard Yellow and Teal.
If you want a border with more texture and volume, these variations are for you. Instead of straight columns of double crochets, these patterns use clusters or “shells” (multiple double crochets worked into the exact same space) fanned out.
How to read it:
- The diagram shows a central cluster of Double Crochets (dc) sitting together.
- Above and below this cluster are chain loops.
- To create the dramatic wave, the next cluster is shifted over to the side, creating a staircase or zig-zag effect.
Best used for: Thick, cozy blankets, decorative pillow edgings, or bohemian-style garments.
Pattern 3: The V-Stitch Zig-Zag (Bottom Left & Bottom Right)
Color Samples: Lime Green and Coral Red.
The V-Stitch is a classic in the crochet world. It is essentially “Double Crochet, Chain 1, Double Crochet” worked into the same space. When you stack these V-Stitches in a staggered formation, you get a charming, sharp zig-zag wave.
How to read it:
- You create a “V” shape with your stitches.
- You move up to the next row, and offset the “V” slightly.
- This creates a sharp, defined corner in your lace, giving it a gorgeous, geometric scallop.
Best used for: Spring tops, market bags, and modern, geometric home decor.
How to Attach These Borders to Your Project
These stitch diagrams can be worked directly onto the edge of your existing project. Here’s the easiest way to do it:
Step 1: Create a Foundation Row
When you finish your main project (like a blanket), do not fasten off. Instead, work a single round of Single Crochet (sc) all the way around the perimeter. This evens out the edges and gives you a solid foundation to attach your fancy border to.
Step 2: Count Your Stitches
Look at the chain spacing in the diagram. You will need to make sure your foundation row has the right number of stitches to support the pattern. For example, if a wave requires 4 chain spaces, you will skip a few sc stitches on your base to create that gap.
Step 3: Follow the Diagram Row by Row
Start at the bottom of the diagram (the chain row) and work your way up. Don’t be afraid to make a practice swatch first! A 4×4 inch square will tell you exactly how the yarn behaves before you commit to the border of a large blanket.
Pro-Tips for Perfect Borders
- Change Colors: One of the easiest ways to make these borders pop is to use a contrasting color for the border. The bright, solid colors shown in the image (Lime Green, Coral Red, Mustard Yellow) are excellent choices for framing a neutral blanket.
- Block Your Work: Crochet has a memory! After you finish your border, gently wet-block the piece. This forces the chains to open up and the waves to lay flat and defined.
- Tension Control: When working chains in a border, keep your tension slightly loose. Tight chains will cause your border to curl inward.
Conclusion
It is truly amazing how two simple stitches—Double Crochet and Chain—can be combined to create such diverse textures. Whether you prefer the airy arches of the Wavy Ladder, the dense texture of the Shell Clusters, or the geometric look of the V-Stitch, there is a pattern here for every project.
Which of these 6 patterns will you try first? Save this post to your Pinterest board and let us know in the comments!
Happy Hooking! 🧶✨


