Learn how to make a charming daisy chain beaded bracelet with this easy 4-step tutorial. Perfect for beginners using seed beads and simple wire technique!
The Cutest Beaded Bracelet You Can Make
There is something undeniably cheerful about daisies. They represent innocence, purity, and new beginnings—and now, you can wear them on your wrist!
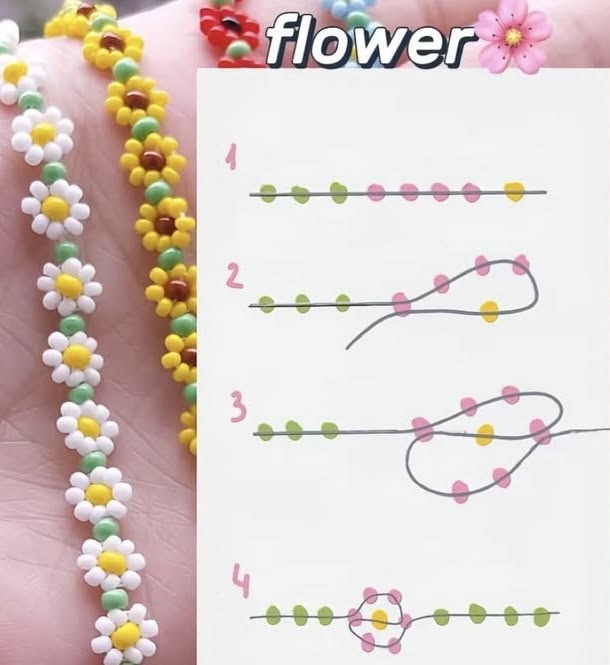
Today, we are sharing a super simple Daisy Chain Beaded Bracelet Tutorial. The image above perfectly breaks down this classic beadwork technique into just four easy steps. If you can thread a needle and loop a wire, you can absolutely make this adorable floral jewelry.
Best of all? These bracelets are incredibly affordable to make, use minimal supplies, and look fantastic stacked together in different colors. Let’s gather our beads and get crafting!
What You Will Need
Before you dive into the diagram, make sure you have these basic supplies on hand:
- Seed Beads (Size 11/0 or 8/0): You need three colors.
- Green: For the spacer beads between the flowers.
- Yellow: For the center of the daisy.
- Pink (or White): For the flower petals.
- Beading Wire or Thread: A sturdy, flexible nylon-coated wire or heavy-duty beading thread works best so the bracelet holds its shape.
- Needle: A beading needle (very thin) to easily pass through tiny seed beads.
- Clasp & Jump Rings: To finish your bracelet so it can be worn. (A simple lobster clasp is perfect for beginners).
- Scissors or Wire Cutters: For trimming your thread or wire.
Pro Tip: While the picture uses pink petals and yellow centers, feel free to swap these colors out! Blue petals with a yellow center makes a beautiful cornflower, or try all white for a classic, crisp daisy look.
Step-by-Step Instructions (Following the Diagram)
This pattern is a continuous loop technique. You are not making individual flowers and stringing them; rather, the thread weaves in and out to create the flowers directly on the line.
Step 1: String the Spacers and Start a Daisy (Image #1)
- Take your beading thread or wire.
- Begin by stringing on 2 Green spacer beads.
- Next, string on 5 Pink (petal) beads.
- Finally, string on 1 Yellow (center) bead.
- Note: Keep the thread slightly loose at this stage; you do not want to pull it tight yet.
Step 2: Loop Back Through the Petals (Image #2)
- Take your needle and thread it backwards through the first Pink bead you just strung (the one closest to the green spacers).
- Pull the thread gently, but do not tighten it completely yet. You are creating a loop that will hold the yellow center.
Step 3: Close the Daisy Loop (Image #3)
- Thread your needle through the 2nd, 3rd, 4th, and 5th Pink beads sequentially.
- As you pull this thread taut, watch the yellow bead move into the center of the pink loop.
- Pull tight! The pink beads will now form a perfect circle (the petals) locking the yellow bead firmly in the middle as the center of the daisy.
Step 4: Start the Next Daisy (Image #4)
- Once your first daisy is tight and locked into place, string on 2 more Green spacer beads.
- Now, begin the process all over again! String 5 Pink, 1 Yellow, and loop back through the first Pink.
- Continue this pattern until your bracelet reaches the desired length around your wrist.
Pro-Tips for Perfect Daisy Chains
- Tension is Everything: If you pull the thread too tight when forming the daisy, the petals will bunch up. If you leave it too loose, the yellow bead will fall out of the center. Aim for a firm, snug tension.
- Use a Bead Mat: This project involves tiny, rolling beads. Work over a soft bead mat or a clean, lint-free towel so you don’t lose any down the crack of your couch!
- Measure Your Wrist: While you are creating the chain, hold it up to your wrist every few flowers. It’s much easier to add an extra flower now than to take it apart later.
- Stacking: These daisy chains look absolutely stunning stacked three or four high on one wrist in different colors (e.g., Pastel Rainbow, Bright Neon, or Classic White).
How to Add the Clasp
Once your daisy chain is long enough to wrap comfortably around your wrist:
- Tie off the thread with a secure surgeon’s knot or double knot right at the end of the last green spacer bead.
- Thread a small crimp bead over the knot and squeeze it flat with pliers to secure it (if using wire).
- Add a jump ring and a lobster clasp to one end.
- Add a single jump ring to the other end to serve as the catch.
- Trim the excess thread closely, and admire your work!
Conclusion
The Daisy Chain technique is a staple in the jewelry-making world for a reason. It is quick, incredibly satisfying to watch come together, and the finished product is a timeless, vintage-inspired beauty.
These bracelets make wonderful, thoughtful handmade gifts for friends, mothers, or even as party favors for a bridal shower.
Save this tutorial to your Pinterest board and let us know in the comments: What color combo are you going to try first?
Happy Beading! 🌸✨


