Learn how to braid beautiful cords using a Kumihimo disk with these 6 free strand patterns. Easy-to-read diagrams show exactly where to place your threads!
Introduction: Master the Art of Kumihimo
Have you ever marveled at those gorgeous, tightly woven friendship bracelets and wondered, “How are they made?” The secret lies in a fun and ancient Japanese craft called Kumihimo.
Kumihimo literally translates to “gathered threads.” It uses a simple foam disk and a few basic moves to create incredibly complex-looking, perfectly round braids. Best of all, once you get the hang of the rhythm, it is a meditative, highly satisfying craft that you can do while watching TV or waiting for a kettle to boil.
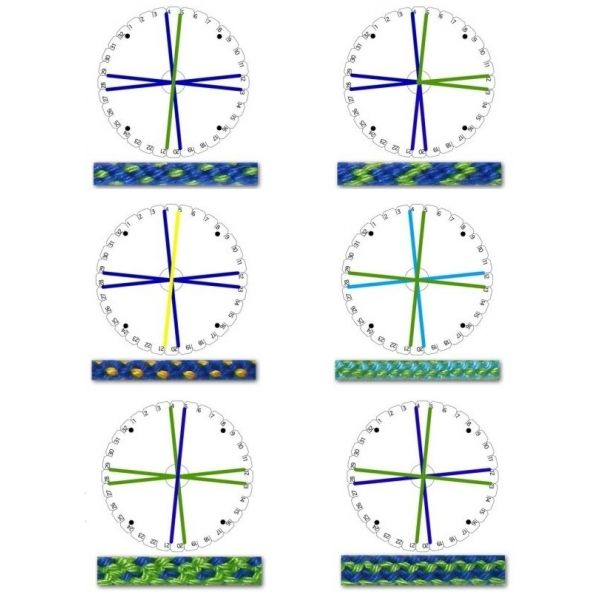
Today, we are looking at the foundation of Kumihimo: The 6-Strand Braid. The image above shows 6 different thread layouts (or setups) on the Kumihimo disk. Even though the braiding moves are identical for all of these, the final look changes drastically based on the colors and positions of your threads.
Let’s break down how to read these disks, set up your threads, and create beautiful cords!
What is a Kumihimo Disk?
Before we start, you need to understand your tools:
- The Disk: A round foam disc with 32 slots (numbered 1 through 32). It has a hole in the center where the top of your braid hangs down.
- The Bobbins (Optional): Small weights or thread bobbins that hold the strands to keep them taut.
- The Threads: For a 6-strand basic round braid, you will use 6 threads. The slots on the disk are used to tension and move the threads to weave them together.
Key Rule: In a 6-strand setup, you will typically place threads on opposite sides (North/South and East/West). This creates the tension needed for a tight, round braid. Note: In the images above, the black dots on the outer ring often indicate where the main strands sit, while the empty slots are used during the rotating braiding process.
How to Set Up Your 6-Strand Disk (The Diagrams)
To begin any Kumihimo braid, you must “load” the disk. The 6 diagrams above show six different color setups.
The Basic Setup Technique:
- Choose your 6 strands of embroidery floss, cord, or yarn.
- Fan them out on the disk.
- North/South: Place two strands in the top slots (approximately 12 o’clock) and two strands in the bottom slots (approximately 6 o’clock).
- East/West: Place one strand in a left slot (approximately 9 o’clock) and one strand in a right slot (approximately 3 o’clock).
Understanding the 6 Variations in the Image:
- Top Left (Blue & Green): Alternating colors on all four sides. This creates a classic, multi-colored spiral ribbon.
- Top Right (Green & Blue): Similar to the top left, but the dominant and secondary colors are swapped. Try this to see how a color shift changes the vibe.
- Middle Left (Dark Blue & Yellow): A high-contrast setup. The yellow threads will pop vividly against the deep blue, creating a striking, sunburst-like pattern.
- Middle Right (Teal & Mint Green): A gorgeous, beach-inspired color palette. This layout creates a soft, wavy twist that looks like ocean waves.
- Bottom Left (Bright Green & Dark Green): A monochromatic look using two shades of green. This is excellent if you want an earthy, natural cord.
- Bottom Right (Blue & Green – Variation): A slightly different spacing of the two colors compared to the top row. This produces a tighter, different “step” in the spiral.
The Basic Braiding Move (How to Braid)
Once your disk is loaded with your chosen pattern, here is the basic movement for a 6-strand round braid. Note: This movement is repeated constantly to create the cord.
- Hang your bundle: Tie a knot at the end of your threads, drop the bundle through the center hole, and hold it tight (or weigh it down with a bobbin).
- Move Top to Bottom (Start): Take the thread from the top-left slot (North) and move it down to the bottom-right slot (South).
- Move Bottom to Top (Rotate): Take the thread from the bottom-left slot (South) and move it up to the top-right slot (North).
- Rotate the Disk: Rotate the entire disk 90 degrees (a quarter turn) clockwise.
- Repeat the Process: Now, the threads that were on the left side are now at the top/bottom. Repeat the moves: Top Left to Bottom Right, Bottom Left to Top Right.
- Repeat forever: Continue rotating the disk and moving threads. As you do, a beautiful, tightly woven round cord will emerge from the center hole!
Pro-Tips for Perfect Kumihimo Braids
- Tension is Everything: The tighter you pull the threads after every move, the rounder and tighter your braid will be. If you pull loosely, the braid will be flat and floppy.
- Use a “Bead Stopper”: To start, tie a bead or a piece of tape onto your knot so it doesn’t slip up through the center hole of the disk.
- Fine vs. Thick Thread: The examples in the image look thick and chunky (like yarn or thick cord). If you use fine embroidery floss (6 strands), you will get a very delicate, thin braid perfect for bracelets.
- Watch the Slots: The numbered slots on the outside edge are there to help you keep count of your rotations, preventing you from making mistakes.
What Can You Make With These Braids?
Once you finish your 6-strand Kumihimo cord, the possibilities are endless!
- Friendship Bracelets: Add a sliding knot or a button closure.
- Dog Leashes: Use thick, durable macrame cord for a strong, pretty leash.
- Necklaces: Braid with a metallic thread, and thread a beautiful pendant onto the center before you start.
- Bag Straps: Create a colorful strap for a tote bag.
- Lanyards: A sturdy, attractive way to hold your ID badges.
Conclusion
Kumihimo is one of the most beginner-friendly fiber arts out there. You do not need to know how to knit or crochet; you only need to move threads from one slot to another! The 6-strand setup in the image above is a fantastic place to start your journey.
Save this pattern chart to your Pinterest board for your next craft project! Let us know in the comments: Which of the 6 color combinations in the image is your absolute favorite?
Happy Braiding! 🧵🌀✨


