Learn how to set up an 8-strand Kumihimo braid using a round foam disk. We walk you through the Southwestern color palette shown here, plus tips for getting a perfect braid!
Introduction: A Colorful Journey into Kumihimo
If you have been looking for a relaxing, portable, and incredibly rewarding craft, let me introduce you to Kumihimo. This ancient Japanese art of cord braiding has taken the modern DIY world by storm—and for good reason.
Instead of fiddling with complex knitting needles or hooks, Kumihimo uses a simple foam disk and pre-threaded bobbins. You simply move the threads from slot to slot in a rhythmic pattern. The result? A perfectly round, impossibly tight braid that looks like it was woven by a machine.
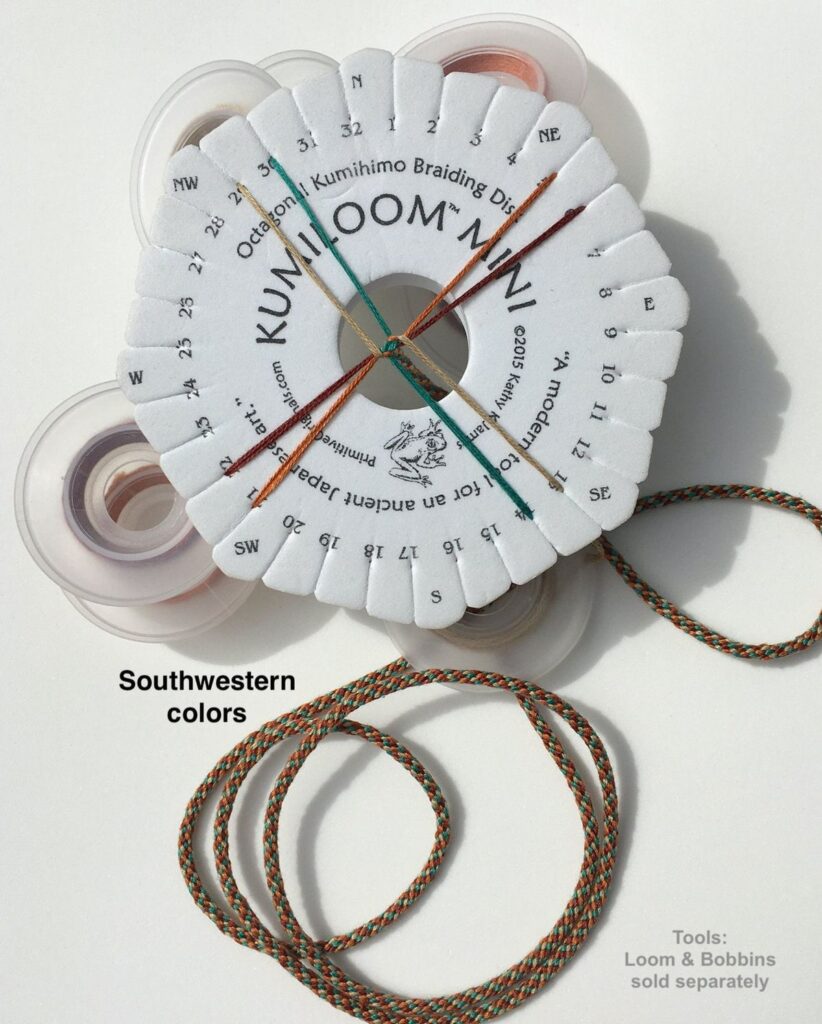
Today, we are focusing on a beautiful 8-strand braid using a Southwestern color palette. The image above captures the perfect example: a stunning mix of terracotta, warm brown, turquoise, and tan. Let’s break down exactly how to set this up and what makes this color combination so special.
Understanding the Kit (Materials You Need)
Take a look at the image. This is an 8-slot Kumihimo setup on a traditional round foam disk. Here is what you are seeing and what you will need to recreate it:
- Kumihimo Disk: An octagonal or round foam disk with numbered slots (1–32). The numbers help you keep track of your rotations.
- Threads / Cord: You need 8 strands of thread. The image uses a combo of embroidery floss or medium-weight cord.
- Bobbins: Those clear, plastic disc-like tools hanging off the side of the disk in the photo. Bobbins hold your excess thread, pulling it taut to keep consistent tension on the braid.
- Color Palette: Our “Southwestern” theme requires four colors:
- Terracotta / Rust Orange (Bringing the desert heat)
- Turquoise / Teal Green (Reminiscent of southwest turquoise jewelry)
- Light Tan / Sand (A neutral earth tone)
- Dark Brown / Chocolate (To ground the pattern)
Step 1: How to Load the Disk (The Setup)
To create the braid shown in the photo, you need to thread your disk correctly. For an 8-strand basic round braid, you will use the 4 cardinal directions: North, South, East, and West.
Here is the setup for this Southwestern braid:
- North (Slot 1 & 32): Place a Tan thread on one side, and a Rust thread on the other.
- South (Slot 16 & 17): Place the other Tan thread and the other Rust thread, mirroring the North position.
- East (Slot 8 & 9): Place the Turquoise thread and the Brown thread here.
- West (Slot 24 & 25): Place the remaining Turquoise and Brown threads, mirroring the East side.
(Note: While the specific numbers might vary slightly based on your disk, the rule is simple—place the threads in opposite slots to create the tension needed for a perfectly round braid).
Step 2: The Basic Braiding Rhythm
Once your threads are loaded into their slots and your bobbins are weighted, it’s time to start weaving. Important: You must keep your hands holding the bobbin threads slightly taut at all times.
The Standard 8-Strand Move:
- From Top to Bottom: Take the top-right thread (in the NE position) and move it down to the bottom-right slot (SE position).
- From Bottom to Top: Take the bottom-left thread (in the SW position) and move it up to the top-left slot (NW position).
- Rotate: Turn your entire disk 90 degrees clockwise (a quarter turn).
- Repeat: Now, the threads that were on the right side are at the top and bottom. Repeat steps 1 and 2.
- Keep going: Continue turning the disk and moving the threads. A perfect braid will begin to grow downward through the center hole.
Why the Southwestern Palette Works So Well
The “Southwestern” aesthetic is incredibly popular in handmade crafts. It is drawn from the natural landscape of the American Southwest—red sandstone deserts, saguaro cacti, and clear blue skies.
- Contrast: The Terracotta and Turquoise are complementary colors (opposites on the color wheel). Placing them next to each other in a braid makes both colors pop with vibrating energy.
- Anchoring: The dark Brown acts as a shadow, holding the bright colors in place, while the Tan gives the pattern a sun-bleached, vintage feel.
Design Note: If you look closely at the finished coil of braid at the bottom of the photo, you’ll see that the alternating placements create a lovely, subtle chevron or spiral pattern. It is not a random stripe; the slight offset in the threads creates a beautifully structured, textured design.
Pro-Tips for Perfect 8-Strand Braiding
- Tension is Everything: The biggest mistake beginners make is pulling loosely. Always pull the threads outward slightly after moving them into their new slots. This is what turns the braid from a flat ribbon into a perfectly round cord.
- Check Your Bobbins: If your thread gets twisted around the bobbin, the tension will become uneven. Take a moment to untwist them every few inches.
- Use a “Stopper”: Before you start pulling, tie a bead or a knot at the very bottom of your threads and drop it through the hole. This prevents the very top of your braid from pulling up through the disk as you work.
- Foam is Forgiving: If you put a thread in the wrong slot, don’t panic! Kumihimo disks are made of tough, high-density foam. You can stretch the slots to move threads around without breaking the disk.
What to Make With Your Finished Cord
Once you finish braiding a long cord in these beautiful Southwestern colors, what do you do with it?
- Friendship Bracelets: Because these threads are thin, this makes an elegant, boho friendship bracelet. Finish it with a simple sliding macrame knot.
- Necklace Cords: Braid a length long enough for a necklace. Add a chunky turquoise pendant or a silver charm to the center, and finish with a magnetic clasp.
- Dog Collar or Leash: If you used thicker cord (like waxed cotton), this makes a durable and stylish leash for a beloved pet.
- Decorative Trim: Use it to trim the edges of a woven basket, a fabric lampshade, or a leather bag.
Conclusion
Kumihimo is a craft that feels almost meditative. The repetitive motion of moving threads becomes a rhythm, and watching the beautiful braid grow out of the center hole is incredibly satisfying.
The Southwestern color palette we used today is a timeless favorite, but don’t be afraid to experiment! Swap the Turquoise for deep purple, or the Rust for sunflower yellow, and watch how the pattern completely changes.
Save this guide to your Pinterest board for your next craft day! Let us know in the comments: What is your favorite color palette to use for braiding?
Happy Braiding! 🧵🌀


