Learn how to easily braid friendship bracelets on a square Kumihimo loom using this step-by-step setup. Perfect beginner guide with color tips!
Introduction: The Perfect Portable Craft
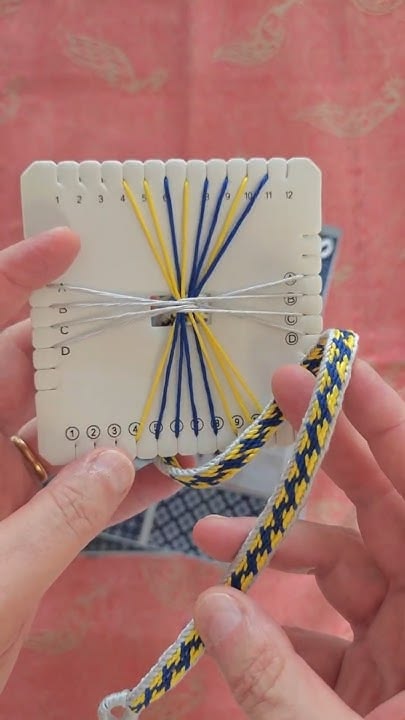
If you are looking for a crafting hobby that is easy to learn, highly portable, and produces professional-looking results, you have to try Kumihimo braiding. While the round disk is the most famous tool, the Square Kumihimo Loom (like the one shown in the photo) is actually the preferred tool for making flat, sturdy braids—often called “friendship bracelets.”
The beauty of the square loom is its simplicity. You simply load your threads into the slots, cross them in the center, and follow a repetitive rhythm. Within minutes, you will see a beautiful, tightly woven cord growing out of the hole.
Today, we are breaking down the exact setup shown in the photo. This is a classic 6-thread color mix featuring Yellow, Blue, and White threads. Whether you are a complete beginner or a pro looking to refresh your skills, this guide is for you!
What is a Square Kumihimo Loom?
Unlike the round disk, the square loom allows you to create flat, ribbon-like braids (often referred to as “flat braids” rather than the round “kongo” braid).
- The Anatomy: The loom has slots on all four edges.
- The Letters: In the image, you can see the top slots are numbered (1-12), while the side and bottom slots are lettered (A, B, C, D). This precise labeling helps you keep track of your moves.
- The Center: There is a small hole in the very center. As you load your threads through the hole and fan them out, the actual braid will grow right here, gradually pushing down and out of the way as you work.
Materials You Will Need
To replicate the setup in the picture, gather these simple supplies:
- Square Kumihimo Loom: A soft, dense foam loom with numbered/lettered slots.
- Embroidery Thread / Crochet Thread: You need three colors:
- Yellow (2 strands)
- Blue (2 strands)
- White (2 strands)
- Bobbins (Optional): Small flat plastic bobbins to wrap excess thread, keeping it taut and tangle-free.
- A Bead or Weight: To weigh down the bottom of your threads as you start braiding.
Step 1: How to Load the Square Loom (The Setup)
Look closely at the image provided. This is the exact layout you need for a 6-thread flat braid.
1. Set Up the Center
- Gather all 6 threads (2 Yellow, 2 Blue, 2 White).
- Find the exact middle of your threads, tie a small knot, and drop this knot through the center hole of the loom.
2. Load the Top Slots (Numbers 1-12)
- From the center hole, pull the threads up and place them in the top slots.
- The image shows them fanned out slightly. While there is some flexibility, a good rule of thumb is to space them evenly. Place one color on the left side of the top, one in the middle, and one on the right.
3. Load the Side and Bottom Slots (Letters A-D)
- The side slots (labeled A-D) and bottom slots (labeled 1-12 on the bottom edge) hold the remaining threads.
- In the photo, the White threads are loaded horizontally across the left side, going through the A, B, C, and D slots.
- The Yellow and Blue threads are loaded into the bottom slots on the right side.
Important Setup Tip: The exact loading position on a square loom isn’t always a rigid “put this thread in slot 3.” The most important thing is to group your colors on opposite sides. The pattern of your braid is determined by where you put the threads. In this image, the White is grouped on the left, and the Blue and Yellow are grouped on the top and bottom right.
Step 2: The Basic Braiding Motion (The Move)
Once your loom is loaded, it’s time to make the braid. The basic square Kumihimo move is incredibly simple.
- Bottom to Top: Take the thread from the bottom-left slot and move it up to the top-left slot.
- Top to Bottom: Take the thread from the top-right slot and move it down to the bottom-right slot.
- Left to Right: Take the thread from the middle-left side slot and move it to the middle-right side slot.
- Right to Left: Take the thread from the middle-right side slot and move it to the middle-left side slot.
Rotate the Loom: After every complete set of moves, rotate the entire square loom 90 degrees (a quarter turn). Then, simply repeat the exact same moves over and over again!
Step 3: Why the Colors Matter
Look at the finished braid at the bottom of the photo. You can see a beautiful zig-zag, chevron pattern. This pattern was not created by a complex chart. It was created simply by the original layout of the colors.
When you group the White threads on one side and the Blue/Yellow threads on the opposite side, and you rotate the loom constantly, the colors are forced to cross over each other in a specific rhythm.
Pro-Tip: If you want a spiral pattern instead of a zig-zag, simply place one thread of each color next to each other all around the loom rather than grouping them on specific sides.
Pro-Tips for Perfect Square Loom Braids
- Tension is Everything: The secret to a good braid is tight tension. Always tug the threads outward slightly after placing them in a new slot to keep the foam loom hugging the thread.
- Watch the Center: As you braid, the cord will grow downward out of the center hole. Make sure you push the finished braid down gently as you work so it doesn’t get caught.
- Use a “Stopper” Bead: Take a large, heavy bead (like a wooden pony bead) and thread it onto your six strands at the very bottom knot. The weight of the bead will pull the threads down, making it much easier to maintain proper tension while you braid.
- Take it with You: The best part about square Kumihimo is that it is incredibly portable! You can pop the loom and some bobbins in a ziplock bag and braid while you travel, wait in lines, or watch TV.
What Can You Make With a Flat Square Braid?
The flat, sturdy braid you make with a square loom is incredibly versatile.
- Friendship Bracelets: The perfect use for these braids! Add a button closure or a sliding knot to finish it off.
- Bag Straps: Use thicker macrame cord instead of thread to make a colorful, durable strap for a tote bag.
- Decor Trim: Stitch the braid onto the edge of a denim jacket, a cushion cover, or a canvas bag.
- Pet Leashes: If you use thick, waxed cotton cord, this makes an incredibly durable braid for a small dog leash.
Conclusion
If you have been intimidated by round Kumihimo disk setups, the square loom is a fantastic alternative. The visual of the threads crossing in the center makes the braiding process incredibly intuitive. As you can see from the photo, mastering the 6-strand flat braid gives you a beautifully textured cord with sharp color patterns.
Save this guide to your Pinterest board for your next movie night craft! Let us know in the comments: What color combo are you going to try first with your square loom?
Happy Braiding! 🧵🌀✨


