A tubular bead bracelet is a versatile, elegant piece of jewelry that can be worn alone or stacked with other bracelets. Unlike flat beading, tubular beading creates a hollow, rope-like structure that is lightweight, flexible, and comfortable to wear. Using the “circle stitch” technique, you can create a continuous spiral of beads that forms a beautiful, durable bracelet.
In this guide, you will learn:
- The full meaning of each step in the process
- Step-by-step instructions for creating the tubular structure
- How to finish ends and attach a clasp
- Color ideas for your own designs
Why Make a Tubular Bead Bracelet?
| Benefit | Explanation |
|---|---|
| Lightweight | Hollow tube uses fewer beads than solid beading |
| Flexible | Moves and drapes like fabric |
| Quick to make | Once you learn the rhythm, it works up fast |
| Endless color combinations | Stripes, spirals, gradients, or random |
| Professional look | Looks like a store-bought beaded rope |
Part 1: Materials Needed
| Material | Specification | Notes |
|---|---|---|
| Seed beads | Size 8/0, 10/0, or 11/0 | Smaller beads = finer tube |
| Beading thread | Nylon (Nymo, One-G, or Wildfire) | Strong, flexible |
| Beading needle | Size 10 or 12 | Fine enough to pass through beads multiple times |
| Clasp | Lobster clasp or toggle clasp | With jump rings |
| Scissors | Sharp | For cutting thread |
| Beading mat (optional) | Soft surface | Prevents beads from rolling |
Part 2: Step-by-Step Instructions
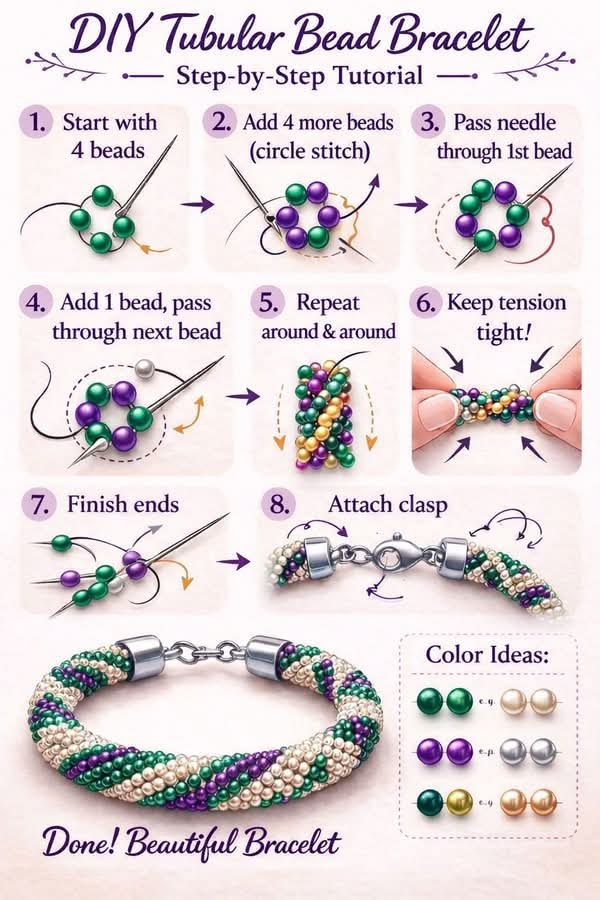
Step 1: Start with 4 Beads (Circle Stitch)
| Action | Detail |
|---|---|
| String 4 beads onto your thread | Leave a 15–20cm tail |
| Pass the needle through all 4 beads again | Form them into a circle |
| Pull tight | You now have a small ring of 4 beads |
Result: A tight circle of 4 beads — this is the foundation of your tube.
Important: Keep the tail thread long — you will use it later to secure the ends.
Step 2: Add 4 More Beads (Circle Stitch)
| Action | Detail |
|---|---|
| String 4 more beads onto your needle | These will form the next “row” of the tube |
| Pass the needle through the first bead of the previous circle | Connect the new beads to the existing structure |
Result: You have added a second ring of 4 beads sitting next to the first.
Step 3: Pass Needle Through 1st Bead
| Action | Detail |
|---|---|
| Pass your needle through the first bead of the new set | This locks the beads into position |
| Pull tight | The tube should be forming a straight line |
Result: The two rings are now securely connected.
Step 4: Add 1 Bead, Pass Through Next Bead
| Action | Detail |
|---|---|
| Add 1 new bead to your needle | This is the first bead of the next ring |
| Pass the needle through the next bead in the previous ring | Continue the circular pattern |
Result: You are building the tube one bead at a time.
Step 5: Repeat — Around and Around
| Action | Detail |
|---|---|
| Continue adding beads in the same pattern | Always add 1 bead, then pass through the next bead in the previous ring |
| Each complete circle = 4 beads | The tube grows in length |
| Keep the rhythm steady | Consistent tension is key |
Result: A continuous spiral of beads forming a hollow tube.
Step 6: Keep Tension Tight!
| Action | Detail |
|---|---|
| Pull the thread firmly after each bead | Do not leave gaps |
| The tube should be firm but not rigid | Beads should sit snugly against each other |
Pro tip: If the tube is loose, it will look like a floppy chain. If it is too tight, the thread may break. Find the “sweet spot” where beads just touch.
Step 7: Finish Ends
| Action | Detail |
|---|---|
| When the bracelet reaches your desired length | Measure around your wrist |
| Pass the needle through the final circle several times | To secure the end |
| Weave the tail back through the tube | Hide the thread inside the beads |
| Knot and trim | Cut close to the knot |
Repeat for the starting tail:
- Use the 15–20cm tail you left in Step 1
- Weave it back through the tube
- Knot and trim
Step 8: Attach Clasp
| Action | Detail |
|---|---|
| Attach a jump ring to one end of the tube | Through the end bead circle |
| Attach a lobster clasp or toggle clasp to the jump ring | Or use a magnetic clasp |
| Attach another jump ring to the opposite end | For the clasp to hook into |
Alternative closure:
- Create a loop at one end (using a bead circle)
- Attach a button to the other end
Part 3: Visual Summary of the Stitch Pattern
The tubular bead bracelet uses a continuous circle stitch:
Round 1:  ● - ● - ● - ●  (4 beads in a circle)
Round 2:  ● - ● - ● - ●  (add 4 beads, connect to Round 1)
Round 3:  ● - ● - ● - ●  (continue)
Each new bead is added one at a time and passed through the previous bead to lock it in place.
Step-by-Step Rhythm (Once Established)
| Action | Bead Count |
|---|---|
| Add 1 bead | 1 new bead on needle |
| Pass through next bead of previous round | Connect |
| Repeat | Continue around the circle |
After 4 repeats, you complete one full round and advance the tube by one “ring.”
Part 4: Color Ideas (From Your Image)
Your image suggests these color combinations:
| Palette | Colors | Effect |
|---|---|---|
| Monochromatic | Shades of a single color | Subtle, elegant gradient |
| Alternating | Two colors in sequence | Stripe effect |
| Spiral | One color per round | Spiral tube |
| Random | Multiple colors | Playful, eclectic |
| Ombre | Gradual color change | Smooth transition |
Suggested Color Combinations
| Theme | Colors |
|---|---|
| Ocean | Navy, light blue, aqua, white |
| Sunset | Orange, coral, gold, amber |
| Garden | Green, pink, yellow, lavender |
| Purple artisanal | Lavender, amethyst, deep violet, silver |
| Neutral | Black, white, grey, silver |
| Festive | Red, gold, green |
Part 5: Understanding the Stitch — Full Explanation
What is the “Circle Stitch”?
The circle stitch is a variation of circular peyote stitch or tubular ladder stitch. Instead of working in a flat row, you work around a small circle, adding beads one at a time to build a hollow tube.
Why 4 Beads per Circle?
| Number of Beads | Effect |
|---|---|
| 3 beads | Triangular tube (smaller, stiffer) |
| 4 beads | Square tube (standard, flexible) |
| 5 beads | Pentagon tube (larger, floppier) |
4 beads is the most common because it creates a balanced, square tube that drapes well.
Tension is Everything
| Tension | Result |
|---|---|
| Too loose | Floppy, gappy, unstructured |
| Just right | Firm, flexible, professional |
| Too tight | Stiff, hard to bend, thread may break |
Part 6: Sizing Guide
How Long Should the Tube Be?
| Wrist Size | Tube Length (before clasp) |
|---|---|
| 14 cm (5.5 in) | 15–16 cm |
| 16 cm (6.3 in) | 17–18 cm |
| 18 cm (7 in) | 19–20 cm |
| 20 cm (7.9 in) | 21–22 cm |
Add 1–2 cm to the wrist measurement to allow the tube to curve around your wrist. The clasp will add additional length.
How Many Beads?
For size 8/0 seed beads (approx. 2.5mm diameter):
- 1 cm of tube ≈ 4 beads (in length)
- 16 cm bracelet ≈ 64 beads in length × 4 beads per round = 256 beads total
For size 11/0 seed beads (approx. 1.5mm diameter):
- 1 cm of tube ≈ 7 beads
- 16 cm bracelet ≈ 112 beads in length × 4 beads per round = 448 beads total
Part 7: Finishing Options
| Option | How To | Best For |
|---|---|---|
| Lobster clasp | Attach jump ring + lobster clasp | Standard, secure |
| Toggle clasp | Attach ring on one end, bar on the other | Decorative, easy to use |
| Magnetic clasp | Glue or sew magnetic ends | Easy on/off (not for heavy beads) |
| Button & loop | Sew a button to one end; create a bead loop at the other | Casual, handmade look |
| Sliding knot | Attach cord ends and tie Peruvian knot | Adjustable |
Part 8: Common Mistakes & Fixes
| Mistake | Cause | Fix |
|---|---|---|
| Tube is twisted | Needle went through beads in wrong order | Start over — keep beads aligned in a straight line |
| Gaps between beads | Tension too loose | Pull tighter after each bead |
| Thread breaks | Tension too tight or thread quality | Use stronger thread (Wildfire or FireLine) |
| Tube is stiff | Tension too tight or beads too large | Loosen tension; try smaller beads |
| Starting circle falls apart | Did not reinforce | Pass through the 4 beads twice before adding more |
| Clasp falls off | Did not secure end beads | Weave thread back through 5–6 beads before knotting |
| Uneven color pattern | Lost track of color sequence | Use a color chart or pre-string beads in order |
Part 9: Design Variations
| Variation | How To | Effect |
|---|---|---|
| Striped tube | Alternate 2 colors (e.g., A,B,A,B) | Vertical stripes |
| Spiral tube | Change color every round | Diagonal spiral |
| Ombre tube | Gradually change shades | Smooth color transition |
| Beaded ends | Add larger beads at the clasp | Focal points |
| Multi-strand | Make 2–3 tubes and braid them | Thicker, more substantial bracelet |
| Anklet | Make longer tube | Wear on ankle |
SEO Blog Post Optimization
| Meta Tag | Suggested Content |
|---|---|
| Title | DIY Tubular Bead Bracelet: Complete Step-by-Step Tutorial |
| Meta Description | Learn to make a tubular bead bracelet with seed beads. Step-by-step instructions for the circle stitch, finishing ends, and attaching a clasp. Perfect for beginners. |
| URL slug | /tubular-bead-bracelet-tutorial |
| Keywords | tubular bead bracelet, circle stitch beading, seed bead bracelet, DIY beaded bracelet, tubular peyote stitch |
| Alt text for image | Step-by-step tubular bead bracelet tutorial showing circle stitch with 4 beads, adding beads one at a time, keeping tension tight, finishing ends, and attaching a clasp |
Final Pro Tip: Practice with Larger Beads First
If you are new to tubular beading, practice with size 8/0 or 6/0 seed beads and a larger needle. The larger beads are easier to see and handle. Once you master the stitch with larger beads, switch to finer size 11/0 beads for delicate, professional-looking jewelry.
Summary: You Can Now Make a Tubular Bead Bracelet
| Step | Skill Learned |
|---|---|
| 1 | Create a foundation circle of 4 beads |
| 2 | Add 4 more beads to form the second ring |
| 3 | Lock beads by passing needle through the first bead |
| 4 | Add one bead at a time, passing through the next bead |
| 5 | Repeat the rhythm around and around |
| 6 | Maintain consistent, firm tension |
| 7 | Finish ends by weaving and knotting |
| 8 | Attach a clasp with jump rings |
This technique is endlessly customizable. Change colors, bead sizes, and clasp styles to create unique bracelets for every outfit and occasion.


