This beautiful bracelet design features interconnected five-pointed stars made from seed beads. The stars are created using a circular base of 20 beads, with center beads added to form each point. The result is a stunning, geometric bracelet that sparkles and catches the light.
Beaded Star Bracelet Tutorial: How to Make a 5-Point Star Bracelet with Seed Beads In this guide, you will learn:
The full meaning of each step in the process
Step-by-step instructions for creating individual starsHow to connect stars to form a continuous braceletMaterials needed for a 6.5-inch bracelet
Designer: Stacey Gibson’s Unbridled DesignShop: http://www.Etsy.com/shop/UnbridledDesign
Why Make a Beaded Star Bracelet?
Benefit Explanation Stunning geometric design Five-pointed stars create a professional, eye-catching look Uses two bead colors Outline color + center color for contrast Repeatable pattern Each star is made the same way, then connected Perfect for gifts Handmade star bracelets are cherished keepsakes Adjustable length Add or remove stars to fit any wrist
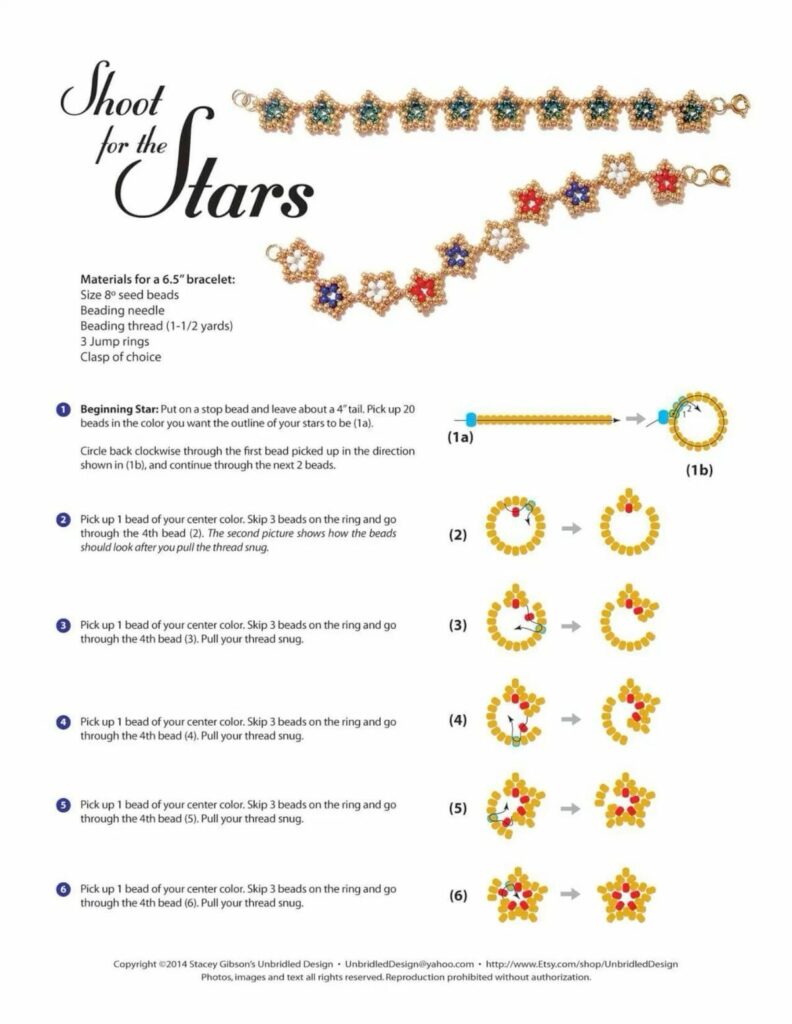
Part 1: Materials for a 6.5″ Bracelet
Material Specification Notes Seed beads Size 8/0 Two colors: outline color + center color Beading needle Size appropriate for 8/0 beads Fine enough to pass through beads multiple times Beading thread 1.5 yards (54 inches / 137 cm) Nylon thread (Nymo, One-G, or Wildfire) Jump rings 3 For connecting stars and attaching clasp Clasp Lobster clasp or toggle clasp Your choice Stop bead 1 bead (temporary) Prevents beads from sliding off
Note: Size 8/0 seed beads are approximately 2.5mm in diameter.
Part 2: Step-by-Step Instructions
Step 1: Beginning Star — Create the Base Ring
Action Detail Put on a stop bead Slide a bead onto your thread as a temporary stopper Leave about a 4″ tail Approximately 10cm — you will use this later Pick up 20 beads In the color you want for the outline of your stars (see image 1a) Circle back clockwise through the first bead Follow the direction shown in image (1b) Continue through the next 2 beads This reinforces the ring
Result: A circular ring of 20 beads, with your needle exiting from the third bead.
Why 20 beads? A five-pointed star has 5 points. 20 ÷ 5 = 4 beads between each center bead attachment point.
Step 2: Add First Center Bead
Action Detail Pick up 1 bead of your center color This will become the first point of the star Skip 3 beads on the ring Do not go through the next 3 beads Go through the 4th bead Counting from your exit point
Result: The center bead sits across the ring, creating the first star point.
Check the second picture: After pulling the thread snug, the beads should look like the image (2).
Step 3: Add Second Center Bead
Action Detail Pick up 1 bead of your center color Same as Step 2 Skip 3 beads on the ring Skip the next 3 beads Go through the 4th bead Pull your thread snug
Step 4: Add Third Center Bead
Action Detail Pick up 1 bead of your center color Same pattern Skip 3 beads on the ring Skip 3 beads Go through the 4th bead Pull your thread snug
Step 5: Add Fourth Center Bead
Action Detail Pick up 1 bead of your center color Continue Skip 3 beads on the ring Skip 3 beads Go through the 4th bead Pull your thread snug
Step 6: Add Fifth Center Bead
Action Detail Pick up 1 bead of your center color The final point Skip 3 beads on the ring Skip 3 beads Go through the 4th bead Pull your thread snug
Result: A complete five-pointed star! Each point is formed by one center bead, with 4 outline beads between each point.
Part 3: Visual Summary of the Star Geometry
Bead Count per Star
Component Number of Beads Outline ring 20 beads Center points 5 beads Total per star 25 beads
Spacing Between Star Points
| Between each center bead | 4 outline beads |
Thread Path
Exit point → Pick up center bead → Skip 3 beads → Enter 4th beadAfter 5 repetitions, you return to the starting point.
Part 4: How to Connect Multiple Stars
To make a full bracelet, you will create multiple stars and connect them.
Connection Method
Step Action 1 Complete one full star 2 Instead of finishing the thread, continue to the next star 3 Share outline beads between adjacent stars 4 Stars are connected at their edges
Connecting Tip
When you finish the 5th center bead of a star:
Your needle is positioned to begin the next star
The shared outline beads create a continuous chain
Each new star uses some beads from the previous star as part of its outline ring
Part 5: Finishing the Bracelet
Adding Jump Rings
Step Action 1 Attach a jump ring to the first star (at one end) 2 Attach another jump ring to the last star (at the other end) 3 Use a third jump ring to connect the clasp if needed
Attaching the Clasp
Option How To Lobster clasp Attach to one jump ring; attach a larger jump ring to the other end Toggle clasp Attach the ring to one end, the bar to the other Magnetic clasp Sew or glue to end stars
Securing Thread Ends
Action Detail Weave the 4″ tail back through several beads Use the tail you left in Step 1 Weave the working end back through when finished Hide both tails inside beads Knot between beads (invisible) Use a surgeon’s knot Trim close to the beads Be careful not to cut the thread that holds beads together
Part 6: Color Ideas
Color Combinations
Combination Outline Color Center Color Effect Classic Silver Crystal Sparkly, elegant Contrast Black White Bold, graphic Monochromatic Dark blue Light blue Subtle gradient Jewel tones Gold Ruby red Rich, luxurious Pastel Lavender Pink Soft, feminine Purple artisanal Deep violet Amethyst Rich purple tones
Tips for Choosing Colors
Tip Why Use high-contrast colors Makes the star shape visible Metallics catch the light Silver, gold, or bronze add sparkle Frosted or AB beads Aurora borealis finish adds rainbow iridescence Transparent vs. opaque Mix for depth and interest
Part 7: Sizing Guide
For a 6.5″ Bracelet
Specification Value Target length 6.5 inches (16.5 cm) Approximate number of stars 6–8 (depending on tension and bead size) Thread length needed 1.5 yards (54 inches / 137 cm)
How Many Stars for Your Wrist?
Wrist Size Approximate Stars (size 8/0 beads) 5.5″ (14 cm) 5–6 stars 6″ (15 cm) 6 stars 6.5″ (16.5 cm) 6–7 stars 7″ (17.8 cm) 7–8 stars 7.5″ (19 cm) 8 stars
Make the bracelet slightly shorter than your wrist measurement — the bracelet will sit snugly, and the clasp adds length.
Part 8: Common Mistakes & Fixes
Mistake Cause Fix Star points are uneven Skipped different numbers of beads Always skip exactly 3 beads between center beads Star is lumpy Tension inconsistent Pull each center bead snugly but not tight enough to warp the ring Ring twists Thread path incorrect Follow the clockwise direction in diagram (1b) Stars won’t connect Forgot to share beads When starting a new star, weave through existing outline beads Thread tangles Thread too long Use 1.5 yards maximum; shorter is easier to manage Stop bead falls off Not tied securely Use a bead with a small hole as a stop bead; knot if necessary Clasp pulls out Thread not secured properly Weave ends through 5–6 beads in different directions before cutting
Part 9: Designer Information
Credit Detail Designer Stacey Gibson’s Unbridled Design Email UnbridledDesign@yahoo.com Shop http://www.Etsy.com/shop/UnbridledDesign Copyright ©2014 Stacey Gibson’s Unbridled Design
Please respect the copyright: Photos, images, and text are all rights reserved. Reproduction is prohibited without authorization. This guide is for personal use only.
SEO Blog Post Optimization
Meta Tag Suggested Content Title Beaded Star Bracelet Tutorial: 5-Point Star Bracelet with Seed Beads Meta Description Learn to make a beaded star bracelet with size 8/0 seed beads. Step-by-step instructions for creating 5-point stars and connecting them into a beautiful bracelet. URL slug /beaded-star-bracelet-tutorial Keywords beaded star bracelet, seed bead star, 5-point star bracelet, Stacey Gibson Unbridled Design, size 8 seed beads Alt text for image Beaded star bracelet tutorial by Stacey Gibson’s Unbridled Design showing step-by-step: pick up 20 beads, circle back, pick up center bead, skip 3 beads, go through 4th bead, repeat 5 times to form a star
Final Pro Tip: Work with a Beading Mat
Seed beads are tiny and roll easily. Work on a beading mat (a soft, felt-like surface) or a towel to prevent beads from bouncing away. Keep your 20 outline beads organized in a small dish or on the mat in a circle shape before threading.
Summary: You Can Now Make a Beaded Star Bracelet
Step Skill Learned 1 Create a 20-bead foundation ring (clockwise) 2–6 Add 5 center beads, each skipping 3 beads on the ring Result A perfect five-pointed star Connect Share outline beads to form a continuous chain Finish Add jump rings and clasp
This beautiful bracelet makes a wonderful gift — and once you master the star pattern, you can create earrings, necklaces, and keychains using the same technique.